
Page 1
v2.2
WEGMATTLLC dAISy 2+ AIS Receiver
Contents
1 Disclaimer ..................................................................................................................................2
2 Connecting dAISy 2+ to a computer .............................................................................................2
2.1 Windows 10 and newer ................................................................................................................ 2
2.2 Windows 7, Vista and XP .............................................................................................................. 2
2.3 Windows 8 .................................................................................................................................... 3
2.4 Mac OS X ....................................................................................................................................... 3
2.5 Linux and Raspberry Pi .................................................................................................................. 3
2.6 Configuration of OpenCPN ............................................................................................................ 4
2.7 Connecting dAISy with other software ......................................................................................... 5
3 Using dAISy 2+ ............................................................................................................................6
3.1 Interpreting the status LED ........................................................................................................... 6
3.2 Configuration and debug menu .................................................................................................... 7
4 Using the NMEA 0183 connector .................................................................................................9
5 Using the Auxiliary Serial connector .......................................................................................... 10
5.1 AIS over WiFi with the DT-06 WiFi module ................................................................................. 11
6 Tips for good AIS reception ....................................................................................................... 15
6.1 Antenna ....................................................................................................................................... 15
6.2 Location, location, location ......................................................................................................... 15
6.3 Radio frequency noise ................................................................................................................ 16
7 Troubleshooting ....................................................................................................................... 16
8 Specifications ........................................................................................................................... 17
9 Source code and schematics...................................................................................................... 18
10 Contact ................................................................................................................................. 18
Wegmatt LLC
6356 138
th
Ave NE #212
Redmond, WA
United States of America
https://wegmatt.com
Designed and assembled in USA

Page 2
v2.2
1 Disclaimer
dAISy 2+ is a reliable, dual-channel AIS Receiver. However, under no circumstances it should be solely
relied on for collision avoidance or navigation. It’s the user’s responsibility to use the product
prudently. Neither Wegmatt LLC nor its dealers accept responsibility or liability to the product user or
their estate for any accident, loss, injury, or damage whatsoever arising out of the use of this product.
2 Connecting dAISy 2+ to a computer
2.1 Windows 10 and newer
Good news! With Windows 10 or newer, no driver is required. When plugging the AIS receiver into USB,
a new COM port will be detected. The port will automatically show up in the DataPort drop-down of
OpenCPN. See the chapter about configuring OpenCPN below for more information.
2.2 Windows 7, Vista and XP
Your user must have administrative rights on the Windows machine to install the USB driver.
To install the required driver on Windows 7, Windows Vista and Windows XP follow these steps:
1. Download the USB driver from https://wegmatt.com/files/daisyUSB%20inf%20v2.zip.
2. Extract the USB descriptor file (.inf) contained in the archive into a folder on your computer.
3. Plug dAISy into a free USB port.
4. Windows will detect a new USB device and start looking for a driver.
5. When prompted for a driver, select “Browse my computer for driver software” and select
the folder containing the .inf file.
a. When not prompted for a driver, open Device Manager and look for “Other Devices
> dAISy AIS Receiver” and select “Update Driver”.
6. Windows will warn you that the driver has no signature, i.e. is from a software vendor
unknown to Microsoft. Acknowledge the warning about the unsigned driver.
a. Note that the .inf file is a text file that tells Windows that a device with the name
dAISy and a certain ID should be handled by the standard USB driver that comes
with Windows. It does not contain any code.
7. After successful installation, “dAISy AIS Receiver” should show up in the Device Manager
under “Ports (COM & LPT)”, note the assigned COM port number.
8. In OpenCPN create a new serial connection on DataPort COM** (where ** is the number
Windows assigned) and with 38400 as baud rate. See the chapter about configuring
OpenCPN below for more information.

Page 3
v2.2
2.3 Windows 8
Windows 8 requires to temporarily disable driver signature verification while installing dAISy’s USB
descriptor file. As preparation to the actual installation, follow the steps in this article:
https://www.howtogeek.com/167723/how-to-disable-driver-signature-verification-on-64-bit-windows-
8.1-so-that-you-can-install-unsigned-drivers/
Once driver signature verification is disabled, follow the instructions for Windows 7, Vista and XP.
For your safety, reboot your PC after completion of the installation. This will re-enable driver signature
verification.
2.4 Mac OS X
No driver is required for Mac OS X. dAISy will show be recognized a USB modem.
You can determine the ID of dAISy with the following steps:
1. Plug dAISy into a USB port
2. Launch Terminal.app
3. Type: ls /dev/*usb*
4. The system will return a list of USB devices, with names like /dev/cu.usbmodemXYZ where
XYZ is a number.
5. Copy /dev/cu.usbmodemXYZ to the clipboard, where XYZ is substituted with specifics from
your setup.
6. In OpenCPN.app create a new serial connection on DataPort using the copied string. See the
chapter about configuring OpenCPN below for more information.
2.5 Linux and Raspberry Pi
No driver is required for Linux. When plugged into the computer, dAISy will automatically show up as a
USB CDC serial device, accessible through the port /dev/ttyACM0.
You can verify the serial connection with a serial terminal program like for example screen. You may
have to install screen first by running:
sudo apt-get install screen
With screen installed, connect to the dAISy with
screen /dev/ttyACM0 38400
If the serial port is properly configured, pressing ESC will bring up the configuration and debug menu.
Pressing ESC again will return dAISy into receive mode. Exit screen by pressing CTRL-A, release the keys,
then press K (kill session) and then Y to confirm.
Also see the chapter about configuring OpenCPN below for more information.

Page 4
v2.2
2.6 Configuration of OpenCPN
OpenCPN is a free chart plotter and navigation software. Among many other things, OpenCPN supports
input from AIS receivers to display the position of ships on its charts.
You can learn more about OpenCPN and download it on the OpenCPN web page: https://opencpn.org
To use dAISy with OpenCPN, go to the Options dialog, select the Connections icon and add a new
connection. Set Properties to Serial. Enter or select the Dataport under which dAISy presents itself (see
OS-specific chapters above to determine the correct port). Set Baudrate to 38400. Leave everything else
as preset by OpenCPN.
Configuration of a serial connection for dAISy in OpenCPN

Page 5
v2.2
2.7 Connecting dAISy with other software
dAISy presents itself to computers as a virtual serial port. See the OS-specific chapters above about
installation to learn how to determine the serial port.
The serial communication parameters of dAISy are:
Baud rate
38400
Data bits
8
Parity
None
Stop bits
1
Flow control
None
Depending on the software dAISy is used with, some or all these parameters have to be configured. For
details, please refer to the instruction manual of the respective application.

Page 6
v2.2
3 Using dAISy 2+
Using dAISy is as simple as connecting it with an antenna and a PC and powering up your AIS capable
application of choice. When plugged in, dAISy automatically starts to listen for AIS transmissions.
3.1 Interpreting the status LED
dAISy has two, two-color status LED, has two two-color status LED, giving an indication about how it’s
doing. Each LED represents one of the two AIS channels.
Short GREEN flash every 5 seconds
dAISy is well and alive and in receive mode, listening for AIS messages.
While in receive mode, the mode dAISy starts in when powered up, it will very briefly blink green every 5
seconds to indicate that everything is ok.
Long GREEN flash
Yay! dAISy received a valid AIS packet.
For every packet received and passing all error checks, the LED will turn green for ¼ second. At the same
time, the dAISy will output the received message as NMEA AIVDM sentence on the connected ports.
Long RED flash
dAISy received an invalid packet.
This means that the dAISy received bits that looks like the start of an AIS package, but the data did not
pass other sanity checks like checksum. It might be a ship just out of range, interference from another
radio source, or just random noise.
Don’t panic, you will see a lot of red even under optimal conditions.
Fast regular blinking RED
dAISy encountered an unexpected system error.
The most common cause is that it lost USB connection, which happens on some PCs (particularly Macs)
when they go into sleep mode. Unplug dAISy and plug it in again to fix this condition.
If the condition persists, there might a hardware issue with your device. Please contact us.
No LED activity
dAISy failed to boot or crashed. Unplug dAISy and plug it in again to fix this condition. If the condition
persists, there might a hardware issue with your device. Please contact us.
Or dAISy is not in receive mode because you are using the debug menu.

Page 7
v2.2
3.2 Configuration and debug menu
When connecting to dAISy with a serial terminal program (e.g. Putty or Termite on Windows, screen on
Linux and OS X), pressing ESC will bring up a menu with a few configuration and debug options.
3.2.1 Configuration options
0-3: Control the speed of the NMEA and auxiliary serial ports at the back of the device. Pressing 1
enables the port with a speed of 4800 baud, 2 is for 9600 baud, and 3 is for 38400 baud. Pressing 0 turns
the NMEA and aux serial ports off. The recommended setting is 38400 baud.
M: Selects the function of the auxiliary serial port.
1. NMEA output: Output AIS messages as NMEA AIVDM sentences.
2. NMEA input: Act as an input for NMEA sentences, for example from a GPS module. All NMEA
sentences received through the auxiliary serial port will be forwarded to the other ports.
C: Configure the radios of the dAISy to listen to specific AIS channels. The dAISy 2+ has two radios, which
by default are configured to listen on channel A at 161.975 MHz and channel B at 162.025 MHz
respectively. The dAISy 2+ also supports receiving the less common “Long range AIS” channels at
156.775 and 156.825 MHz.
K: If keep-alive is enabled, the AIS receiver will periodically output a dummy message. This is only
required in special setups, where another device may disconnect when there is no traffic.
B: Enter boot loader mode for firmware updates. dAISy exits this mode through power-cycling, after a
20 second timeout without further activity, or after completing firmware upgrade.

Page 8
v2.2
#: Save current settings (serial, AIS channel, and debug) as power-on defaults. This is particularly useful
when you want to persist the settings for the NMEA and auxiliary serial output.
ESC: Resume receiving AIS messages.
3.2.2 Debug options
D: Toggles debug messages. When enabled and in AIS receive mode, signal strength and other
information about valid and invalid AIS packets will be displayed. It is normal to receive a lot of broken
packages as there always will be radio noise and ships just out of range. With some experience, you can
use the debug messages to analyze and improve reception issues.
N: Keep pressed to get an idea of the current noise level. -120 to -100 dBm is normal. dAISy will only be
able to receive valid packets roughly 15 dBm above that level, consistent reception 25+ dBm above
noise.
S: If valid packages were received, this gives a summary of the signal strength at which AIS messages
arrived (min, max, average).
T: Enter test mode. In this mode, dAISy outputs a test message every 5 seconds. You can enter your own
message or have it output a preprogrammed AIS message. This mode is useful when you want to test
dAISy but do not have AIS reception at your current location. You can exit test mode by pressing ESC or
power-cycling dAISy.
Page 9
v2.2
4 Using the NMEA 0183 connector
dAISy 2+ comes with a NMEA 0183 connector. This allows to connect the AIS receiver to chartplotters
and other marine equipment. The connector also allows to power dAISy from the boat’s power system
instead of USB.
dAISy NMEA connector
Chartplotter / boat
Comment
NMEA +
NMEA + or A RX
NMEA -
NMEA - or B RX
If your device only has one RX wire per port,
leave NMEA - unconnected
GND
Ground
If your device has only one RX wire or you
connect external power, ground must be
connected.
9-36V
Boat 12-36V power
system
External power for dAISy if you are not using
USB.
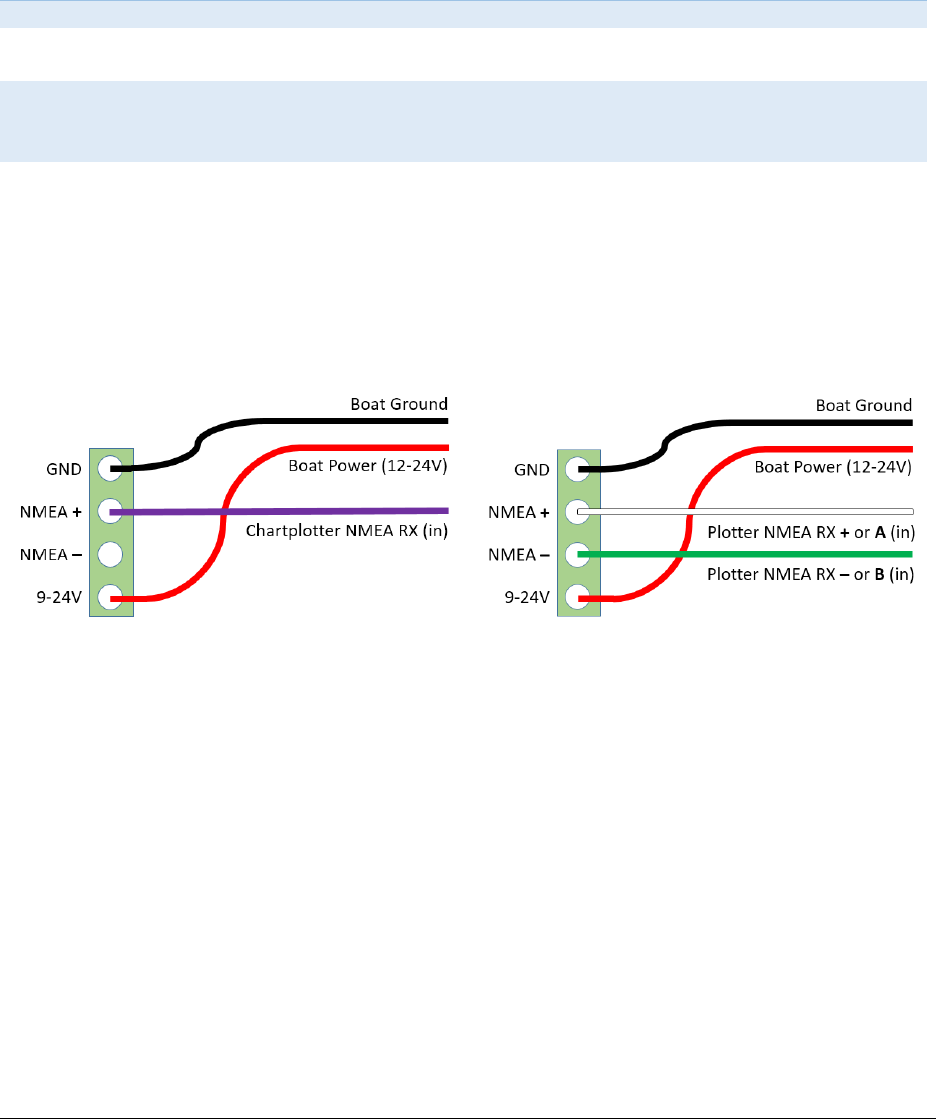
Below is an illustration on how to connect the dAISy NMEA connector with a compatible device using
single-wire or two-wire NMEA 0183 connection. Note that the wire colors are not standardized and
may be different depending on the manufacturer of your equipment. Check the installation
instructions of your chartplotter to identify the proper connections.
single-wire NMEA connection
two-wire NMEA connection
By default, dAISy is configured to output at 38400 Baud (NMEA high speed). This can be changed to
other baud rates in the configuration and debug menu. You also need to check the configuration of your
chartplotter. In many models, the NMEA port needs to be enabled in the settings menu and set to the
correct protocol, like for example NMEA high speed.
NMEA 0183 is compatible with RS-422, which means that the NMEA connector can also be used to
connect dAISy with RS-422 to serial, RS-422 to Ethernet and other RS-422 compatible equipment. You
may need to swap the NMEA + and NMEA - leads.

Page 10
v2.2
5 Using the Auxiliary Serial connector
For tinkerers, dAISy 2+ provides an auxiliary serial port on the rear of the unit. This connector can be
used to process AIS messages with other devices.
The pinout of the serial connector is compatible with HC-05/HC-06 Bluetooth modules and DT-06 WiFi
modules widely available on eBay. It can also be used to connect dAISy with other devices like data
loggers, Arduinos etc.
The serial output is enabled by default and can be configured in the debug menu (see chapter 3.2). It
shares the port with the NMEA 0183 output. This means, that both will always output the same data and
at the same data rate.
Pin
Function
NC
This pin is not connected
TXD
Transmit data, output, 3.3V – dAISy transmits data on this pin. Typically,
this signal is connected to the RXD pin on the other device.
RXD
Receive data, input, 3.3V – dAISy receives data on this pin. Typically, this
signal is connected to the TXD pin on the other device.
GND
Ground – This pin must always be connected to GND on the other device.
VCC
Power – Use this pin to power your device from dAISy. The output voltage
can be set to 3.3V or 5V with a switch inside dAISy. Maximum current is
150mA at 3.3V or 300mA at 5V.
This pin can also be used to power dAISy from an external 5V or 3.3V
power source. If doing so, double-check the voltage selection switch to
avoid damaging dAISy.
Note, that the voltage selection switch does NOT change the voltage level
of the other pins. All other pins are 3.3V only!
I/O
Spare input or output pin, 3.3V – This pin is currently not in use.

Page 11
v2.2
5.1 AIS over WiFi with the DT-06 WiFi module
The auxiliary serial port is pin-compatible with the inexpensive DT-06 WiFi module. With the module,
dAISy 2+ can make data available wirelessly to mobile devices like laptops, tablets and smartphones.
5.1.1 What you need
- DT-06 WiFi module, available for US$4 to $10 on Ebay and other online shops.
- An app that accepts AIS from a network connection, like for example OpenCPN or Navionics. In
this document, we will use OpenCPN, but configuration of other apps is very similar.
WARNING: We received reports that some DT-06 modules offered on Ebay and AliExpress don’t work.
Specifically, modules branded DM DIY MORE do not work! We buy our modules from these vendors:
power5.0 on Ebay: https://www.ebay.com/itm/364553704431
szdoit on AliExpress: https://www.aliexpress.com/item/32813585141.html
Geekcreit on BangGood: https://www.banggood.com/DT-06-Wireless-WiFi-Serial-Port-Transparent-
Transmission-Module-TTL-To-WiFi-With-bluetooth-HC-06-Interface-ESP-M2-p-1141047.html
5.1.2 Installing the WiFi module
Remove power from the dAISy AIS receiver before installing the module.
Plug the WiFi module into AUX Serial so that the VCC and GND pins of the
WiFi module line up with the respective labels on dAISy. With that, dAISy
TXD will be connected to WiFi RXD, and dAISy RXD to WiFi TXD. Note: The
module may be upside down compared to the picture, that’s ok if the
pins are connected as described above.
Connect dAISy to power. The LED on the WiFi module should light up.
At any time, the module can be reset to factory default settings by keeping the button labelled G
pressed until the LED turns off.
5.1.3 Configuring the WiFi module
When first powered up, the module will show up as a WiFi access point with the name Doit_WiFi_x,
where x are the last 6 characters of the module’s MAC address.
Connect to this access point with a computer or mobile device. Open a browser and in the address bar
type http://192.168.4.1 and press enter. You will see the configuration menu of the WiFi module.

Page 12
v2.2
First, configure the communication between the WiFi
module and dAISy.
Navigate to MODULE > Serial. Set BaudRate to 38400.
Leave the remaining fields at their defaults (8, NONE, 1,
50).
Click Save.
Next, configure protocol, address, and port on which AIS
data will be broadcasted.
Navigate to MODULE > Networks. In the field Socket
Type at the top of the page, select UDP Broadcast from
the drop down.
Further down the page, in the fields below the blue
section title UDP Broadcast, enter the IP address
192.168.4.255 and the port number 9000.
Click Save.
Write down the IP address and the port number on a
piece of paper. You will need them for the configuration
of the navigation apps on PCs and mobile devices.

Page 13
v2.2
We recommend protecting access to the WiFi module by
setting a password.
Navigate to MODULE > WiFi. In the section SOFT AP
Settings enter the desired password into the field
Password. The password must be 8-63 characters.
Optionally, you can change the name of the WiFi module
by updating the field SSID Name.
Leave the other fields unchanged.
Scroll to the bottom of the page and click Save.
If you ever forget the password, you can reset the WiFi
module to factory configuration by keeping the button
labelled G pressed until the LED turns off.
To activate the settings the module needs to be restarted. Navigate to MORE > Restart. The settings
you’ve made are now active.
5.1.4 Configure OpenCPN
Applications that process the AIS data must be configured to receive data from the UDP with the IP
address and port you noted down. Here we use OpenCPN, but the procedure will be similar with other
applications.
Connect your computer or mobile device to the WiFi access point of the dAISy 2+ AIS receiver.
Start OpenCPN. Go to Options > Connections. Click Add Connection to create a new connection. Select
the Network radio button, and under Protocol select UDP. In the field Address, enter the IP address you
noted down. In the field DataPort enter the port you noted down.
Optionally, you can give the connection a name by entering the desired name in the field User
Comment.
Leave the remaining fields at their defaults. Press OK to save and activate the new connection. If there
are AIS targets in range, OpenCPN will now start receiving AIS data.

Page 14
v2.2
5.1.5 Configure Navionics Boating App
Garmin Boating, also known as Navionics, is a popular
app for mobile devices that in its paid version also
supports AIS.
Connect your mobile device to the WiFi access point
of the dAISy 2+ AIS receiver.
Open the Navionics app. Go to Menu > Paired
Devices. Press + to connect a new device, and press
ADD DEVICE at the bottom of the screen. Give the
device a name, for example dAISy. In the field Host
enter the IP address you noted down. In the field Port
Number enter the port you noted down. Press UDP to
select the correct protocol.
Press Save to complete the configuration.
Note that Navionics will report the AIS receiver as
Disconnected if there is no active AIS traffic.

Page 15
v2.2
6 Tips for good AIS reception
Due to their low-cost architecture, dAISy AIS receivers are not as sensitive as some higher priced
receivers. The following basic measures can be taken to improve performance.
6.1 Antenna
If everything else is optimal, almost any antenna tuned to the VHF band will work. We used a simple
wire cut to length for my first prototypes. However, a good antenna will greatly improve results.
AIS messages are broadcast on two channels around 162 MHz, which is in the maritime VHF band. This
means that any antenna sold as “marine VHF antenna” will be a good start.
The short VHF “rubber duck” antennas are cheap and will work at short distance. If you check whether
162 MHz is inside the supported frequency range, you can even ignore the “marine” and save a few
bucks. However, the more broadband the antenna, the worse the reception quality.
A step up are VHF whip antennas. These are steel rods about 90 centimeters (3ft) long. While bulky,
these don’t cost much more than the “rubber duck” but provide superior range. Personally, I use the
TRAM 1600-HC which cost around US $40.
The AIS antenna should be separated as far as possible from the voice VHF antenna to avoid
unnecessary interference. The best separation is achieved by vertically separating the antennas or at
least mounting them on opposite sides of a vessel.
To avoid damaging dAISy AIS receiver with strong transmissions by other devices, the antenna should be
mounted at least 3 meters away from, or at least out of the transmitting beam, of high-power
transmitters such as radars or other VHF antenna installations.
IMPORTANT: Do NOT directly connect the dAISy to the same antenna as your VHF radio. This will
damage the AIS receiver! To share an existing antenna with a VHF radio, use an ACTIVE splitter. Active
splitters protect the AIS receiver by automatically disconnecting it when the VHF radio is transmitting.
Several customers reported good results with the inexpensive Glomex RA201 VHF/AIS/Radio Splitter.
6.2 Location, location, location
Good AIS reception requires line of sight.
A few buildings and trees between you and your targets aren’t ideal, but you will still be able to catch a
few messages. Hills and mountains however are almost certain showstoppers. A clear view of the water
and your targets is ideal.
In my experience the most important factor is the height of the antenna above sea-level. Sitting at the
beach or on the deck of a boat will work. Mounting the antenna on the mast of your boat or standing on
the observation deck of a cruise ship is better. A hill overlooking the harbor is great. Climbing that
2000m mountain that towers over the coast is AIS heaven.
In a nutshell: The farther you can see, the better.

Page 16
v2.2
6.3 Radio frequency noise
The main weakness of the dAISy AIS receivers, and probably most low-cost and SDR-based AIS receivers,
is susceptibility to out-of-band RF noise. The effect of noise is reduced range, and fewer successfully
received packets. Unfortunately, there’s not much we can do except finding a spot that’s less impacted
by noise. Outdoors is better than indoors (computers, power-supplies, wireless networks, LED lights ...).
Countryside is better than down-town (taxi radios).
The dAISy 2+ has an integrated bandpass filter to reduce the impact of radio frequency noise outside the
marine VHF band frequency.
7 Troubleshooting
Problem
Solution
No activity of the status LED
Verify the USB connection, also try a different
USB cable.
Device in reception mode, but not valid AIS
messages received (no ¼ second green flashes)
Verify the antenna connection and location.
Good AIS reception requires line-of-sight, verify
your setup from a location that is certain to have
traffic, e.g. near a harbor.
Device indicates valid AIS messages (¼ second
green flashes), but no messages received on PC
Verify that the serial port shows up on the PC. Try
a different USB cable if this is not the case.
Verify the serial configuration of your software.
Verify the serial communication with a serial
terminal program like Putty or screen.
Software receives positions, but fewer than
expected and/or with worse range than
expected.
Verify the antenna connection and location.
Good AIS reception requires line-of-sight, so the
higher up the antenna is positioned the better
the range. Move the antenna away from sources
of electrical noise.
After some time, dAISy indicates a device error
(fast blinking red LED)
Sometimes the device is not properly initialized
when the connected computer wakes up from
sleep mode. Unplug dAISy and plug in again to
resolve the error.
If a problem persists, please don’t hesitate to contact us.

Page 17
v2.2
8 Specifications
Power
Power input ports
USB, NMEA connector, AUX serial
Input voltage USB
5V
Input voltage NMEA0183 connector
9-24V (36V max)
Input voltage AUX Serial
3.3V or 5V selectable
Input current USB
< 80 mA
Input current NMEA0183 connector
< 45 mA (@12V)
Input current AUX Serial
< 75 mA (@5V)
Power output ports
AUX serial
Output voltage AUX serial
3.3V or 5V selectable
Maximum output current AUX serial (3.3V)
100mA
Maximum output current AUX serial (5V)
300mA (powered via USB or NMEA)
Radio
Independent receivers
2
Frequency bands
161.975MHz, 162.025MHz, 156.775MHz,
156.825MHz
AIS channels
2, freely configurable
Bandpass filter
SAW 156.3 - 162.025MHz pass band
RF connector
BNC
Input impedance
50Ω
Data I/O
AIS message encoding
NMEA 0183 (!AIVDM)
Supported AIS message types
1-27
Serial speed USB (generic CDC serial device)
38400 Baud fixed
Serial speed AUX Serial (logic-level UART, 3.3V)
4800, 9600, 38400 Baud configurable
Serial speed NMEA (RS-422/NMEA-0183)
4800, 9600, 38400 Baud configurable
Serial protocol
8 data bits, no parity, 1 stop bit (8N1)
Serial mode USB / NMEA
NMEA out fixed
Serial mode AUX Serial
NMEA out, NMEA in configurable
Dimensions
Enclosure without connectors
150mm x 52mm x 28mm
Enclosure with connectors
150mm x 97mm x 28mm
Enclosure mounting holes
2x Size: 4mm x 10mm Distance: 95mm
Circuit board without connectors
76mm x 49.5mm
Circuit board with connectors
76mm x 97mm x 20mm
Circuit board mounting holes
4x Size: 2.75mm (M2.5) Distance: 68mm x 42mm
Weight
Product in enclosure
125g
Circuit board only
40g

Page 18
v2.2
9 Source code and schematics
The dAISy project is partially open source.
The core of dAISy, how Silicon Labs Si4362 radio ICs are programmed to receive AIS, is available on
GitHub. While the project does not include all the functionality of dAISy 2+, we do backport any bug
fixes that are relevant to the task of receiving AIS. https://github.com/astuder/dAISy
If you want to experiment with the real code, brick your device with custom firmware or even build your
own dAISy from scratch, contact us. Tinkerers welcome!
10 Contact
The best way to reach us is by email: daisy@wegmatt.com
Please don’t hesitate to contact us if you need support. We also love to hear about your projects and are
happy to share your related blog posts, videos, and pictures on our social media.
You can also reach us on GitHub and Twitter.
https://wegmatt.com
Wegmatt LLC
6356 138
th
Ave NE, #212
Redmond, WA 98052
United States of America
