
Page 1
raspAIS
A21100
receiver - multimedia
Manual
english
Vers.: 1.2

Page 2
Inhalt
1. General safety instructions 4
2. Product and service description 4
2.1. Intended use 4
2.2. Scope 5
2.3. Important product information 5
3. Product Overview
(connectors/sockets) 6
4. Functional elements 7
4.1. Power Supply 7
4.2. HDMI supply 7
4.3. BNC-socket/Antenna-socket 7
4.4. AIS-RX LED 7
4.5. GPS USB Stick 8
5. Operation 8
5.1. Basic functions 8
5.2. NavigationwithWi 8
5.3. Navigation with LAN 9
5.4. Find out the IP address 9
5.5. Navigating with openCPN on
raspAIS 10
5.6. Connecting PC, Tablet, Laptop with
VNC Viewer 10

Page 3
5.7. Installation instructions 11
6. Set up charts to OpenCpn 11
7. Installation of the VHF antenna 13
8. Maintenance and service 14
9. Trouble shooting 15
10. License agreement 16
11. Warranty 16
12. Technical data 18
13. Notes 19
Revision of the operating instructions:
Pos Date Version Author Change
1 Jan 2018 1.0 VV, NK Build
2 09.03.2018 1.1 MSC Rework
3 02.05.2018 1.2 NK Rework

Page 4
1. General safety instructions
WARNING
When guiding ships, it is the sole responsibility of the
skipper to operate the vehicle in a safe manner, to have
full control of all conditions during the entire journey.
Improper behaviour of the driver of a raspAIS equipped
vehicle, where the driver does not pay close attention
to vehicle operation and environmental conditions, may
result in an accident or collision with property damage or
personal injury.
It is the sole responsibility of the user to use the raspAIS
prudently. The raspAIS does not release you from your due
diligence obligations!
• Please read all instructions. Keep all safety instructions
ready for the future!
• Please keep the device out of reach of children!
2. Product and service description
2.1. Intended use
The raspAIS is a mobile AIS receiver.
The device has 2 channel parallel AIS receivers.

Page 5
2.2. Scope
• A211 raspAIS board
• Manual
• Micro USB cable
• GPS USB stick
• Antenna rod
• Magnetic antenna base
2.3. Important product information
The raspAIS is compatible with the worldwide used AIS
system (Automatic Identication System).
Page 6
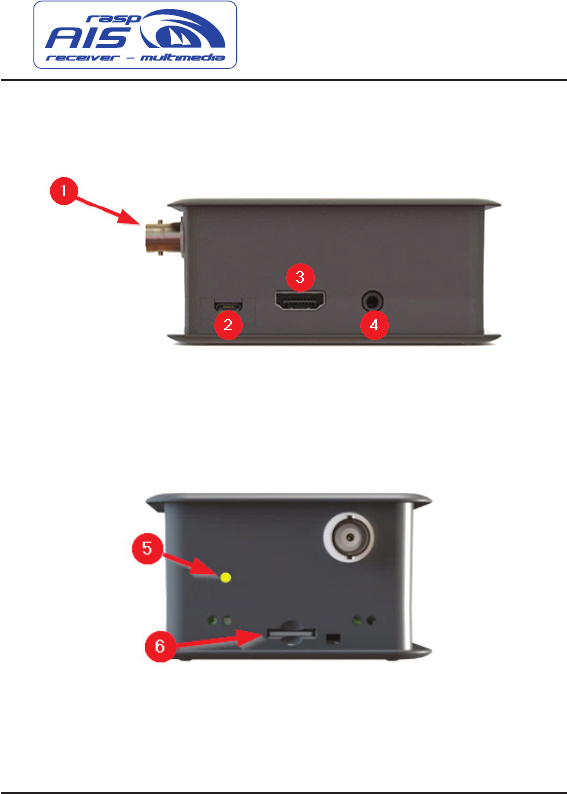
3. Product Overview
(connectors/sockets)
(1) BNC- socket, antenna connection
(2) Micro USB slot, power supply
(3) HDMI port for screen
(4) AUX audio output
(5) AIS-RX LED
(6) Micro SD-card slot
Page 7
4. Functional elements
4.1. Power Supply
The power supply takes place via the Raspberry Pi®. Please
use the enclosed USB cable and connect it with a power
supply. The power supply, car jack/USB or 5/230V/ USB, is
available as a special accessory.
If you have already a 5V USB power supply socket, you can
use this if it has approx. 1A or more.
4.2. HDMI supply
You can connect a monitor via the HDMI socket.
Using the Software already installed on the SD card, you
can visualize the received AIS targets.
In order to use the program, we recommend connecting a
mouse / keyboard to the USB ports.
Restart the raspAIS to recognize the devices. Now you can
open the “OpenCPN” icon on the desktop with your mouse.
4.3. BNC-socket/Antenna-socket
The VHF antenna is connected to the raspAIS via the BNC
socket. An AIS antenna is recommended, which can be used
on the frequencies 161-162 MHz.

Page 8
4.4. AIS-RX LED
The AIS-RX LED ashes orange once every AIS target
received.
4.5. GPS USB Stick
The GPS USB Stick is connected to any USB slot of the
raspAIS and works automatically at a startup.
5. Operation
5.1. Basic functions
In order to use the raspAIS, please connect the VHF-
antenna and the GPS USB stick.
If you use the already pre-installed openCPN version via
HDMI, it is also advisable to connect a mouse already now.
Using the AIS-RX LED (orange) on the raspAIS, you can
always perform an AIS receive analysis.
As soon as you plug in the raspAIS, it starts automatically.
The transmission of AIS data is only possible via Wi and
LAN. (see 5.2 / 5.3)
5.2. NavigationwithWi
When the raspAIS is started, connect to the raspAIS:
SSIDWi:“raspAIS”
Password:“halloais”

Page 9
Now go into an AIS-enabled navigation software / app and
start a new connection
IP: 10.10.10.1 Port 10110
Now the AIS and GNNS (GPS) data are transferred from the
raspAIS to your mobile phone, tablet or laptop.
5.3. Navigation with LAN
Your router and computer will automatically assign the
raspAIS an IP address. You can identify this IP address
either via your router menu or you can also see it in the
Raspberry’s own network settings (5.4), if you have a
monitor connected via HDMI. Finally enter the IP address in
your AIS program.

Page 10
5.4. Find out the IP address
Connect the LAN cable and start the raspAIS with an
attached screen, keyboard and mouse.
1: Click on “Terminal”
2: Enter “ip addr”
3: This is the IP address to use (eg.192.168.0.136)

Page 11
5.5. Navigating with openCPN on raspAIS
Connect the raspAIS with VNC Viewer (see chapter 5.6) or
with an HDMI cable. We recommend to connect a mouse,
which simplies the operation as far as possible (HDMI).
Click “OpenCPN” on the desktop. After the program has
started, you see the received AIS targets on the screen
5.6. Connecting PC, Tablet, Laptop with
VNC Viewer
• Download VNC Viewer from Appstore/Play store
• Connect to the raspAIS network „raspAIS“by Wi
• If you get asked again for a password, its „helloais“
• Start VNC viewer
• Now ll in 10.10.10.1 into „VNC Address “and press
additional windows with ok.
• Now you should see the mirrored desktop of the
raspAIS on your device.
• You can now just start OpenCPN with pre-installed
charts. (see chapter 6)

Page 12
5.7. Installation instructions
To ensure a reliable AIS reception on board, please note the
following:
• Use a 5V power supply> 2 amps (10 watt)
• Mount the raspAIS safely against environmental
inuences, it is not waterproof!
• Avoid major sources of interference in the vicinity
(inverter, radio, fridge, ...)
• Pay attention to sources of interference, especially
when installing the antenna.
6. Set up charts to OpenCPN
Weatherdock AG is not the Author of the charts and does
not ensure its completeness, reliability or its accuracy. We
just add this charts as a guidance and refer to following
sources.
Step 1. Download a chart
For example, on the following websites:

Page 13
After downloading a chart, save it on the USB stick and
plug it into the AIS receiver.
Step 2. Start your raspAIS
Insert all cables, note that the power connection is plugged
in at last.
Step 3. Start OpenCPN (if not already open)
Step 4. Press “Settings”
Step 5. Press “Charts”
Step 6. Press “Add Directory” and then select the le path
where you saved the chart (USB stick)
Step 7. Press “Open”
Step 8. Press on the map and then on Apply
Step 9. Press “Ok”
Now the chart would have to be loaded.
As the SD card is installed permanently, the USB stick must
always remain in the same USB port otherwise the card will
no longer be recognized and the process must be repeated.
If you copy the chart on the raspAIS and repeat the steps
you can use the charts without the USB stick is plugged.

Page 14
7. Installation of the VHF antenna
• We recommend placing the antenna on a metallised
surface. This serves as a counterweight and increases
the reception range.
• Before use, the antenna rod must be hand-screwed
onto the magnetic base. The use of tools is not
necessary.
• The antenna cable should be routed straight and
knot-free for the best transmission.
• The BNC socket is connected to the raspAIS.
• We recommend installing the antenna on the outside
• Do not place the antenna near sources of
interferences
8. Maintenance and service
Although Weatherdock AG always endeavours to handle
all publications with the utmost accuracy, this manual may
contain errors or ambiguities. In addition, these instructions
are the sole responsibility of Weatherdock and can be
changed without notice.

Page 15
9. Trouble shooting
errors x
There is no AIS data • Check if AIS targets are
within reach
• Is the antenna correctly
mounted?
• AIS RX LED: does it
dash?
The raspAIS receives only
very near AIS targets
• Make sure that there
are no large sources of
interference near the
raspAIS. (Fridge, etc.)
• Check your antenna
system.
• Is your antenna cable
properly connected?
• The antenna stands on
a metallic ground?
The raspAIS works
unreliable / crashes
• We recommend
5 VDC / 1-2 A.

Page 16
10. License agreement
By using the raspAIS, you agree to the terms of the fol-
lowing warranty agreements. Please read this agreement
carefully. Weatherdock AG grants you a limited license to
use the device during normal operation of the product.
Title, ownership and intellectual property rights in and to
the Software remain with Weatherdock AG.
11. Warranty
Weatherdock AG warrants this product against defects in
material and workmanship for a period of 2 years from
the date of purchase. Within this period, Weatherdock AG
will, at its discretion, repair or replace faulty components in
normal use. Repairs or replacement at the expense of the
company Weatherdock AG are made without calculation
for parts or working hours. The customer, however, carries
the shipping costs. This warranty does not cover misuse,
accidents or unauthorized changes or repairs. The implied
warranties and rights are exclusive and supersede any
other express or implied warranty and or statute, including
any statutory or other liability arising from a warranty of
merchantability or tness for a particular purpose. This
warranty gives you specic legal rights, depending on
the country. In no case Weatherdock AG is responsible
for accidental, special, indirect or consequential damages
resulting from the use or possible disuse of the product or
from errors in the product. Weatherdock AG reserves the
sole right to repair or replace the device or the software
or to refund the purchase price. This right is your sole and

Page 17
exclusive right in case of warranty. Products purchased
in online auctions do not entitle to discounts or to the
use of special offers Weatherdock AGs. Also, purchase
conrmations from online auctions are not recognized
as proof of warranty claims. To satisfy warranty claims,
an original proof of purchase from the dealer is always
required. Weatherdock AG does not replace missing
equipment or accessories in products purchased in online
auctions. In case of warranty, contact your Weatherdock
AG dealer. He will coordinate the further procedure with
you. In the case of a shipment, pack the device carefully
and send it stamped to the address of your trader names.
For warranty repairs, always include a copy of the original
proof of purchase as proof of ownership. The Weatherdock
AG raspAIS contains no user-repairable parts. If there is a
problem with your device, contact your raspAIS dealer. Any
attempt to open, modify the device will void the warranty
and may irreparably damage the device.
All brands and trademarks mentioned in this document are
the property of the companies named.
Copyright 2018, Weatherdock AG
Further issue and duplication of these documents,
utilization and communication is not permitted. Violations
committed for damages.

Page 18
12. Technical data
Description Value
Dimension (LxBxH) 11m x 70 x 45 mm
Weight Ca .150 g
Frequenz 161,975 MHz and 162,025 MHz
Channel Bandwidth 25kHz
Channel Step 25kHz
RX sensivity -107dBm
Power consumption Approx. 500 mA
UKW socket BNC Female
Displays
1 x LED AIS-RX /
2 x Raspberry PWR & ACT
Interface UART TX (38400 Baud)
Operating temperature
-10°C up to +55°C
Stock temperature
-20°C up to +60°C

Page 19
13. Notes

Page 20
Weatherdock AG
Emmericher Strasse 17
D – 90411 Nürnberg
Tel.: +49 (0) 911 – 37663830
Fax:+49(0)911–37663840
www.easyais.com
https://www.easyais.com/en/products/a21100-raspAIS/
