
VIF - Maintenance of computer systems
infrastructure
Zebra GK420t User Guide
VIF-NA-BG-136, V3.0
© IZUM, 2016
COBISS, COMARC, COBIB, COLIB, IZUM are registered trademarks owned by IZUM.

© IZUM, 18. 4. 2016, VIF-NA-BG-136, V3.0 i
CONTENTS
1 Introduction ......................................................................................................... 1
2 Using the GK420t printer .................................................................................... 1
2.1 Description of the printer ................................................................................................. 1
2.2 Connecting to power supply and installing printer .......................................................... 3
2.3 Cleaning the printhead ..................................................................................................... 4
2.4 Placing the media roll and loading black ribbon cartridge .............................................. 5
2.5 Resetting printer ............................................................................................................... 7
2.6 Status light ........................................................................................................................ 7
3 Installing driver .................................................................................................... 8
4 Printer settings (for COBISS3) .......................................................................... 10
5 Setting logical destinations in COBISS3 ........................................................... 13
6 Potential printing problems ............................................................................... 15
6.1 Printing an extra blank label .......................................................................................... 15
6.2 Printing an extra blank label .......................................................................................... 17

Zebra GK420t User Guide VIF
ii © IZUM, 18. 4. 2016, VIF-NA-BG-136, V3.0
FIGURES
Figure 1: Back side of the printer.................................................................................................... 1
Figure 2: Front side of the printer ................................................................................................... 1
Figure 3: Opening the printer .......................................................................................................... 2
Figure 4: Closing the printer ........................................................................................................... 2
Figure 5: Printhead .......................................................................................................................... 2
Figure 6: Connecting to power supply ............................................................................................ 3
Figure 7: USB connection ............................................................................................................... 3
Figure 8: Serial connection ............................................................................................................. 4
Figure 9: Cleaning the printhead ..................................................................................................... 5
Figure 10: Opening the printer and placing the media roll ............................................................. 5
Figure 11: Pushing the media under the media guides ................................................................... 6
Figure 12: Loading black ribbon cartridge ..................................................................................... 6
Figure 13: Final loading of the black ribbon cartridge ................................................................... 7
Figure 14: Selecting the right model (GK420t) .............................................................................. 9
Figure 15: Selecting the right software package with drivers for GK420t ................................... 10
Figure 16: Control Panel with Devices and Printers ..................................................................... 11
Figure 17: Printing settings ........................................................................................................... 11
Figure 18: Advance printing settings ............................................................................................ 12
Figure 19: Colour dithering.......................................................................................................... 12
Figure 20: COBISS3 user interface .............................................................................................. 13
Figure 21: Local destinations editor.............................................................................................. 13
Figure 22: Setting local destinations ............................................................................................. 14
Figure 23: Detailed settings .......................................................................................................... 14
Figure 24: Refreshing settings in the COBISS3 user interface ..................................................... 15
Figure 25: Setting the printer ........................................................................................................ 16
Figure 26: Sending factory settings .............................................................................................. 16
Figure 27: Printer settings ............................................................................................................. 17
Figure 28: Media calibration ......................................................................................................... 18
VIF Zebra GK420t User Guide
© IZUM, 18. 4. 2016, VIF-NA-BG-136, V3.0 1/18
1 Introduction
This document presents how the GK420t printer is used in the COBISS system (connecting to
power supply, changing paper, etc.).
2 Using the GK420t printer
2.1 Description of the printer
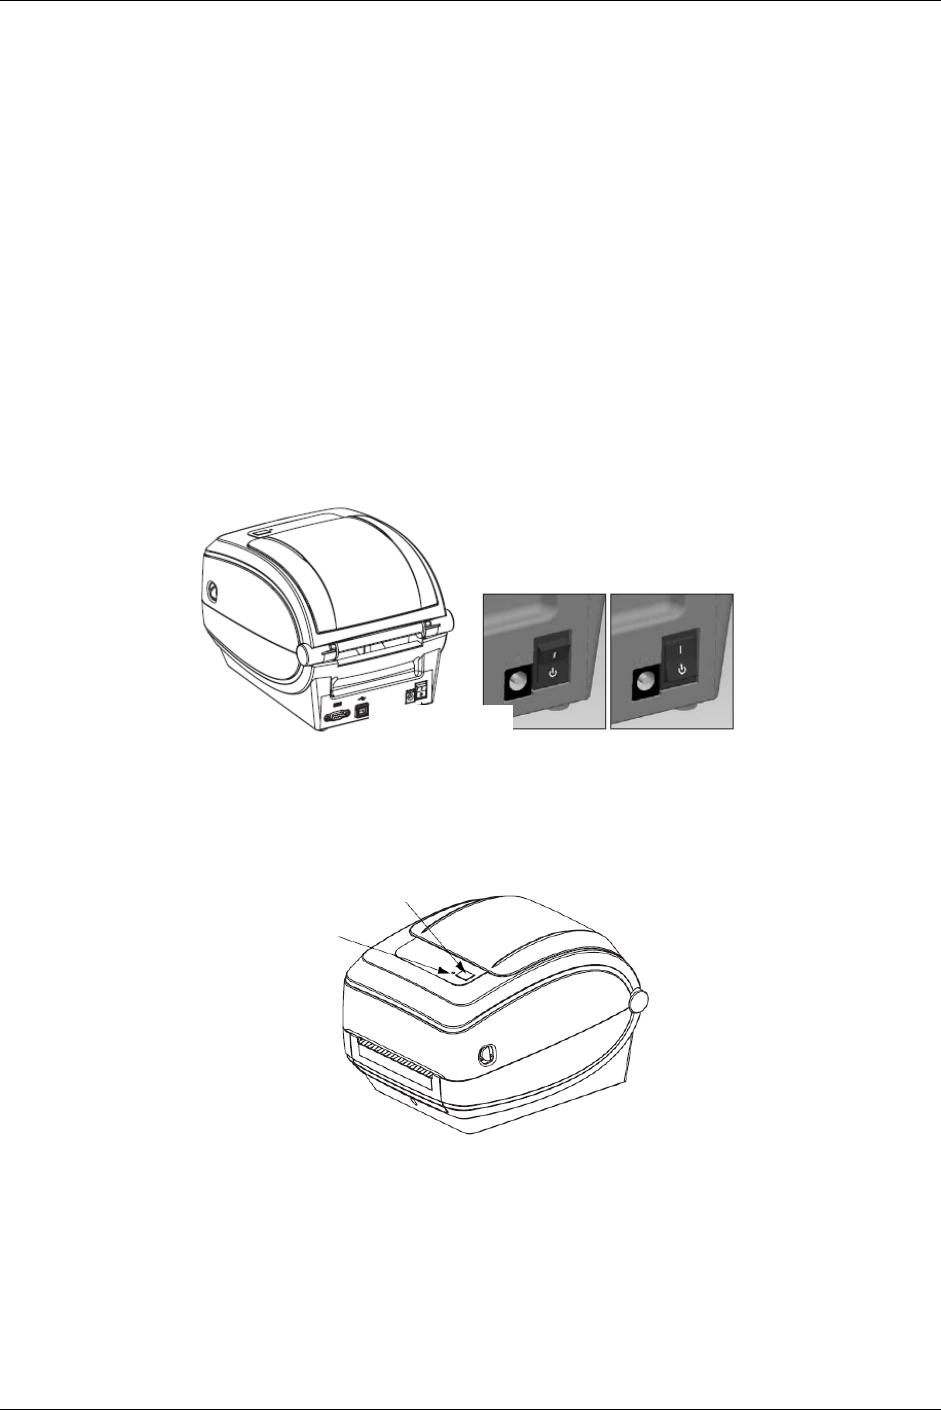
Power switch
Figure 1: Back side of the printer
FEED button and status light
Figure 2: Front side of the printer
FEED Button – In normal operating mode, the label ribbon advances to the next label.
Status light – In normal operating mode the status light is green. If it turns red, an error has
occurred: the printer either ran out of label ribbon or black ribbon cartridge or the service is
needed because of a more complex error.
Power switch
Power OFF Power ON
Power switch
Power off
Power ON
FEED
button
Status
light

Zebra GK420t User Guide VIF
2/18 © IZUM, 18. 4. 2016, VIF-NA-BG-136, V3.0
Opening and closing the printer
Figure 3: Opening the printer
Figure 4: Closing the printer
Printhead position
Figure 5: Printhead

VIF Zebra GK420t User Guide
© IZUM, 18. 4. 2016, VIF-NA-BG-136, V3.0 3/18
2.2 Connecting to power supply and installing printer
To connect your printer to a computer use the serial cable or the USB cable supplied with the
printer.
Connecting to power supply
Figure 6: Connecting to power supply
USB connection
Figure 7: USB connection
USB cable

Zebra GK420t User Guide VIF
4/18 © IZUM, 18. 4. 2016, VIF-NA-BG-136, V3.0
Serial connection
Figure 8: Serial connection
The printer comes with a serial and a USB interface. To connect the printer use the appropriate
cable.
During installation you can use the drivers available:
on CD supplied with your printer,
via http://www.zebra.com/id/zebra/na/en/index/products/printers/desktop/gk420t.4.tabs.html,
via http://www.seagullscientific.com/downloads/drivers/archive/7.2/7.2/Zebra_7.2.exe,
To use the printer from several workstations, it is recommended to connect it only to one
workstation enabling shared use of the printer to other workstations. For help, call +386 (0)2
2520 333 (Call center) or send an email to [email protected].
2.3 Cleaning the printhead
To clean the printhead, use the cleaning pen supplied with your printer containing the cleaning
solution. Use the cleaning pen tip to remove debris and dust that has built-up on the heater
element of the thermal printhead.
The cleaning pen can be used only once and make sure that you use it only for this purpose. If
you use it once again, the contaminants from previous uses may damage the printhead. Instead of
a cleaning pen, you can also use a soft cloth and pure alcohol.

VIF Zebra GK420t User Guide
© IZUM, 18. 4. 2016, VIF-NA-BG-136, V3.0 5/18
Figure 9: Cleaning the printhead
2.4 Placing the media roll and loading black ribbon
cartridge
Go through the following steps of the procedure:
1. Open the printer lid. Place the media roll on the green roll holder.
Figure 10: Opening the printer and placing the media roll

Zebra GK420t User Guide VIF
6/18 © IZUM, 18. 4. 2016, VIF-NA-BG-136, V3.0
2. The media roll must go under both media guides.
Figure 11: Pushing the media under the media guides
3. Place a new ribbon roll on the inner holder. Then, place an empty ribbon core, remained
from the ribbon, on the front holder. Pay attention to lock the notches of the ribbon core
properly. Attach the adhesive strip of the black ribbon cartridge to the empty ribbon core.
Prior to use, pull the ribbon cartridge tight across the printhead.
Figure 12: Loading black ribbon cartridge
Under media
guides

VIF Zebra GK420t User Guide
© IZUM, 18. 4. 2016, VIF-NA-BG-136, V3.0 7/18
Figure 13: Final loading of the black ribbon cartridge
2.5 Resetting printer
Once the media roll is placed and the black ribbon cartridge loaded, go through the following
steps (make sure that the printer’s cover is closed and the status light is green):
1. Turn off the printer.
2. Press and hold the FEED button.
3. Turn on the printer.
4. The green status light flashes in sequences: once, then in the two-flash-, three-flash- and
four-flash sequence.
5. Release the FEED button after the four-flash sequence.
6. The printer starts calibration process and advances the label ribbon to the next label.
7. Once the calibration process is complete, turn off and on the printer.
2.6 Status light
Colour
Status
Explanation and solution
None
Printer is turned off.
Green
Solid green
Normal functioning
Orange
Solid orange
It lights up for about ten seconds
immediately after the printer is turned on.
If it lasts for more than ten seconds, the
printer requires service.

Zebra GK420t User Guide VIF
8/18 © IZUM, 18. 4. 2016, VIF-NA-BG-136, V3.0
Colour
Status
Explanation and solution
Green
Flashing
Normal functioning
Red
Flashing
Labels or ribbon cartridge ran out.
Green
Double flashing
The printer is idle.
Orange
Double flashing
The printerhead is overheated.
Green and red
Alternately flashing
Flash memory is not programmed, the
printer requires service.
Red and green
Flashing twice red and
then once green
The printhead or motor has a failure, the
printer requires service.
Table 1: Status light
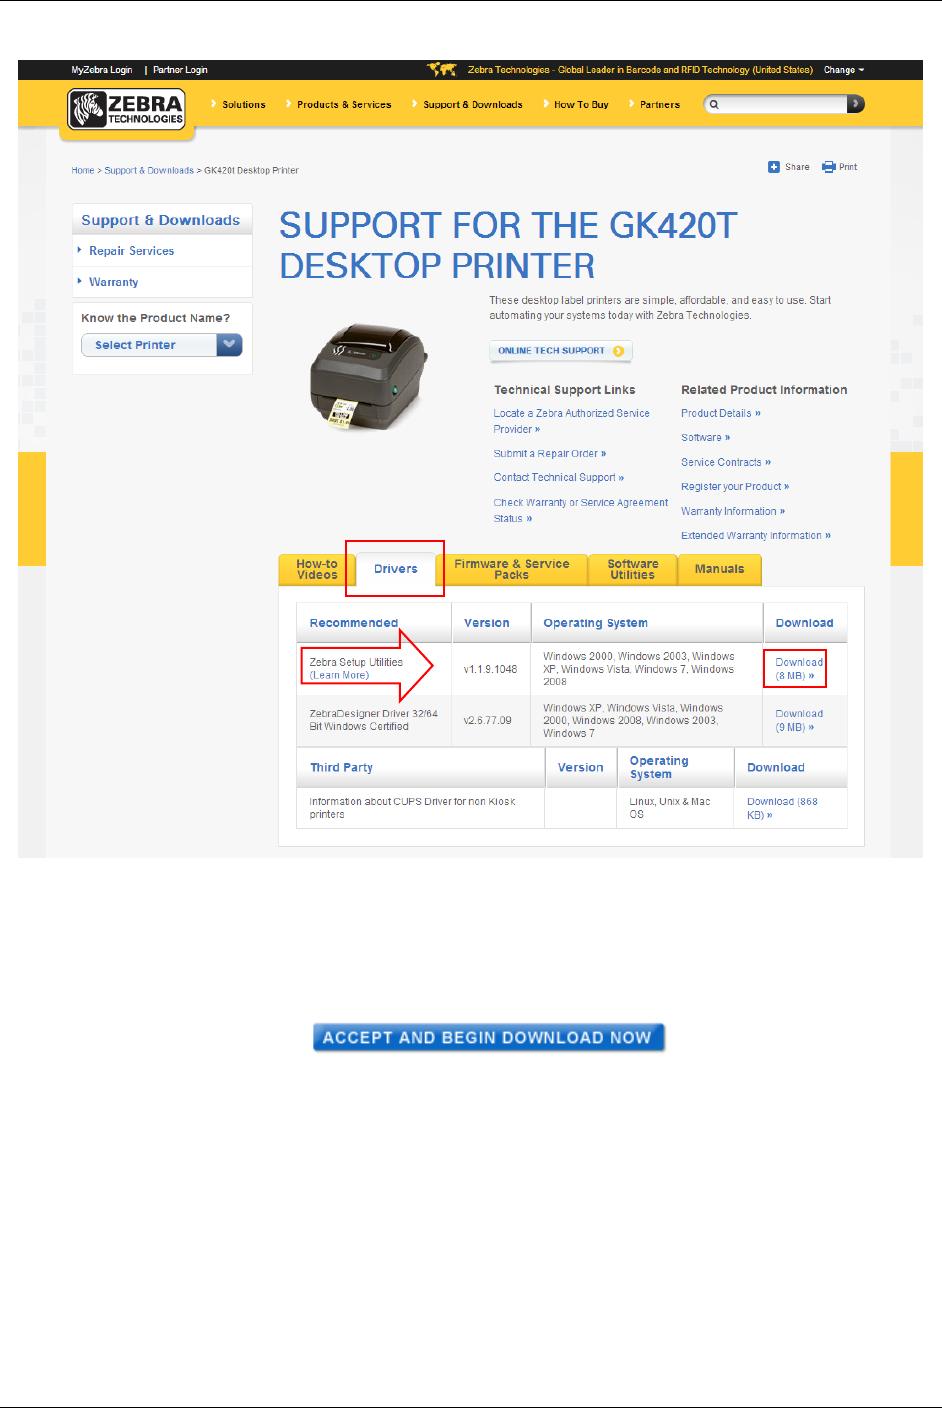
3 Installing driver
If the original or the latest version of the driver for Zebra GK420t is not installed on your local
computer, which is connected to the printer, install the driver or upgrade it. Drivers are available
on Zebra’s official web page
http://www.zebra.com/id/zebra/na/en/index/drivers_downloads.html or on the user’s CD
supplied with your printer.
When the downloading web page opens, select GK420t Desktop Printer from the Printer Support
drop-down list (see Figure 14).

VIF Zebra GK420t User Guide
© IZUM, 18. 4. 2016, VIF-NA-BG-136, V3.0 9/18
Figure 14: Selecting the right model (GK420t)
Then, select the Drivers tab and click Download under "Zebra Setup Utilities" to download the
drivers to your computer (see Figure 15).
Zebra GK420t User Guide VIF
10/18 © IZUM, 18. 4. 2016, VIF-NA-BG-136, V3.0
Figure 15: Selecting the right software package with drivers for GK420t
Before downloading the driver package, the confirmation window will open and ask if you agree
to the specified terms. Click the field to start the download:
After the package has been downloaded, run the package (administrator privileges are required
for the installation of drivers) and follow the instructions (select ZDesigner GK420t if asked for
which printer model you wish to install the driver).
4 Printer settings (for COBISS3)
Once you have installed the drivers, update Zebra GK420t printer settings before you start
printing labels. Go to Control Panel and select Devices and Printers. All available printers are

VIF Zebra GK420t User Guide
© IZUM, 18. 4. 2016, VIF-NA-BG-136, V3.0 11/18
displayed. Select ZDesigner GK420t and right-click the icon. Select Printing Preferences from
the option list (see Figure 16).
Figure 16: Control Panel with Devices and Printers
When you click Printing Preferences, a new window will appear in which you can set up
parameters as illustrated in Figure 17. In the Options tab, pay particular attention to fields in the
red boxes.
Figure 17: Printing settings

Zebra GK420t User Guide VIF
12/18 © IZUM, 18. 4. 2016, VIF-NA-BG-136, V3.0
Once you set up parameters under the Options tab, click the Advanced Settings tab and make
sure that Thermal Transfer is selected under "Media Type" (see Figure 18).
Figure 18: Advance printing settings
At the end, check if Smooth is selected under the Dithering tab (see Figure 19).
Figure 19: Dithering

VIF Zebra GK420t User Guide
© IZUM, 18. 4. 2016, VIF-NA-BG-136, V3.0 13/18
5 Setting logical destinations in COBISS3
In COBISS3, select a printer for printing labels for the material in logical destinations. Select
System/Settings/Logical destinations (see Figure 20).
Figure 20: COBISS3 user interface
A new Local destinations editor window will open in which you will select Label – material:
[default local printer] and click Edit (see Figure 21).
Figure 21: Local destinations editor

Zebra GK420t User Guide VIF
14/18 © IZUM, 18. 4. 2016, VIF-NA-BG-136, V3.0
The User destinations window will open in which you will click Add printer. In the new
window select ZDesigner GK420t from the drop down list which you intend to use to print labels
for the material (see Figure 22).
Figure 22: Setting local destinations
Once you select the printer, click the Details button to check if these detailed settings are correct
for this type of printer (as shown in Figure 23):
Figure 23: Detailed settings
When all settings are set, click the OK button to confirm each choice. At the end, in the System
menu, select Refresh settings (see Figure 24). If this option is not available, refresh the newly
configured settings by first logging out and then logging in to the COBISS3 software.

VIF Zebra GK420t User Guide
© IZUM, 18. 4. 2016, VIF-NA-BG-136, V3.0 15/18
Figure 24: Refreshing settings in the COBISS3 user interface
Now, you can start printing labels for the material.
6 Potential printing problems
6.1 Printing an extra blank label
If labels cannot be printed properly after installing the drivers and setting the logical destinations
(e.g. printing an extra blank label), the factory settings should be sent to the printer via original
drivers.
The procedure is as follows: Go to Control Panel and click the Devices and Printers icon.
Find the printer, that is the Designer GK420t icon and right-click on it.
Select Printer properties from the list of options. A new window should pop up in which you
will click the Preferences... button (see Figure 25).

Zebra GK420t User Guide VIF
16/18 © IZUM, 18. 4. 2016, VIF-NA-BG-136, V3.0
Figure 25: Setting the printer
By clicking the Preferences… button a new window with additional settings should pop up
again, then select the Tools tab (see Figure 26).
Figure 26: Sending factory settings

VIF Zebra GK420t User Guide
© IZUM, 18. 4. 2016, VIF-NA-BG-136, V3.0 17/18
Select Action under Command type and Load factory defaults under Command Name, then
click the Send button. This command sends the default factory settings to the printer. After that
retry printing a label.
6.2 Printing an extra blank label
If the settings do not resolve problems with an extra blank label, you can try with label
calibration. You can use this method even if the printer prints one extra blank label besides the
label for the material.
The procedure is as follows: go to the Control panel and click the Devices and Printers icon.
Find the printer, that is the Designer GK420t icon and right-click on it. Select Printer properties
from the drop-down menu.
When a new window pops up, click the Preferences... button (see Figure 27).
Figure 27: Printer settings
By clicking the Preferences… button a new window with additional settings should pop up
again, then select the Tools tab (see Figure 28).

Zebra GK420t User Guide VIF
18/18 © IZUM, 18. 4. 2016, VIF-NA-BG-136, V3.0
Figure 28: Media calibration
Select Action under Command type and Calibrate media under Command name as shown in
Figure 28. By clicking the Send button new re-calibration parameters are sent to the printer.
After that retry printing a label.
