
BEFORE YOU BEGIN
All information is based on the latest product information available at the time of publication. Kohler Co. reserves
the right to make changes in product characteristics, packaging, or availability at any time without notice.
Please leave these instructions for the consumer. They contain important information.
NOTE:
These products should be located and mounted toawall. While it is possible to mount them to any surface, a stud
or concrete mounted product will yield the best results.
DANGER: (Risk of personal injury )
These products are not designed or intended for use asagrab bar or support bar. Do not install where the product
might be used as a grab or support bar.
1243008-2A-A 1
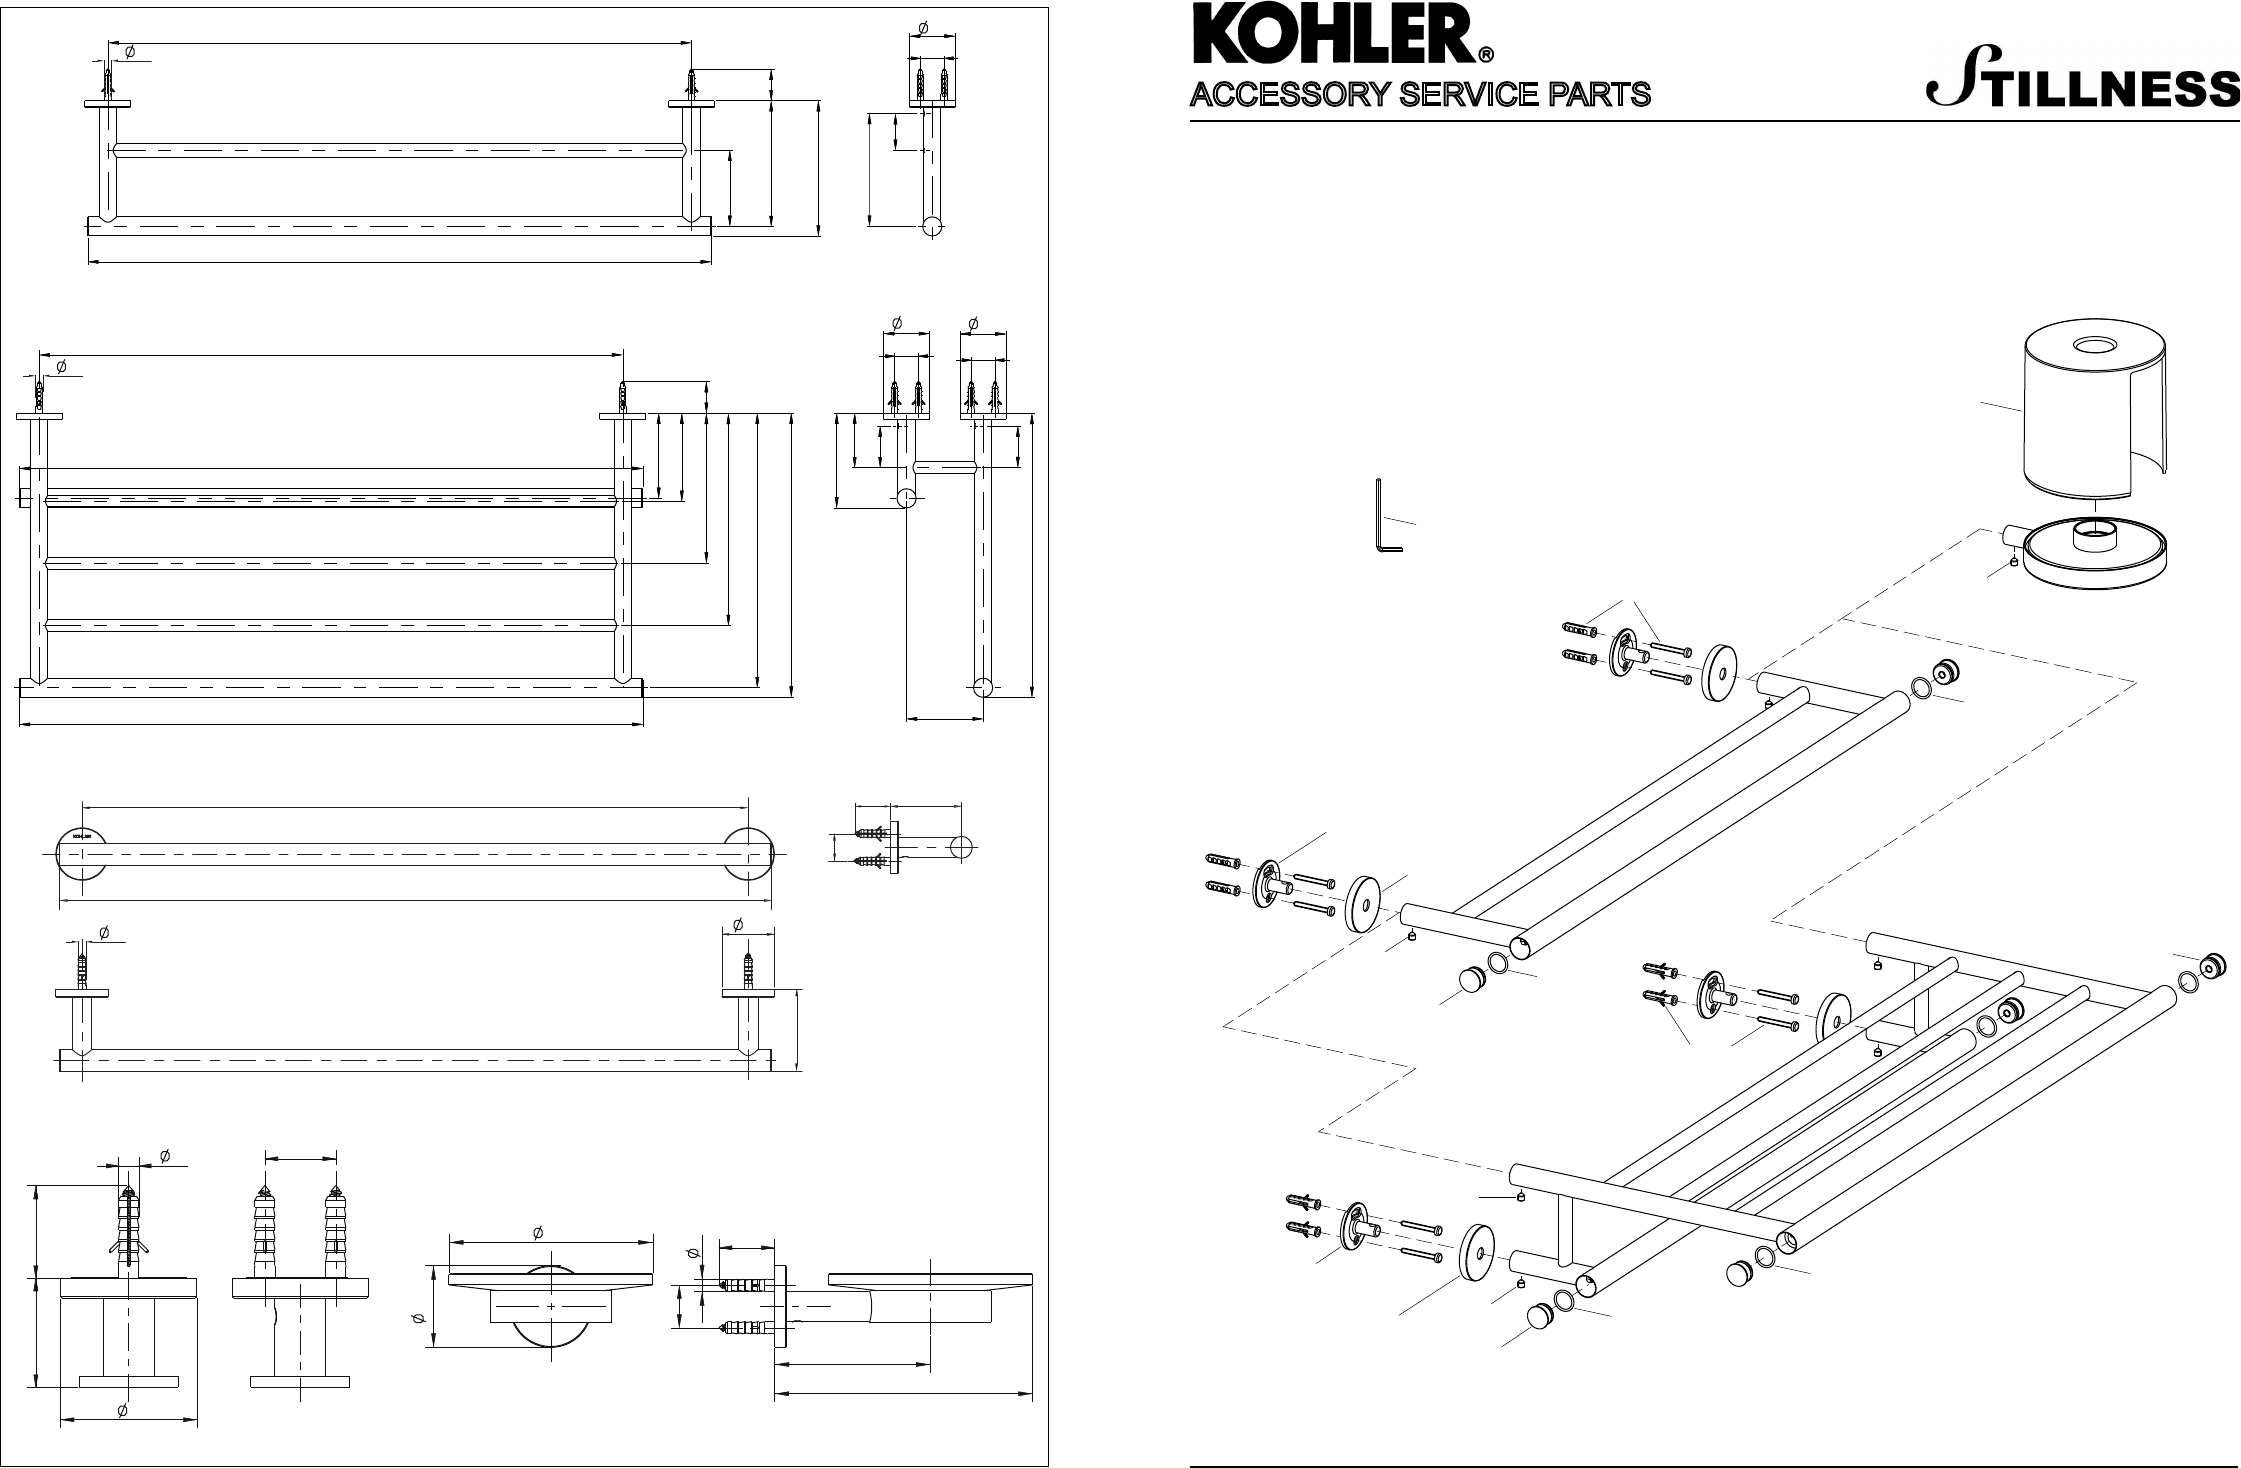
ROUGH-IN DIMENSIONS
ACCESSORY INSTALLATION INSTRUCTIONS
1243008-2A-A 8
**Color code must be specified when ordering
ACCESSORY SERVICE PARTS
14388T Covered Toilet Paper Holder
14389T Brush Holder
14391T 24″ Double Towel Bar
14397T 24″ Double Towel Shelf
14451T 24″ Towel Bar
14455T Glass Shelf
14456T Towel Ring
14458T Robe Hook
14459T Toilet Papaer Holder
14461T Soap Dish
14463T Tumbler Holder
14388T
14389T
119
124
133
16.7
48
25
13.5
33
93.5
154.5
122
120
391
21
61
49
104
76
12
5.6
。
273
110
389
7
33
7
1061576
1161640
3006135
1142338
1142345**
834638
1142346
14389T Brush Holder
1243008-2A-A 2
652
610
79.5
131.5
141.5
118
38.5
48
25
14391T
43.5
57
99
297
287
222
157
92
89
43.5
297
80
652
610
652
48
25
48
25
14397T
652
14451T
14461T14458T
48
48
25
25
7
7
39
33
120
33
92
152
610
33
65
25
75
7
48
33
33
7
7
1243008-2A-A 7
1061576
1017949
1014835**
1143814
38634
1061576
1017963**
834638
1104667**
1014835**
1104667**
1017949
1017949
1017949
38634
38634
38634
1017963**
1017963**
**Color code must be specified when ordering
ACCESSORY SERVICE PARTS
14388T Covered Toilet Paper Holder
14391T 24″ Double Towel Bar
14397T 24″ Double Towel Shelf

1243008-2A-A 3
14459T
14463T
14456T
14455T
48
48
48
25
25
25
25
7
7
7
7
123
109
33
128
92
73
211
225
146
65
160
117
75
572
470
33
160
169
145
33
102
75
33
1243008-2A-A 6
How To Install The Bracket
Only For 14451T/14455T/14391T/14397T
As Fig 1 shown, select a location on the vertical wall to stick the templet,
ensure the templet is horizontal. Drill hole in the finished wall as required.
INSTALLATION
Fig 1
Only for 14451T/14455T/14391T/14397T
PN: XXXXXXX
9
8
7
34
36
35
Ensure that all connections are tightened.
Ensure all setscrews face straight down.
INSTALLATION CHECKOUT
CLEANING INSTRUCTIONS
All Finishes: Clean the finish with mild soap and warm water. Wipe entire surface completely dry with a clean soft
cloth. Many cleaners may contain chemicals, such as ammonia, chlorine, toilet cleaner etc. Which could adversely
affect the finish and are not recommended for cleaning.
Do not use abrasive cleaners or solvents on Kohler faucets and fittings.
How To Install The Tumbler Holder
Slide the escutcheon(7) onto bracket. Insert the extension(35) of the tumbler
holder kit(34) onto bracket, orienting the screw hole of extension downward.
Tighten the screw(9) with the hex wrench(8) to secure the tumbler holder kit.
Remove the tumbler(36) from tumbler holder kit as required. Assemble it back
to the tumbler holder kit after use.

1243008-2A-A 4
Fig 3
Fig 2
Fig 4
1
2
3
4
1
3
4
2
Fig 5
7
8
9
10
5
7
9
16
8
7
9
8
7
9
20
8
6
8
13
14
15
12
11
17
18
19
1243008-2A-A 5
21
32
31
26
9
9
30
9
7
25
8
7
27
28
8
8
29
7
9
8
7
33
For All Products(Except For 14451T/14455T/14391T/14397T)
Select a location on the vertical wall to install the bracket.
As Fig 2 shown, mark anchor(1) mounting hole location on wall as shown,
ensure the large slotted mounting hole of the bracket(2) upward, the smaller
hole of the bracket downward and two screw holes are vertical. Drill hole in the
finished wall as required.
As Fig 3 shown, mark anchor(1) mounting hole location on wall as shown,
ensure two long straight edges of the bracket(4) are vertical. Drill hole in the
finished wall as required.
For All Products
As Fig 4 shown, press the anchor(1) into the hole. Orienting the large slotted
mounting hole of the bracket upward, the smaller hole of the bracket downward
and two screw holes are vertical, secure the bracket(2) with the self-tapping
screw(3).
As Fig 5 shown, press the anchor(1) into the holes. Orienting the straight edge
of the bracket(4) vertically, secure the bracket with self-tapping screw(3).
How To Install The
Toilet
Brush Holder
Keeping screw hole of the escutcheon(14) downward, aligning bulge of the
bracket with slot of the escutcheon, slide the escutcheon onto the bracket,
tighten the screw(13) with the hex wrench(8) to secure the escutcheon. Then
orienting the bulge(11) of the brush holder kit(15) align with the larger hole of
the escutcheon(14) to install the brush holder kit onto the escutcheon.
Remove the brush kit(12) from the brush holder kit as required.
How To Install The Covered Toilet Paper Holder
Slide the escutcheon(7) onto the bracket. Insert the extension(6) of the paper
holder kit(10) onto the bracket , orienting the screw hole of the extension
downward. Tighten the screw(9) with the hex wrench(8) to secure the paper
holder kit.
If needed, remove the cover(5) from the paper holder kit to install toilet paper,
then reinstall the cover.
How To Install The Double Towel Bar
Slide the escutcheon(7) onto each bracket. Insert the extension(17) of the towel
bar kit(16) onto bracket, orienting the screw hole of extension downward.
Tighten the screw(9) with the hex wrench(8) to secure the towel bar kit.
How To Install The Towel Shelf
Slide the escutcheon(7) onto each bracket. Insert the extension(19) of the towel
shelf kit(18) onto bracket, orienting the screw hole of extension downward.
Tighten the screw(9) with the hex wrench(8) to secure the towel shelf kit.
How To Install The Towel Bar
Slide the escutcheon(7) onto each bracket. Insert the extension(21) of the towel
bar kit(20) onto bracket, orienting the screw hole of extension downward.
Tighten the screw(9) with the hex wrench(8) to secure the towel bar kit.
How To Install The Glass Shelf
Slide the escutcheon(7) onto each bracket. Insert two extensions(22) onto each
bracket, orienting the screw hole of extension downward. Tighten the screw(9)
with the hex wrench(8) to secure the extension.
Slide the shelf(24) onto the slot of each extension, orienting the shelf horizontal
and symmetrical. Tighten the screws(23) with a screw driver to secure the
shelf.
NOTE:
Install shelf(24) with the frosted surface downward.
How To Install The Towel Ring
Slide the escutcheon(7) onto bracket. Insert the extension(26) of the towel ring
kit(25) onto bracket, orienting the screw hole of extension downward. Tighten
the screw(9) with the hex wrench(8) to secure the towel ring kit.
How To Install The Robe Hook
Slide the escutcheon(7) onto bracket. Insert the extension(28) of the robe hook
kit(27) onto bracket, orienting the screw hole of extension downward. Tighten
the screw(9) with the hex wrench(8) to secure the robe hook kit.
How To Install The Toilet Paper Holder
Slide the escutcheon(7) onto bracket. Insert the extension(30) of the paper
holder kit(29) onto bracket, orienting the screw hole of extension downward.
Tighten the screw(9) with the hex wrench(8) to secure the paper holder kit.
How To Install The Soap Dish
Slide the escutcheon(7) onto bracket. Insert the extension(33) of the soap dish
kit(31) onto bracket, orienting the screw hole of extension downward. Tighten
the screw(9) with the hex wrench(8) to secure the soap dish kit.
Remove the dish(32) from soap dish kit for cleanning as required. After clean-
ning, assemble it back to the soap dish kit.
7
9
23
22
24
8

1243008-2A-A 9
**Color code must be specified when ordering
ACCESSORY SERVICE PARTS
1104667
1014835**
1061576
1014830**
1014830**
1017949
1017969
1017949
1017949
1017969
1017960
1104667
1138779**
1061576
834638
1017963**
38634
1017963**
38634
1017949
14451T 24″ Towel Bar
14455T Glass Shelf

1104667
834638
1061576
1017949
1017949
1017949
1014802
1014803
1017949
1017949
1014816**
870817
1017962**
1243008-2A-A 10
**Color code must be specified when ordering
ACCESSORY SERVICE PARTS
14456T Towel Ring
14458T Robe Hook
14459T Toilet Papaer Holder
14461T Soap Dish
14463T Tumbler Holder
1138779**
