
Einstein Vision and Language Model Builder:
Getting Started
Updated: 5/22/2019
Overview
Before you install this app, we recommend that you complete the Einstein Vision . Trailhead
NOTE: This app is optimized for Chrome, so we recommend you use Chrome to install the app and when you use it in
Salesforce.
1.
2.
a.
b.
3.
a.
b.
4.
a.
b.
5.
6.
App Installation and Configuration
Einstein Vision
Einstein Vision (Image Classification): Create and Train a Dataset to Create a Model
Einstein Vision (Image Classification): Get a Prediction
Einstein Language (Intent)
Einstein Language (Intent): Create and Train a Dataset to Create a Model
Einstein Language (Intent): Get a Prediction
Einstein Language (Sentiment)
Einstein Language (Sentiment): Create and Train a Dataset to Create a Model
Einstein Language (Sentiment): Get a Prediction
Troubleshooting
Considerations for Creating Image Datasets
App Installation and Configuration
1.
2.
a.
b.
3.
a.
b.
c.
up for an Einstein Platform Services account. If you already have an account and key, you can skip this step. Sign
Download your private key.
Save a copyof your key and the email you used to sign up (the email address associated with the Salesforce org)
in a text file for easy access.
Download the key file and save it aseinstein_platform.pem.
Enable a custom domain.
Log in to your org.
Make sure you have configuredMy Domain and Enabledit for all users.


e.
f.
g.
h.
i.
j.
Select that you have read and agree to the terms and conditions and click Confirm and Install.
If prompted, log in to Salesforce.
On the installation page, click Install. You can choose to make it available for admins, all users, or all users with
specific profiles.
Approve third-party access and click Continue.

k.
l.
m.
5.
a.
b.
c.
d.
Wait for the package to successfully install.
Click Done.
Add your key to Einstein components
From the App Launcher, navigate toEinstein Playgroundapp.
You see a message about the account configuration. This message appears until you upload your key which is
what you do next.

e.
i.
ii.
iii.
iv.
v.
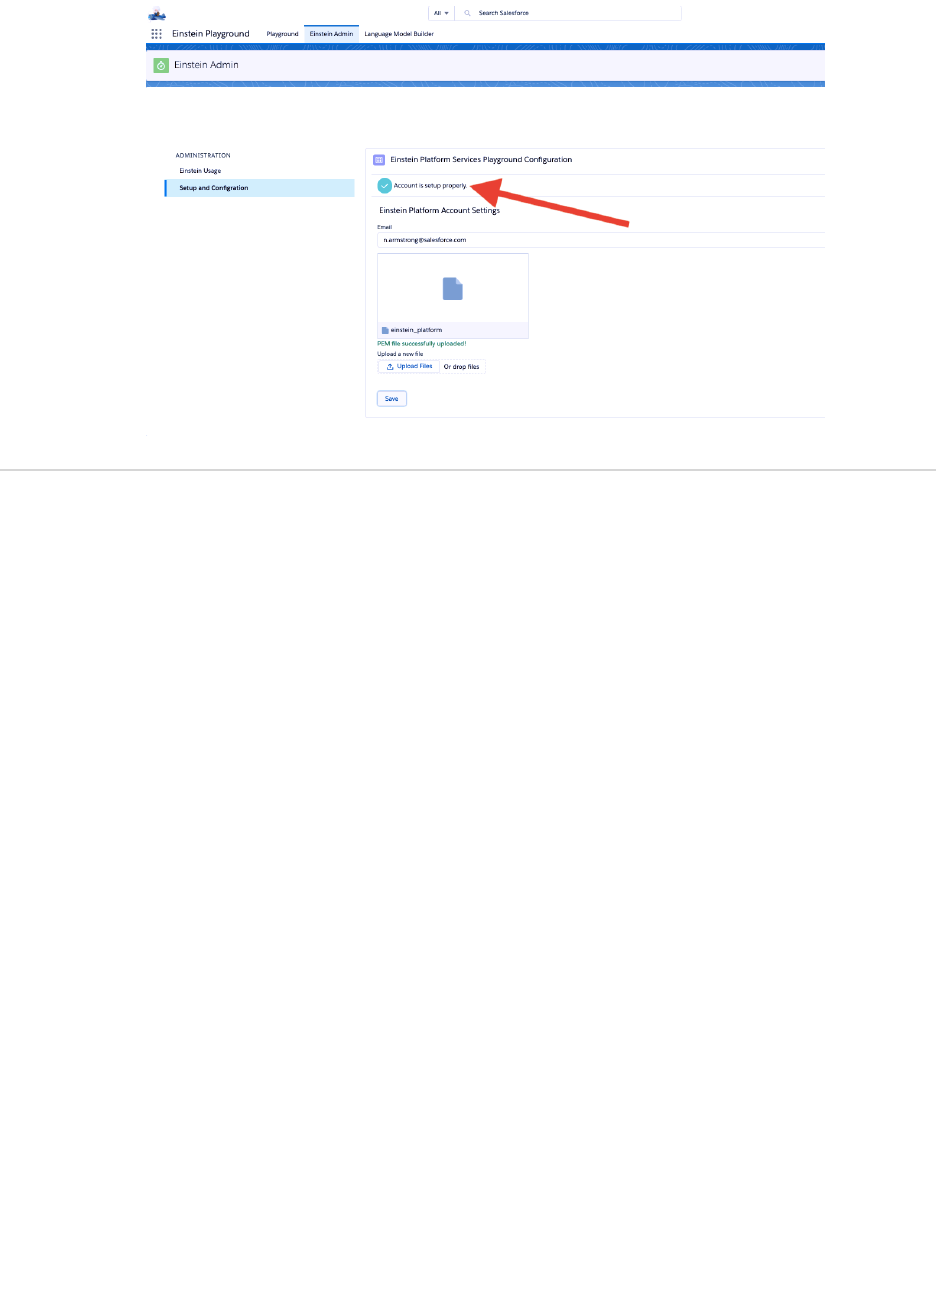
ClickEinstein Admin. The error is expected.
Click Setup and Configuration.Add the email address that you used to sign up for anEinstein Platform
Services account. Upload your PEM File.
Click Save. After you hit save you should see a message that the account is set up! Now you're ready to
create datasets and start making predictions!
Einstein Vision (Image Classification): Create and Train a Dataset to Create a
Model
Einstein Playground currently doesn't support adding more examples to an existing dataset. If you need to add more examples
to your dataset after the initial upload, use external API tools such as Postman or cURL.
CREATE THE DATA FILE
To create a dataset, first create a .zip file that contains all your example files (images) in a specific structure.
1.
a.
b.
c.
2.
Create a folder of images.
See and for guidelines. Create a Dataset From a Zip File Asynchronously Dataset and Model Best Practices
Download the sample .zip file for reference: http://einstein.ai/images/mountainvsbeach.zip
Your folder should contain a minimum of 40 images. Each label (subfolder) must have at least 15 images for
each label. We recommend adding more! Consider a few hundred if possible, a thousand is best!
Zip the folder of images into a single .zip file.
UPLOAD YOUR DATASET
The Einstein Playground currently provides two methods for uploading datasets: from a local drive or from a web location. The
maximum .zip file size you can upload from a local drive is 50 MB. The maximum .zip file size you can upload from a web
location is 1 GB. If your zip file is greater than 50 MB, youmust use the URL method.
Creating a Dataset from a File
1.
2.
3.
Navigate to thePlayground tab.
Select the Image Classificationtab and then3. Dataset Creation.

4.
5.
6.
ClickUpload examplesand navigate to the .zip file.
Click Done.
Click 1. Datasets and Models, and then click Refresh Datsets to see the new dataset.
Creating a Dataset from a URL
To use the URL method, you need an account on a file sharing service. You can use whatever service you like. The following
instructions use Dropbox as an example.
1.
2.
a.
b.
c.
d.
e.
3.
4.
5.
6.
7.
Upload your .zip file to Dropbox.
Get the direct download link for the file. The method to do this will vary by server. For Dropbox:
Click theSharebutton next to your file
In the dialog, click Copy linkto put the link on your clipboard
Paste the link in the File urlfield in a text editor
Replace the hostwww.dropbox.comwithdl.dropbox usercont ent .comin the URL. Your resulting URL
should look something
likehttps://dl.dropboxusercontent.com/s/8fup846bfc32sse/LegoPeople.zip?dl=0
To verify that you have the right kind of URL, paste the URL into an incognito browser window and make sure the
fileimmediatelystarts downloading. If you see a web page and have to click <download>, or you get a sign-in
page, then it'snot a direct download link.
Navigate to thePlaygroundtab.
Select theImage Classificationtab and then3. Dataset Creation.
Paste the direct download link in the File urlfield. Alternatively, you can use this image dataset that contains images of
mountains and beaches: https://einstein.ai/images/mountainvsbeach.zip.
Click Create.
Click 1. Datasets and Models, and then click Refresh Datsets to see the new dataset.
TRAIN THE DATASET TO CREATE A MODEL
Now that your dataset has been uploaded, you train it to create the model. Training the dataset is the process through which a
model is created and learns the classification rules based on the examples in your dataset.
1.
2.
Navigate toImage Classification>1. Datasets and Models. If you don't see the dataset you just uploaded,
clickRefresh Datasets.

3.
4.
5.
6.
7.
8.
9.
10.
Locate your new dataset. You see a list that contains all the labels in the dataset and the number of examples in each
label. Note that theModelstab indicates there are0models.
ClickTrainonce.The toast message indicates that the training process has started.
Click the Modelstab next to the Labelstab. You see that your new model's training is running.
It may take some time to train your dataset. Get up and grab a coffee while you wait! Training typically takes 5 to 30
minutes. Periodically clickRefresh Models. When the training process is complete and the model is ready, you see
something like this:

If after 30 minutes, you still can't do a prediction, you will need to get help from a Pathfinder or use Postman and the
documentation. See . https://metamind.readme.io/ Troubleshooting
Einstein Vision (Image Classification): Get a Prediction
The Einstein Playground provides a simple way to test out your model before implementing anything in your Salesforce org.
1.
2.
3.
4.
5.
6.
SelectImage Classification>2. Prediction.
Select a model to use for your prediction. You see three pre-built models that are available from Einstein Platform
Services out of the box. In addition, you see any custom models you created.
Select the image you want to predict. Two options are available in Einstein Playground: providing a URL to the image or
uploading the image file. The prediction process will begin.
After several seconds, the prediction response appears in the Response section.

Einstein Language (Intent): Create and Train a Dataset to Create a Model
UPLOAD YOUR DATASET
1.
2.
3.
a.
4.
An intent sample dataset has already been created for you.
NavigateIntent> 3. Dataset Creation.
Now all you have to do is click Create. If you have your own dataset, replace the link in the File url field with your own
link. 's an example dataset if you want to create your own. Here
At this point you should see a success message saying that your dataset was created successfully.
TRAIN THE DATASET TO CREATE A MODEL
1.
a.
To train the dataset, navigate to Intent> 1. Datasets and Models. You should be able to see the new dataset. If you
don't see the new dataset, click Refresh Datasets. ClickTrainto create your first model!

2.
a.
3.
a.
You should be able to see a success message at this point as well.
You can now track the progress by navigating to the Modelstab. When the status is SUCCEEDED, your model is ready
to make predictions.
Einstein Language (Intent): Get a Prediction

The Einstein Playground provides a simple way you can test out your models before implementing anything in your Salesforce
org.
1.
2.
3.
4.
5.
6.
Select Intent >2. Prediction.
Select a model to use for your predictions.You see three pre-built models that are available from Einstein Platform
Services out of the box. In addition, you see any custom models you created.
Type in the text you want to predict and click Send.
After several seconds, the prediction response appears in the Response section.
Einstein Language (Sentiment): Create and Train a Dataset to Create a Model
UPLOAD YOUR DATASET
1. The Einstein Sentiment APIs come with a pre-built sentiment model. You can choose to create your own dataset the
same way you did for intent.
TRAIN THE DATASET TO CREATE A MODEL
1.
2.
To train the dataset and create a model, navigate to Sentiment > 1. Datasets and Models. You should be able to see
the newly created dataset (if not, refresh the page). Now hit theTrainbutton to create your first model! You should be
able to see a success message at this point as well.
You can now track the progress by navigating to the models tab. Wait till the status changes to succeeded!
Einstein Language (Sentiment): Get a Prediction
The Einstein Playground provides a simple way you can test out your models before implementing anything in your Salesforce

org.
1.
2.
3.
4.
Select Intent >2. Prediction.
Select a model to use for your prediction.In this case, selectPre-Built - Community Sentiment Model.If you created
your own model, you see it in the picklist.
Type in the text you want to predict and click Send. After several seconds, the prediction response appears in the
Response section.
Troubleshooting
1.
2.
3.
4.
5.
6.
7.
8.
If you get an error, double check that you have properly saved your email and token in the Einstein Vision Admin
Component.
Try using small images that are < 100K and 100x100 to 400x400 pixels in size with short file names.
You must have 14+ images per folder/label (ten is the minimum but a percentage of images are held out for training
validation).
Double check .Considerations for Creating Image Datasets
Try using Postman to build the data set: https://metamind.readme.io/docs/create-examples-from-zip
Reach out to your Einstein Pathfinder.
If your training failed, you can see the error message. Screenshot below:
Considerations for Creating Image Datasets
https://metamind.readme.io/docs/create-a-dataset-zip-async
Keep the following points in mind when creating datasets.

●
●
●
●
●
●
●
●
●
●
When specifying the URL for a .zip file in a cloud drive service like Dropbox, be sure it's a link to the file and not a link to
the interactive download page. For example, the URL should look like
https://www.dropbox.com/s/abcdxyz/mountainvsbeach.zip?dl=1
The maximum image file name length is 100 characters including the file extension. If the .zip file contains a file with a
name greater than 100 characters (including the file extension), the example is created in the dataset, but the API
truncates the example name to 100 characters.
The maximum directory name length is 180 characters. If the .zip file contains a directory with a name greater than 180
characters, the label is created in the dataset, but the API truncates the label name to 180 characters.
Unicode characters aren't supported in .zip file names, directory names, or image file names. If you have any non-ASCII
characters in any of these names, you'll see unpredictable names and training the dataset might fail. For example, if the
.zip file contains an image file called HôtelDeVille.jpg, you might be able to upload the example, but the API returns an
error when you try to train the dataset.
Image files must be smaller than 1 MB. If the .zip file contains image files larger than 1 MB, the image won't be loaded
and no error is returned.
Images must be no larger than 2,000 pixels high by 2,000 pixels wide. You can upload images that are larger, but
training the dataset might fail.
The supported image file types are PNG, JPG, and JPEG. If the .zip file contains any unsupported image file types,
those images won't be uploaded and no error is returned.
In the case of duplicate image files in the .zip file, only the first file is uploaded. If there's more than one image file in the
same directory, with the same name and the same file contents, only the first file is uploaded and the others are
skipped.
If the .zip file contains an image file that has a name containing spaces, the spaces are removed from the file name
before the file is uploaded. For example, if you have a file called sandy beach.jpg the example name becomes
sandybeach.jpg.
Each label in the data set should have 14 images or more (10 might be OK) and you can't just duplicate the same
image.
