

MobileIron Core 11.0.0.0 System Manager Guide| 2
Copyright © 2009 - 2020 MobileIron, Inc. All Rights Reserved.
Any reproduction or redistribution of part or all of these materials is strictly prohibited. Information in this publication
is subject to change without notice. MobileIron, Inc. does not warrant the use of this publication. For some phone
images, a third-party database and image library, Copyright © 2007-2009 Aeleeta's Art and Design Studio, is used.
This database and image library cannot be distributed separate from the MobileIron product.
“MobileIron,” the MobileIron logos and other trade names, trademarks or service marks of MobileIron, Inc.
appearing in this documentation are the property of MobileIron, Inc. This documentation contains additional trade
names, trademarks and service marks of others, which are the property of their respective owners. We do not
intend our use or display of other companies’ trade names, trademarks or service marks to imply a relationship
with, or endorsement or sponsorship of us by, these other companies.

MobileIron Core 11.0.0.0 System Manager Guide| 3
New Features and Enhancements
This guide documents the following new features and enhancements for Core release 11.0.0.0:
l
SSP-related log files now available: With this release, you can view and download self-service user
portal (SSP)-related log files from the System Manager > Troubleshooting > Logs page.
FIGURE 1. VIEW OR DOWNLOAD SSP LOG FILES
o
To view the SSP-related logs, click the SSP link in the View Module Logs section (1). A scrolling
window opens, displaying the logs (2).
o
To download the SSP-related logs, enter your criteria in the Export Logs section. Select Download as
the Export type (3)(HTTP and SFTP are not supported at this time). Click Export (4).
For more information about log files, see Working with logs.
New Features and Enhancements

MobileIron Core 11.0.0.0 System Manager Guide| 4
Contents
New Features and Enhancements 3
Contents 4
Introducing System Manager 14
System Manager Overview 14
Documentation resources 14
Terminology 14
Starting System Manager 14
Starting System Manager using the URL 15
Starting System Manager from the Admin Portal 15
Logging into the System Manager 15
Logging into the System Manager with user ID and password 16
Logging in to the System Manager with a smart card 16
System Manager Workspace 17
System Manager menus 17
System Settings 21
Settings overview 21
Network: Interfaces 22
Physical interface mapping to M2600 NIC ports 23
Changing physical interfaces 23
Modify Interface window field description 23
Adding VLAN interfaces 24
Add VLAN window field description 24
Deleting a VLAN interface 25
Network: Routes 25
Adding network routes 25
Add Route window 25
Contents

MobileIron Core 11.0.0.0 System Manager Guide| 5
Deleting a network route 26
DNS and Hostname 26
Modifying the DNS configuration 26
DNS Configuration window 26
Static Hosts 27
Adding hosts 27
Add Host window 27
Editing hosts 27
Deleting hosts 28
Date and Time (NTP) 28
Editing date and time 28
Data and Time window 28
CLI 29
Editing CLI settings 29
CLI Configuration window 29
Data Export: Splunk 30
Enabling the Splunk Forwarder 31
Adding a Splunk Indexer 31
Add Splunk Indexer window 31
Configuring Splunk Data 31
Data Export: SysLog 32
Exporting syslog data 33
Configuring the syslog servers 33
Add SysLog window 33
View Data Export: SysLog Advanced Options categories 35
Configuring the syslog data to export 35
Data Export: Reporting Database 35
Generating the authentication token 35
Configuring the Reporting Database Exporter 36
Contents

MobileIron Core 11.0.0.0 System Manager Guide| 6
Log Upload 36
Setting a log upload user 36
SNMP 37
Configuring SNMP on MobileIron Core 37
Configuring the SNMP trap receiver server 37
Add SNMP Trap Receiver window 38
Deleting SNMP trap receiver servers 38
Enabling the SNMP service with the v3 protocol 38
Add SNMP v3 User window 39
Deleting SNMP v3 users 39
Enabling the SNMP service with the v2c protocol 40
Email Settings 40
Testing email configurations 40
Deleting the email configuration 41
Email Configuration window 41
Port Settings 42
Changing port settings 42
Changing the default CRL protocol and port configuration 43
Verifying Sentry connectivity 43
Port Configuration window 44
Data Purge 46
Configuring manual or automatic data purge 46
Configuring audit log purge 47
Manually purging DB data using CLI commands 48
Setting up the system storage alert 48
Services 49
Managing Services 49
Security Settings 50
Security overview 50
Contents

MobileIron Core 11.0.0.0 System Manager Guide| 7
Identity Source: Local Users 52
Adding local System Manager users 52
Add New User window 52
Editing local System Manager users 53
Deleting local System Manager users 54
Identity Source: Password Policy 54
System Manager local user password policy overview 54
Local user password complexity enforcement 55
Local user password strength enforcement 55
Setting password policy 56
Local user password complexity enforcement details 56
Local user password strength enforcement details 58
Local user password strength value descriptions 59
Certificate Mgmt 61
Certificates you configure in the System Manager 62
Generate a self-signed certificate 64
Certificate signing request (CSR) requirements 64
Generate a certificate signing request (CSR) 65
Upload client certificate (CSR) window 66
Uploading certificates 67
Viewing certificates 67
Access Control Lists: Networks and Hosts 68
Adding a host or subnet mask 68
Add Network/Hosts window 68
Access Control Lists: Network Services 69
Adding a service 69
Add Network Services window 69
Access Control Lists: ACLs 70
Adding an ACL 70
Contents

MobileIron Core 11.0.0.0 System Manager Guide| 8
Add ACE window 71
Editing an ACL 71
Copying an ACL 72
Deleting an ACL 72
Access Control Lists: Portal ACLs 72
Enabling an ACL Portal 72
Portal ACLs window 73
Advanced: Host Header Validation 74
Selecting host header validation 74
Strict Host Header Validation options 74
Advanced: HSTS 75
Before enabling HSTS 75
Enabling HSTS 76
Disabling HSTS 76
Advanced: Incoming SSL Configuration 76
Protocols and cipher suites on Core first-time installation 77
Protocol versions for incoming connections on upgrade 77
Cipher suites for incoming connections on upgrade 78
Protocol version negotiation for incoming SSL/TLS connections 78
Verify server requirements for incoming SSL/TLS connections 79
Configuring incoming SSL/TLS connections 79
Prerequisites for configuring incoming SSL/TLS connections 79
Configuring the cipher suites for incoming SSL/TLS connections 79
Changing to the default set of cipher suites for incoming connections 80
Advanced: ModSecurity 81
Enabling ModSecurity 81
Configuring Detection Only mode 82
Viewing ModSecurity logs 82
Advanced: Outgoing SSL Configuration 82
Contents

MobileIron Core 11.0.0.0 System Manager Guide| 9
Protocols and cipher suites on Core first-time installation 83
Protocols and cipher suites on Core upgrades 84
Protocol versions for outgoing connections on upgrade 84
Cipher suites for outgoing connections on upgrade 84
Protocol version negotiation for outgoing SSL/TLS connections 85
Determining which servers use which protocol versions and cipher suites 85
Configuring outgoing SSL/TLS connections 87
Prerequisites for configuring outgoing SSL/TLS connections 87
Configuring the cipher suites for outgoing SSL/TLS connections 87
Changing to the default set of cipher suites for outgoing connections 88
External servers connected to with outgoing SSL connections 89
Advanced: SAML 89
Configuring SAML/IdP support 90
Deactivating or deleting the IdP metadata file 91
Advanced: Trusted Front End 91
Advanced: Portal Authentication 93
Self-service user portal authentication 93
Admin Portal authentication 94
System Manager authentication 94
Certificates required for certificate authentication to Core portals 95
Certificate attribute mapping used in certificate authentication to the Core portals 96
Using $EDIPI$ in certificate authentication 97
Entrust URL for getting derived credentials 98
Configuring password authentication to a Core portal 98
Configuring certificate authentication to the user portal 99
Configuring certificate authentication to the Admin Portal 100
Configuring certificate authentication to the System Manager 101
Configuring the Entrust URL for getting derived credentials 101
Replacing the certificate for authentication 102
Contents

MobileIron Core 11.0.0.0 System Manager Guide| 10
Advanced: SSH Configuration 102
Default SSH configuration 103
FIPS SSH configuration 103
CC SSH configurations 104
Maintenance Settings 105
Maintenance overview 105
Software updates 106
Self Diagnosis 106
Self Diagnosis window 107
Self Diagnosis table 107
History button 108
Run Diagnosis option 108
Preferences options 108
Using self diagnosis 109
Export configuration 110
Import a configuration 110
Clear configuration 110
System Storage 111
Configuring system storage thresholds 112
Warning Threshold email 113
Stop Threshold email 113
Stopped Core services 113
Increasing available disk storage 113
Restart Core services 114
Restarting Core services using System Manager 114
Restarting Core services using the CLI 114
Reboot 114
System backup 115
Prerequisites for configuring system backups 115
Contents

MobileIron Core 11.0.0.0 System Manager Guide| 11
Enabling backups 116
System backup status 116
System backup email notifications 117
Configuring system backup settings 118
System Backup Configuration group 119
Running an immediate system backup 120
Backup filename format 120
Viewing backup logs 120
Restore a system backup 120
Restoring only data 121
Create local backup 122
Configuring local backup 122
Restore System 123
Optimize database 123
Optimizing the database 123
Do not reboot Core while database optimization is running 124
Optimize the database after deleting retired devices 124
Optimizing the database 124
Optimization tables 125
Troubleshooting 126
Troubleshooting overview 126
Working with logs 126
Setting the log level for Stunnel and HTTPD logs 127
Setting the Stunnel log level 127
Setting the httpd log level 127
Enabling debugging for MobileIron modules 127
Disabling debugging 128
Disabling all debugging 128
Disabling debugging for MICS or the employee portal 128
Contents

MobileIron Core 11.0.0.0 System Manager Guide| 12
Disabling debugging for MIFS packages 128
Clearing logs 128
Log Names 129
Viewing logs 130
Viewing only new log entries 130
Viewing logs by device or user 130
Exporting logs 131
Network monitor 132
Enabling debugging 132
Span Monitor Configuration 132
Service diagnosis 133
LDAP sync history 133
System monitor 133
Running the system monitor 134
Configuring the server to upload the log files to 134
Configuring the system monitor 135
The system monitor files 135
Queue Activation 136
In-Memory Queue Monitor 136
Upgrading MobileIron Core Releases 138
Upgrading overview 138
Upgrade planning notes 138
First-generation physical appliances 139
Upgrade URLs 139
Preparing the Windows Phone app 139
Activating Apple Device Enrollment after upgrading 139
LDAP group user and group names for IBM Domino server 140
SMS option in Privacy policy 140
Upgrade Core using System Manager 140
Contents

MobileIron Core 11.0.0.0 System Manager Guide| 13
CDN preparation 140
VM requirements 141
Backup availability 141
Updating Core 141
Verifying the upgrade is complete 142
Viewing upgrade status 143
Updating Core using the CLI 143
Configuring your update repo 143
Initiating the upgrade 144
Rebooting Core 144
MobileIron OS and platform updates 145
Automatic data update 145
Manual data update 145
Contents

1
MobileIron Core 11.0.0.0 System Manager Guide| 14
Introducing System Manager
• System Manager Overview
• Starting System Manager
• System Manager Workspace
System Manager Overview
After installing MobileIron Core, administrators have access to the following web portal tools:
l
System Manager: for performing most configuration tasks, including:
o
Configuring Core
o
Managing network settings
o
Managing Core within your infrastructure
o
Upgrading Core
o
Troubleshooting and maintenance
l
Admin Portal: for performing most common administrative tasks.
Refer to your MobileIron Core Device Management Guide for information on using the Admin Portal.
Documentation resources provides instructions on how to access MobileIron product documentation.
Documentation resources
MobileIron Core and related product documentation is available in the Support Community:
https://community.mobileiron.com/welcome
MobileIron Support credentials are required to access the Support Community.
Terminology
The following terminology is used in this document.
l MICS: MobileIron Configuration Service (the service that supports System Manager)
l MIFS: MobileIron File Service (the service that supports the rest of MobileIron Core)
Starting System Manager
You can start System Manager two ways:

MobileIron Core 11.0.0.0 System Manager Guide| 15
l Starting System Manager using the URL
l Starting System Manager from the Admin Portal
Starting System Manager using the URL
Procedure
To start System Manager using the System Manager URL:
1.
Open a supported browser.
Refer to the latest release notes for information on supported and compatible browsers.
2.
Enter your Core URL in the browser to open the System Manager log in screen.
For example: https://<Core_fully_qualified_hostname>:8443/mics
Starting System Manager from the Admin Portal
Procedure
To start System Manager from the Admin Portal:
1. Log into the into Admin Portal.
2. Click on the person icon at the top right of the Admin Portal page.
3.
Select System Manager from the menu to open the System Manager workspace.
The System Manager login screen displays.
Logging into the System Manager
When first setting up MobileIron Core, a system administrator determines which login methods are allowed for the
System Manager.
l Logging into the System Manager with user ID and password
l Logging in to the System Manager with a smart card
Starting System Manager using the URL

MobileIron Core 11.0.0.0 System Manager Guide| 16
Related topics
l Advanced: Portal Authentication
l Identity Source: Local Users
Logging into the System Manager with user ID and password
If supported by your system administrator, you can login to the System Manager with a user ID and password.
Refer to Advanced: Portal Authentication for information on setting up this authentication method. The user ID is
case-sensitive and must be either:
l the user ID created during the initial setup of MobileIron Core
l the user ID created in the System Manager under Security > Identity Source > Local Users.
Procedure
1. In the web browser displaying the System Manager login screen, enter the user ID and password of a
System Manager user.
2. Click SIGN IN to open the System Manager workspace.
Logging in to the System Manager with a smart card
If supported by your system administrator, you can login to the System Manager on a desktop computer using an
identity certificate on a smart card. Refer to Advanced: Portal Authentication for information on setting up this
authentication method. This user must a local user created in the System Manager under Security > Identity
Source > Local Users.
This authentication method is supported only on desktop computers. It is not
supported on mobile devices. Also, it is not supported with Firefox.
Procedure
1.
Attach your smart card reader with your smart card to a USB port on the desktop computer.
If your computer has a built-in smart card reader, insert your smart card.
2. Go to the URL of the System Manager at https://<fully_qualified_hostname>:8443/mics
3.
If you are not logged in, select Sign In With Certificate.
A prompt appears to select your certificate.
4. Select the certificate from the smart card.
5.
If prompted, enter the password of the private key of the identity certificate on your smart card.
The System Manager workspace displays.
Logging into the System Manager with user ID and password

MobileIron Core 11.0.0.0 System Manager Guide| 17
System Manager Workspace
System Manager is a web-based portal where you can perform most configuration tasks. When you log into
System Manager, you are presented with the System Manager workspace, which has the following components
(the number listed below correspond to the numbers in System Manager workspace):
1. Admin Portal link: opens the Admin Portal.
2. Sign Out button: exits System Manager and automatically retain (but does not save) current settings,
however, rebooting Core without saving settings returns Core to its previously-saved configuration.
3. Save button: saves current settings.
4. Menu tabs: lists the top-level System Manager functionality.
5. Menu items pane: lists each item associated with the selected menu.
6. Menu item details pane: lists the detailed functionality and options for the selected menu item.
7. Menu item(s) breadcrumbs: provides a menu > menu item path.
FIGURE 2. SYSTEM MANAGER WORKSPACE
System Manager menus
The following table describes the top-level menus, menu items associated with each menu, and the tasks of each
menu item.
System Manager Workspace

MobileIron Core 11.0.0.0 System Manager Guide| 18
Menu Item Task
Settings Menu
Network > Interfaces
l Change physical interface settings
l Add VLAN interfaces
l Change VLAN interfaces
Network > Routes
l Change the default gateway
l Route through different gateways
DNS and Hostname Change DNS servers
Static Hosts Edit the host list for MobileIron Core
Date and Time (NTP) Change the time source used by Core
CLI
l Change the Enable Secret set during installation
l Enable/Disable ssh access
l Change ssh settings
Data Export > Splunk Indexer
Configure a Splunk indexer
Data Export > Splunk Data
Configure the data to export to Splunk
Data Export > Syslog Servers
Configure syslog servers.
Data Export > SysLog Data
Configure the data to export to Syslog servers.
Data Export > Reporting Database Configure the authentication token for the Reporting Database
and the data to export
Log Upload Upload log files to an external server.
SNMP Configure SNMP servers
Email Settings Configure SMTP settings for communication between Core and
devices
Port Settings Change default port configuration for Core
Data Purge Configure automated data purging
Services Enable/Disable Core services
Security Menu
Identity Source > Local Users Create, delete, and manage local users for System Manager.
TABLE 1. SYSTEM MANAGER MENUS
System Manager menus

MobileIron Core 11.0.0.0 System Manager Guide| 19
Menu Item Task
Identity Source > Password Policy Create, edit, and restore default values for password in the
System Manager.
Certificate Mgmt
l View and manage certificates for:
l Portal HTTPS
l Client TLS
l iOS Enrollment
Access Control Lists > Networks &
Hosts
Create and manage entries for networks and hosts
Access Control Lists > Network
Services
Create and manage entries for network services
Access Control Lists > ACLs Compile access control lists
Access Control Lists > Portal ACLs Compile access control lists for specific MobileIron Core
components
Advanced > Host Header Validation Enhance security of incoming HTTP traffic in MobileIron Core, by
validating HTTP host headers
Advanced > HSTS HSTS provides an additional layer of security for HTTPS,
reducing the ability to intercept requests and responses between
a user and a web application server.
Advanced > Incoming SSL Configuration Select protocols and cipher suites other than the defaults for
incoming SSL/TLS connections
Advanced > ModSecurity Configure protection against certain types of future public security
vulnerabilities
Advanced > Outgoing SSL Configuration Select protocols and cipher suites other than the defaults for
outgoing SSL/TLS connections.
Advanced > SAML Allows local admin users to use single-sign on for the Admin
Portal and Self-Service User Portal.
Advanced > Trusted Front End Set up a Trusted Front End for communication from devices to
Core.
Advanced > Portal Authentication Select whether device users authenticate to the self-service user
portal, Admin Portal, and System Manager with a password,
certificate, or both.
Advanced > SSH Configuration
Configures ciphers, key exchange algorithms and hmacs.
TABLE 1. SYSTEM MANAGER MENUS (CONT.)
System Manager menus

MobileIron Core 11.0.0.0 System Manager Guide| 20
Menu Item Task
Maintenance Menu
Software Updates
Update the following information with a Core upgrade: device
operating system, version information, platform type
Self Diagnosis
Automates maintenance by providing rapid responses to fixing
important issues and reducing the need for patch releases.
Export Configuration
Export MobileIron Server configuration settings to XML format.
Import Configuration
Import a MobileIron Server configuration from a local XML file or
FTP site.
Clear Configuration
Clear unsaved configuration settings and return to the default
configuration.
System Storage
Monitor disk storage availability.
Reboot
Clear current configuration settings and restart all server
modules.
System Backup
Back up system configurations.
Optimize Database
Optimize Core database performance by cleaning up
fragmentation in the database
Troubleshooting Menu
Logs
Use logs to debug the system.
Network Monitor
Produces a TCP dump for one of the MobileIron Server physical
interfaces.
Service Diagnosis
Check the health of multiple services, such as MapQuest, DNS,
NTP, and Email.
System Monitor
Monitor Core performance in log files that contain performance
information about CPU usage, memory usage, threads, tomcat
performance, database performance, and mysql logs.
Queue Activation
Provides data about Queue Activation that is useful to MobileIron
Technical Support.
In-Memory Queue Monitor
Provides MobileIron Technical Support with information about
tasks in the queue in your Core memory.
TABLE 1. SYSTEM MANAGER MENUS (CONT.)
System Manager menus

2
MobileIron Core 11.0.0.0 System Manager Guide| 21
System Settings
l Settings overview
l Network: Interfaces
l Network: Routes
l DNS and Hostname
l Static Hosts
l Date and Time (NTP)
l CLI
l Data Export: Splunk
l Data Export: SysLog
l Data Export: Reporting Database
l Log Upload
l SNMP
l Email Settings
l Port Settings
l Data Purge
l Services
Settings overview
System Manager Settings contains menu items for configuring MobileIron Core. The following table summarizes
the tasks associated with each menu item.
Settings Menu Task
Network > Interfaces
l Change physical interface settings
l Add VLAN interfaces
l Change VLAN interfaces
Network > Routes
l Change the default gateway
l Route through different gateways
DNS and Hostname Change DNS server details
TABLE 2. SYSTEM MANAGER SETTINGS MENU ITEMS

MobileIron Core 11.0.0.0 System Manager Guide| 22
Settings Menu Task
Static Hosts Add, edit, and delete the host list for MobileIron Core
Date and Time (NTP) Change the time source used by Core
CLI
l Change the Enable Secret set during installation
l Enable/Disable ssh access
l Change ssh settings
Data Export > Splunk Indexer
Configure a Splunk indexer
Data Export > Splunk Data
Configure the data to export to Splunk
Data Export > Syslog Servers
Configure Syslog servers.
Data Export > SysLog Data
Configure the data to export to Syslog servers.
Data Export > Reporting Database Configure the authentication token for the Reporting Database and the
data to export
Log Upload Upload log files to an external server.
SNMP Configure SNMP servers
Email Settings Configure SMTP settings for communication between Core and
devices
Port Settings Change default port configuration for Core
Data Purge Configure automated data purging
Services Enable/Disable Core services
TABLE 2. SYSTEM MANAGER SETTINGS MENU ITEMS (CONT.)
Network: Interfaces
Use the Settings > Network > Interfaces menu options to change parameters for the following network interface
points for MobileIron Core:
l Physical interfaces: are configured as part of the installation process.
l Virtual Local Area Network (VLAN) interfaces: are optional interfaces you can configure on MobileIron
Core to manage bandwidth and load balancing.
This section includes the following topics:
l Physical interface mapping to M2600 NIC ports
l Changing physical interfaces
Network: Interfaces

MobileIron Core 11.0.0.0 System Manager Guide| 23
l Modify Interface window field description
l Adding VLAN interfaces
l Add VLAN window field description
l Deleting a VLAN interface
Physical interface mapping to M2600 NIC ports
The following table provides a mapping of the physical interface name in the MobileIron Core System Manager to
the physical NIC port in the M2600 appliance.
Physical interface M2600 NIC port
GigabitEthernet1 I - eth0 (NIC-3)
GigabitEthernet2 J - eth1 (NIC-4)
GigabitEthernet3 K- eth2 (NIC-5)
GigabitEthernet4 L- eth3 (NIC-6)
GigabitEthernet5 C- eth4 (NIC-1)
GigabitEthernet6 D- eth5 (NIC-2)
TABLE 3. PHYSICAL INTERFACE MAPPING TO M2600 NIC PORTS
Changing physical interfaces
Procedure
To change a physical interface:
1. In the MobileIron Core System Manager, go to Settings > Network > Interfaces.
2. Click the interface name in the Physical Interfaces group to open the Modify Interface window.
3.
Modify one or more of the interface fields, as necessary.
Refer to the Modify Interface window field description table for details.
4. Click Apply > OK to save the changes.
Modify Interface window field description
The following table summarizes fields and descriptions in the Modify Interface window:
Physicalinterface mapping to M2600 NIC ports

MobileIron Core 11.0.0.0 System Manager Guide| 24
Fields Description
IP Enter the IP address of the physical network interface.
Unless you are configuring a standalone implementation for a small trial, you should
specify at least one physical interface.
Mask Enter the netmask of the physical network interface.
ACL Name Select an Access Control List for this interface.
Admin State To enable this interface for use with the MobileIron system, click Enable. To temporarily
prevent use of this interface with the MobileIron system, click Disable.
TABLE 4. MODIFY INTERFACE WINDOW FIELD DESCRIPTION
Adding VLAN interfaces
The following describes how to add a VLAN interface.
Procedure
1. In the MobileIron Core System Manager, go to Settings > Network > Interfaces.
2. Go to the VLAN Interfaces group.
3. Click Add to open the Add VLAN window.
4.
Configure the VLAN interface, as necessary.
Refer to the Add VLAN window field description table for details.
5. Click Apply > OK to save the changes.
Add VLAN window field description
The following table summarizes fields and descriptions in the Add VLAN window:
Fields Description
VLAN ID Specify a number between 2 and 4094.
IP Address Enter the IP address for this VLAN interface.
Mask Enter the netmask for this VLAN interface.
Physical Interface Select the physical interface that corresponds to this VLAN interface.
ACL Name Select an Access Control List for this interface. See Portal ACLs window.
Admin State To enable this interface, click Enable. To temporarily suspend use of this VLAN, click
Disable.
TABLE 5. VLAN WINDOW FIELD DESCRIPTION
Adding VLAN interfaces

MobileIron Core 11.0.0.0 System Manager Guide| 25
Deleting a VLAN interface
The following describes how to delete a Virtual Local Area Network (VLAN) interface:
Procedure
1. In the MobileIron Core System Manager, go to Settings > Network > Interfaces.
2. Go to the VLAN Interfaces group.
3. Select the VLAN you want to remove.
4. Click Delete > Yes.
Network: Routes
Use the Network > Routes menu options to create and maintain static network routes within the enterprise. This
section includes the following topics:
l Adding network routes
l Add Route window
l Deleting a network route
Adding network routes
Procedure
1. Log into System Manager.
2. Go to Settings > Network > Routes.
3. Click Add to open the Add Route window.
4.
Configure the network route, as necessary.
Refer to the Add Route window table for details.
5. Click Apply > OK to save the changes.
Add Route window
The following table summarizes fields and descriptions in the Add Route window:
Fields Description
Network Enter the network IP address.
Mask Enter the subnet mask.
Gateway Enter the IP address for the gateway.
Deleting a VLAN interface

MobileIron Core 11.0.0.0 System Manager Guide| 26
Deleting a network route
To delete a network route:
1. Log into System Manager.
2. Go to Settings > Network > Routes.
3. Select the entry you want to delete.
4. Click Delete > Yes.
DNS and Hostname
Use the Settings > DNS and Hostname window to manage the hostname, default domain, and DNS information
entered during installation. This section includes the following topics:
l Modifying the DNS configuration
l DNS Configuration window
Modifying the DNS configuration
Procedure
To modify the DNS configuration and hostname:
1. Log into System Manager.
2. Go to Settings > DNS and Hostname to display the DSN Configuration options.
3.
Configure the host, as necessary.
Refer to the DNS Configuration window table for details.
4. Click Apply > OK to save the changes.
DNS Configuration window
The following table summarizes fields and descriptions in the DNS Configuration window:
Fields Description
Host name Specify the fully-qualified host name for the appliance.
Default Domain Specify the default domain for the appliance.
Preferred DNS Server Specify the IP address of the primary DNS server to use.
Alternate DNS Server 1 Specify the IP address of an optional alternate DNS server.
Alternate DNS Server 2 Specify the IP address of an optional alternate DNS server.
Deleting a network route
MobileIron Core 11.0.0.0 System Manager Guide| 27
Static Hosts
Use the Settings > Static Hosts options to edit the hosts file when:
l DNS is not available or does not resolve the necessary names.
l DNS resolves the hostname to the external IP, but you want the traffic to go via the internal IP.
This section includes the following topics:
l Adding hosts
l Add Host window
l Editing hosts
Adding hosts
Procedure
1. Log into System Manager.
2. Go to Settings > Static Hosts.
3. Click Add to open the Add Host window.
4.
Configure the host, as necessary.
Refer to the Add Host window table for details.
5. Click Apply > OK to save the changes.
Add Host window
The following table summarizes fields and descriptions in the Add Host window:
Fields Description
IP Address The IP address for the host you are adding.
FQDN The fully-qualified domain name for this host, as in appdoc1.mycompany.com.
Alias The alias for this host.
Editing hosts
Procedure
1. Log into System Manager.
2. Go to Settings > Static Hosts.
3. Click the IP address to open the Modify Host window.
Static Hosts

MobileIron Core 11.0.0.0 System Manager Guide| 28
4.
Edit the fields, as necessary.
Refer to the Add Host window table for details.
5. Click Apply > OK to save the changes.
Deleting hosts
Procedure
1. Log into System Manager.
2. Go to Settings > Static Hosts.
3. Select the entry you want to delete.
4. Click Delete > Yes.
Date and Time (NTP)
Use the Settings > Date and Time (NTP) options to manage Network Time Protocol (NTP) information specified
during installation. This configuration step is optional, but is recommended due to the effect of database
timestamps on the behavior of the system, as well as on the quality of reporting.
Currently, only UTC time format is supported for NTP. If you want to use a time format other than UTC, you must
choose the local time source instead..
This section includes the following topics:
l Editing date and time
l Data and Time window
Editing date and time
Procedure
1. Log into System Manager.
2. Go to Settings > Date and Time (NTP).
3.
Edit the fields, as necessary.
Refer to the Data and Time window table for details.
4. Click Apply > OK to save the changes.
Data and Time window
The following table summarizes fields and descriptions in the Date and Time window:
Deleting hosts
MobileIron Core 11.0.0.0 System Manager Guide| 29
Fields Description
Time Source
l Select NTP if you intend to specify one or more NTP servers.
l Select Local if you intend to use the system time of the MobileIron
Server.
If you select NTP for the time source
Primary Server Specify the IP address or fully-qualified host name for the NTP server to use.
Secondary Server Specify the IP address or fully-qualified host name for the first failover NTP
server to use.
Tertiary Server Specify the IP address or fully-qualified host name for the second failover NTP
server to use.
If you select Local for the time source
Date Enter the current date.
Time (Hours:Mins:Secs) Enter the current time in Hours:Mins:Secs.
CLI
Use the Settings > CLI options to manage command line interface access settings specified during configuration.
This section includes the following topics:
l Editing CLI settings
l CLI Configuration window
Editing CLI settings
Procedure
1. Log into System Manager.
2. Go to Settings > CLI to open the CLI Configuration window.
3.
Modify one or more of the CLI fields, as necessary.
Refer to the CLI Configuration window table for details.
4. Click Apply > OK to save the changes.
CLI Configuration window
The following table summarizes fields and descriptions in the CLI Configuration window:
CLI

MobileIron Core 11.0.0.0 System Manager Guide| 30
Fields Description
Enable Secret Click the Change Enable Secret link to require users to enter a password
in order to use the CLI.
Confirm Enable Secret Re-enter the specified password to confirm. This field displays only if you
click the Change Enable Secret link.
CLI Session Timeout (minutes) Specify the duration of inactivity on the SSH connection that will cause the
session to time out.
SSH Select Enable if you want to allow SSH access to the MobileIron
Administration tool.
Max SSH Sessions Specify the maximum number of simultaneous SSH sessions to allow.
Data Export: Splunk
The following system statistics are forwarded to Splunk Indexer:
l MobileIron Core Java Virtual Machine (JVM)
l CPU: including an overview and breakdown by host, process, user, stat, and source.
l Memory: including an overview and breakdown by host, process, user, and source.
l Disk: including usage by host, source, and files opened by command, type, and user.
l Network: including interfaces, interface throughput, connection details, and network sources.
Refer to the MobileIron Core Splunk Forwarder and App for Splunk Enterprise Guide for information on how to set
up the end-to-end MobileIron Splunk solution. Documentation resources provides instructions on how to access
MobileIron product documentation.
This section includes the general workflow to configure the Splunk Indexer:
Step 1 Enabling the Splunk Forwarder to turn on the Splunk Forwarder so it can push data to the
Splunk Indexer.
Step 2 Adding a Splunk Indexer to configure which external Splunk Indexer will receive and
manipulate the data from the Splunk Forwarder.
Step 3 Configuring Splunk Data to configure which data Splunk Forwarder sends to the Splunk
Indexer.
Data Export: Splunk

MobileIron Core 11.0.0.0 System Manager Guide| 31
Enabling the Splunk Forwarder
Procedure
1. Log into System Manager.
2. Go to Settings > Services.
3. Select Enable next to Splunk Forwarder.
4. Click Apply > OK to save the changes.
Adding a Splunk Indexer
Procedure
1. Log into System Manager.
2. Go to Settings > Data Export > Splunk Indexer.
3. Click Add to open the Add Splunk Indexer window.
4. Modify the fields, as necessary.
5. Refer to the Add Splunk Indexer window table for details.
6. Click Apply > OK to save the changes.
Add Splunk Indexer window
The following table summarizes fields and descriptions in the Add Splunk Indexer window:
Fields Description
Splunk Indexer Add the IP address of your Splunk Enterprise Server.
Port Add port of your Splunk Enterprise Server.
Enable SSL Click this check box to enable SSL
Configuring Splunk Data
Procedure
To configure the data to export to Splunk:
1. Log into System Manager.
2. Go to Settings > Data Export > Splunk Data to open the Data to Index window.
3.
Modify the fields, as necessary.
Click Show/Hide Advanced Options to further customize which data to send to Splunk.
4. Click Apply > OK.
Enabling the Splunk Forwarder

MobileIron Core 11.0.0.0 System Manager Guide| 32
5.
Restart the Splunk Forwarder by disabling it, then enabling it again.
a. Go to Settings > Services.
b. Select Disable next to Splunk Forwarder.
c. Click Apply > OK.
d. Select Enable next to Splunk Forwarder.
6. Click Apply > OK to save the changes.
Data Export: SysLog
SysLog is a standard for message logging. You can use a syslog server to gather, analyze, and report on
MobileIron Core activity. Using the System Manager, you configure the syslog servers that receive syslog data.
You also can configure which data to export to which syslog server, and the format of the exported data.
MobileIron Core logs the following as Syslog events:
l Android client authentication failure events
l failure to establish connection to determine revocation status
l failure to establish TLS session
l failure to generate key pair
l key randomization failure
l number of registered devices exceeded for this user
l self test failure
l self test start
l SSH connection failed
l trusted channel during device enrollment
l X.509 certificate validation failure
l
Certificate related events, including the following Certificate Expiry events:
o
Portal HTTPS Certificate
o
Client TLS Certificate
o
iOS Enrollment Certificate
Syslog events are stored on MobileIron Core and copied to the configured Syslog servers. The logs remain on Core
until deleted as part of the default log rotation process. View the data in System Manager at TroubleShooting >
Logs > View Module Logs.
SysLog support on MobileIron Core includes:
Data Export: SysLog

MobileIron Core 11.0.0.0 System Manager Guide| 33
l Secure connections between Core and your syslog servers using TLS over TCP.
l
Ability to specify which data to export, which allows you to:
o
adhere to your security requirements.
o
improve performance on both Core and your syslog servers, as well as disk usage requirements on
your syslog servers.
o
focus only on data of interest to you.
l Ability to format the exported syslog data to meet your needs by using syslog templates.
Exporting syslog data
This section includes the general workflow to export syslog data:
Step 1 Configuring the syslog servers to receive the exported syslog data.
Step 2 View Data Export: SysLog Advanced Options categories to export to the syslog servers.
Configuring the syslog servers
Procedure
1. Log into System Manager.
2. Select Settings > Data Export > SysLog Servers.
3. Click Add to open the Add SysLog window.
4.
Modify the fields, as necessary.
Refer to the Add SysLog window table for details.
5. Click Apply > OK to save the changes.
Add SysLog window
The following table summarizes fields and descriptions in the Add SysLog window:
Fields Description
Server Enter the host name for the remote syslog server.
Protocol Select the protocol to use between MobileIron Core and the syslog server.
If you have more than one syslog server, you cannot use TCP on one of them and TLS
over TCP on another. You can use UDP on one server and TCP or TLS over TCP on
another.
Trusted Server
Certificate
This field displays only if you select TLS over TCP for the Protocol.
Upload a PEM-formatted file containing a valid issuing certificate authority (CA)
certificate. When the syslog server presents its identity certificate to MobileIron Core,
Exporting syslog data

MobileIron Core 11.0.0.0 System Manager Guide| 34
Fields Description
Core validates the identity certificate to the CA certificate that you upload here.
Admin State Select Enable from the dropdown list if you want Core to send syslog data to the
configured syslog server. Select Disable to suspend use of the syslog server.
Template Enter a syslog template to format the logged messages.
Example:
<%pri%>%protocol-version% %timestamp:::date-rfc3339% %HOSTNAME:%
%app-name% %procid% %msgid% [TOKEN@11058 tag=”RsyslogTLS”] %msg%
Severity
(facility.level)
Enter *.* to send all messages to the syslog server for all syslog facilities and severity
levels that MobileIron Core supports.
To filter which messages are sent to the syslog server, provide a syslog regular
expression based on the form:
<facility keyword> <severity level keyword>
where:
l
One of the following syslog facility keywords listed on Settings > Data Export
> SysLog Data:
o
local3 - Virtual machine data (such as tomcat memory logs)
o
local4 - Health data (such as Apache and linux logs)
o
local6 - Device data (such as Core access from devices and Admin
Portal)
o
local7 - Audit data (Audit logs, which are also available on the Admin
Portal at Logs > Audit Logs)
l The syslog severity level keyword, such as info and warning, specifies the
minimum severity level to log.
Example
l local6.* - For all messages relating to device data
l local6.error - For error messages relating to device data
l local6,local7.* - For all messages relating to device data and audit logs
l *.*;local3,local7 - For all messages excluding those relating to virtual machine
data and audit data.
l *.info - For all messages with a severity of info or higher
l local4.warn - For all messages relating to health data with a severity of warn or
higher
l *.=debug - For all messages with a severity of debug
Add SysLog window

MobileIron Core 11.0.0.0 System Manager Guide| 35
View Data Export: SysLog Advanced Options categories
Procedure
1. Log into System Manager.
2. Go to Settings > Data Export > SysLog Data to open the Data to Index window.
3. Click Advanced Options to display the categories within each set of data you want to modify.
Configuring the syslog data to export
Procedure
1. Log into System Manager.
2. Go to Settings > Data Export > SysLog Data to open the Data to Index window.
3. Click Advanced Options to display the categories within each set of data you want to modify.
4. Modify one or more of the fields, as necessary.
5.
Change time intervals, as necessary.
An interval indicates how often MobileIron collects the information and adds it to syslog data.
6. Click Apply > OK to save the changes.
Data Export: Reporting Database
MobileIron RDB (Reporting Database) is a reporting database for MobileIron Core that provides a source you can
query for creating reports. Use the Settings > Data Export > Reporting Database options to:
l Generating the authentication token
l Configuring the Reporting Database Exporter
Refer to the MobileIron Reporting Database Essentials for information on configuring and using the Reporting
Database. Documentation resources provides instructions on how to access MobileIron product documentation.
Generating the authentication token
Procedure
To generate the authentication token for the Reporting Database:
1. Log into System Manager.
2. Go to Settings > Data Export > Reporting Database.
3. Go to the Authentication Token box.
4. Click Generate.
View Data Export: SysLog Advanced Options categories

MobileIron Core 11.0.0.0 System Manager Guide| 36
5.
Copy the displayed token to the clipboard.
Use this token in Configuring the Reporting Database Exporter.
Configuring the Reporting Database Exporter
Procedure
To configure the Reporting Database Exporter:
1. Log into System Manager.
2. Select Settings > Data Export > Reporting Database.
3.
Go to Export Configuration > Data to Export.
l Check data categories to specify the data to export.
l Clear data categories to specify the data to omit.
The Device option is required and cannot be cleared.
4. Select a frequency for Run RDB Export Every.
5. Select a retention time for Retain Export Data For.
6. Click Apply > OK to save the changes.
Log Upload
Use the Settings > Log Upload options to upload MobileIron Core log files to an external server when you are
working with MobileIron Technical support or a MobileIron partner to troubleshoot an issue in Core. You can upload
the following files:
l Log files (see Exporting logs in the Troubleshooting chapter for more information)
l System monitor files (see System monitor in the Troubleshooting chapter for more information)
Setting a log upload user
Procedure
1. Log into System Manager.
2. Go to Settings > Log Upload to open the Log Upload details page.
3.
Fill out the fields in one of the following server groups:
l SFTP Server Configuration
l HTTPS Server Configuration
4. Typically, you will use the default HTTPS Server Configuration, which automatically includes the user
name you entered in Maintenance > Software Updates. Confirm with MobileIron Technical Support that
the entries on this display are correct.
5. Click Apply > OK to save the changes.
Configuring the Reporting Database Exporter

MobileIron Core 11.0.0.0 System Manager Guide| 37
SNMP
MobileIron Core provides (Simple Network Management Protocol (SNMP) capabilities. SNMP is a protocol used
for network management for collecting information about network entities, such as servers and devices, on an
Internet Protocol (IP) network. Various third-party SNMP systems are available that provide SNMP-based
management and tools.
Core provides the following SNMP capabilities:
l
Link up and down traps
Core sends these two SNMP traps (events) to a specified SNMP trap receiver using the SNMP v2c
protocol.
l
An SNMP server can request information from Core related to these management information bases
(MIBs):
o
The HOST-RESOURCES-MIB
o
Apache web server configuration and status values (APACHE2-MIB).
o
disk I/O (UCD-DISKIO-MIB)
l Support for SNMP v2c and v3 protocols to pull MIB information from Core to the SNMP server.
Core limits Incoming SNMP requests to around 10 SNMP requests per minute.
Configuring SNMP on MobileIron Core
This section includes the general workflow to configure SNMP:
Step 1 Configuring the SNMP trap receiver server to which Core sends SNMP traps.
Step 2 Enabling the SNMP service with the v3 protocol from whom Core accepts requests.
Step 3 Enabling the SNMP service with the v2c protocol between Core and your SNMP server.
Configuring the SNMP trap receiver server
Configure the server to which Core sends SNMP traps. This server can also get MIB information from Core.
Procedure
1. Log into System Manager.
2. Go to Settings > SNMP to open the SNMP details pane.
3. Click Add to open the Add SNMP Trap Receiver window.
4.
Edit the fields, as necessary.
SNMP

MobileIron Core 11.0.0.0 System Manager Guide| 38
Refer to the Add SNMP Trap Receiver window table for details.
5. Click Apply > OK to save the changes.
Add SNMP Trap Receiver window
The following table summarizes fields and descriptions in the Add SNMP Trap Receiver window:
.
Fields Description
Server Enter the server name for your SNMP trap receiver.
For example:
trapreceiver.myCompanyDomain.com
Port Enter the port number for your SNMP trap receiver.
Community Enter the string which names the SNMP community on your SNMP trap
receiver.
Version MobileIron Core sends SNMP traps using SNMP protocol V2c. You can choose
V2c or V3 for MIB requests.
Admin State Select Enable to enable the SNMP service for this SNMP server.
TABLE 6. ADD SNMP TRAP RECEIVER VALUES
Deleting SNMP trap receiver servers
To delete one or more SNMP trap receiver servers:
1. Log into System Manager.
2. Go to Settings > SNMP to open the SNMP details pane.
3. Select one or more of the servers you want to delete.
Click the box next to Server to select all servers in the list.
4. Click Delete > Yes.
Enabling the SNMP service with the v3 protocol
Set up the SNMP v3 user from whom Core accepts requests. In addition, you can enable or disable sending traps
to any configured SNMP trap receiver.
Procedure
To enable the SNMP service with the SNMP v3 protocol:
1. Log into System Manager.
2. Go to Settings > SNMP to open the SNMP details pane.
3. Go to the SNMP Control section > SNMP Service.
Add SNMP Trap Receiver window

MobileIron Core 11.0.0.0 System Manager Guide| 39
4. Select Enable to enable the SNMP service on Core.
5.
Go to the Protocol option and verify that v3 is selected.
The v3 option is selected, by default.
6. Click Add to open the Add SNMP v3 User window.
7.
Enter the SNMP v3 user fields, as necessary.
Refer to the Add SNMP v3 User window for details.
8. Click Save to add this user to the SNMP v3 Users table.
9. Go to Link Up/Down Trap.
10.
Click Enable.
Select Disable to stop Core from sending SNMP traps to any SNMP trap receiver.
11. Click Apply > OK to save the changes.
Add SNMP v3 User window
Fields Description
User Name Enter the username with out any spaces (example: miuser).
Security Level Select asecurity level for authentication. The options are:
l noAuthNoPriv: Without Authentication or Privacy.
l authNoPriv: With Authentication and without Privacy
l authPriv: With Authentication and Privacy
Auth Protocol Select an authentication protocol. This can be selected only if the Security
Level is selected as authNoPriv or authPriv.
Auth Password Enter the Auth Password with a minimum of 8 characters.
Privacy Protocol Select a privacy protocol. This can be selected only if Security Level is selected
as authPriv.
Privacy Password Enter a privacy password with minimum of 8 characters.
TABLE 7. ADD SNMP V3 USER WINDOW
Deleting SNMP v3 users
Procedure
1. Log into System Manager.
2. Go to Settings > SNMP to open the SNMP details pane.
3. Go to the SNMP Control group.
4.
Select one or more of the users you want to delete.
Add SNMP v3 User window

MobileIron Core 11.0.0.0 System Manager Guide| 40
Click the box next to User Name to select all users in the list.
5. Click Delete > Yes.
Enabling the SNMP service with the v2c protocol
Set up the SNMP v2c communication between MobileIron Core and your SNMP server. You also enable or disable
sending traps to any configured SNMP trap receiver.
Procedure
1. Log into System Manager.
2. Go to Settings > SNMP to open the SNMP details pane.
3. Go to the SNMP Control section > SNMP Service.
4. Select Enable to enable the SNMP service on Core.
5. Go to the Protocol option and select v2.
6.
Change the value of Read Only Community if necessary.
The standard SNMP community name is public. This is the community the SNMP server uses to pull MIB
information from MobileIron Core.
7.
Go to the Link Up/Down Trap option and select Enable.
Select Disable to stop MobileIron Core from sending SNMP traps to any SNMP trap receiver.
8. Click Apply > OK to save the changes.
Email Settings
Use the Settings > Email Settings options to set up SMTP server access required for MobileIron email alerts,
such as policy violation alerts.
In the US and certain other countries, the SMTP server settings are also required for alerts sent via SMS. In a few
cases, the SMTP server might be used to transmit a control command to certain devices.
This section includes the following topics:
l Testing email configurations
l Testing email configurations
l Deleting the email configuration
Testing email configurations
Procedure
To test your email configuration:
Enabling the SNMP service with the v2c protocol

MobileIron Core 11.0.0.0 System Manager Guide| 41
1. Log into System Manager.
2. Go to Settings > Email Setting to open the Email Configuration window.
3.
Edit the fields, as necessary.
Refer to the Deleting the email configuration table for details.
4. Click the Test button to open the Test Email window.
5. Enter an email address and body for the test email.
6. Click Send.
7. Confirm that the email arrived.
8. Click Apply > OK to save the changes.
Deleting the email configuration
You can delete the email configuration. When deleted, MobileIron Core can no longer send email alerts, such as
policy violation alerts, to devices.
Procedure
To delete the email configuration:
1. Log into System Manager.
2. Go to Settings > Email Setting to open the Email Configuration window.
3. Click Delete.
4. Click Yes to proceed.
Email Configuration window
The following table summarizes fields and descriptions in the Email Configuration window:
Fields Description
From Email Specify the email address to use in the From field for all administrative email
notifications.
Make sure that the account for this email address has the right privileges to send
emails to internal and external email domains.
SMTP Server Specify the IP address or fully-qualified host name for the SMTP server the
MobileIron Server will use.
SMTP Server Port Specify the port configured for the SMTP server.
Protocol If the SMTP server you are configuring is a secured server, that is, it uses the
SMTPS protocol, then select the SMTPS button. Otherwise, leave SMTP
selected. If you want to allow an existing connection to upgrade to an encrypted
TABLE 8. FIELDS AND DESCRIPTIONS IN THE EMAIL CONFIGURATION WINDOW
Deleting the email configuration

MobileIron Core 11.0.0.0 System Manager Guide| 42
Fields Description
connection, select SMTP with STARTTLS.
Authentication Required Specify whether this SMTP server requires authentication. In most cases, this
field will be set to Yes.
User Name If you select Yes for Authentication Required, then this field displays. Enter
the user name required for SMTP authentication.
Password If you select Yes for Authentication Required, then this field displays. Enter
the password required for SMTP authentication.
Confirm Password If you select Yes for Authentication Required, then this field displays. Confirm
the password required for SMTP authentication.
TABLE 8. FIELDS AND DESCRIPTIONS IN THE EMAIL CONFIGURATION WINDOW (CONT.)
Port Settings
Use the Settings > Port Settings > Port Configuration options to change settings for the following MobileIron
services:
l Sync TLS
l MIFS Admin
l Sentry Service
l Apps@Work
l Local CA Certificate Revocation List
Note The Following:
l If you enable client mutual certificate authentication, you must change the Apps@Work Port setting if
you are using iOS devices with the Apps@Work web clip using certificate authentication.
l Other changes to the default port settings are seldom necessary.
l Making changes to these settings sometimes requires that you re-register devices, so use caution when
making changes.
Changing port settings
Procedure
1. Log into System Manager.
2. Go to Settings > Port Setting to open the Port Configuration window.
3. Edit the fields, as necessary.
4. Refer to the Port Configuration window table for details.
Port Settings

MobileIron Core 11.0.0.0 System Manager Guide| 43
The port and protocol default values for newly-issued Local CA Certificate
Revocation List (CRL) distribution points (CDP) have changed. Beginning with
the 10.4 Core release, new Local CDPs will use port 8080 and protocol HTTP by
default. You don't need to generate a new CSR or replace the old certificates.
Local CDPs that were configured to use HTTPS through port 443 will still be
reachable.
Changing the default CRL protocol and port configuration
Use the Settings > Port Settings > CRL (Certificate Revocation List) protocol and port configuration
options to change the default protocol and port for all local certificate authorities (CA).
For new installations, the default value for the certification revocation list (CRL)
is protocol HTTP and port 8080. The need to change the default port is rare.
However, if you do modify the CRL port, verify that no other Core service is using
that port. For example, port 9997 is the default value for Sync TLS, and using the
same port for CRL will result in service disruptions.
Procedure
1. Log into System Manager.
2. Go to Settings > Port Settings to open the Port Configuration window.
3. Scroll down to the CRL (Certificate Revocation List) protocol and port configuration section.
4.
Select the default CRL protocol.
l CRL Protocol: HTTPS or HTTP
l
CRL Port: defaults to the port supporting the selected protocol. If you choose HTTP, you can leave
the default (8080), or modify the CRL port number.
NOTE: When the CRL port and protocol changes, verify that the old port is open on the
network firewall. Otherwise, Apps (such as Apps@Work) using certificates from
before the port change will timeout during the certificate revocation verification
check.
5. Click Apply.
6. Click Save (in the top-right of the page) to globally save your choices when the system is rebooted.
Verifying Sentry connectivity
Procedure
To verify that Standalone Sentry is successfully connecting with MobileIron Core:
Changing the default CRL protocol and port configuration

MobileIron Core 11.0.0.0 System Manager Guide| 44
1. Log into System Manager for the Standalone Sentry.
2. Go to Troubleshooting > Service Diagnosis.
3. For EMM service, click Verify.
4. The Status for the EMM service should show Success.
Port Configuration window
The following table summarizes fields and descriptions in the Port Configuration window:
Fields Description
Sync TLS Port
Enter the port. However, changing this port from the default port 9997 is rare.
This port cannot be the same as any other ports specified in the Port
Configuration section.
This port is used for Mobile@Work for iOS and Android registration and device
check-ins and AppConnect check-ins when mutual authentication is not
enabled.
Select Disable to close this port only if all of the following are true:
l This Core is a new installation, not an upgrade.
l You enable mutual authentication before any devices register.
l iOS devices are using only Mobile@Work 9.8 for iOS through the most
recently released version as supported by MobileIron.
Related topics
“Mutual authentication between devices and MobileIron Core” in the MobileIron
Core Device Management Guide.
MIFS Admin Port
You can change the MIFS Admin port from port 443 (the default) to port 8443.
Using port 443 enhances the security of communications across the port
because port 8443 can be blocked.
Sentry Service Port
The Standalone Sentry is called the Sentry service port. Standalone Sentry
communicates with Core over port 8443 to get device information. The default
Sentry service port is port 8443.
Using port 8443 as the Sentry service port adds an additional layer of security.
Typically, port 8443 is not accessible on the public Internet. Using port 8443
helps ensure that the Sentry service port is protected against unauthorized
external access.
MobileIron recommends that port 8443 is used as the Sentry service port. If your
firewall rules do not allow connections to the Sentry service port on 8443, you
TABLE 9. FIELDS AND DESCRIPTIONS OF THE PORT CONFIGURATION WINDOW
Port Configuration window

MobileIron Core 11.0.0.0 System Manager Guide| 45
Fields Description
can configure 443 as the Sentry service port.
If the Sentry service port is 8443, MobileIron Core will only respond to requests
on port 8443. Requests to 443 will be redirected to 8443. If the Sentry service
port is 443, MobileIron Core will only respond to requests on port 443. Requests
to 8443 will be redirected to 443.
If the Sentry service port is 443, it is important that you define a Portal ACL for
the Sentry connection.
Apps@Work Port
This port is used by Apps@Work on iOS, Android, and macOS devices to
communicate with MobileIron Core. By default, it is port 443.
Change the port in these cases:
l
If both of the following are true:
o
You enabled client mutual certification authentication on the Admin
Portal at Settings > Security > Certificate Authentication.
o
You are using iOS devices with the Apps@Work web clip using
certificate authentication.
l
If identity certificates with the root CA “CN=DigiCert Assured ID Root
CA” are issued to iOS devices.
For example, you might use identity certificates with this root CA in the
Exchange, VPN, or Wi-Fi settings that you apply to iOS devices.
If you change the port, MobileIron recommends port 7443. However, you can use
any port except the port that the MIFS Admin Port uses, which is either 443 or
8443.
Atlas Port
Atlas is a legacy product of MobileIron Core versions prior to Core 10.2.0.0. This
feature is a MobileIron service which aggregates data from multiple Cores,
extending reporting and management services.
The port is 443 by default, but you have the option to change it when enabled.
TABLE 9. FIELDS AND DESCRIPTIONS OF THE PORT CONFIGURATION WINDOW (CONT.)
Other port services not configurable from the UI include:
l Sync service port – Default port is 9999 and cannot be changed.
l Provisioning protocol – Default protocol is HTTPS and cannot be changed.
l Provisioning port – Default port is 443 cannot be changed
Port Configuration window

MobileIron Core 11.0.0.0 System Manager Guide| 46
Data Purge
MobileIron Core stores significant amounts of data in its database and log files. Every four hours, MobileIron Core
automatically purges client logs and notification tables. You can automatically or manually purge other data.
Purging enables you to:
l manage system storage
l fulfill corporate or legal requirements for data disposal
For example, a production system managing thousands of phones can exhaust available system storage. In
addition, certain industries and countries must adhere to legal mandates requiring purging of data after a pre-defined
period of time.
MobileIron provides a data purging feature that enables you to:
l turn auto-purging on/off
l configure auto-purging based on system storage usage or the age of the data
l manually purge audit log data
l manually purge old database data using CLI commands
This section includes the following topics:
l Configuring manual or automatic data purge
l Configuring audit log purge
l Manually purging DB data using CLI commands
l Setting up the system storage alert
Configuring manual or automatic data purge
You can configure auto-purging based on either the amount of system storage used or the age of the data stored.
The page also displays the amount of data currently in system storage, and the last Core run status for data and log
files.
Procedure
To configure purge values:
1. Log into the System Manager.
2.
Go to Settings > Data Purge. (The numbers on the image reflect the associated task step.)
Data Purge

MobileIron Core 11.0.0.0 System Manager Guide| 47
3.
Set Auto Purge to ON or Off.
4. To purge data based on the age of the data:
l Enter a value for Keep data no more than __ days. The default is 90 days.
l Enter a value for Keep logs no more than __ days. The default is 30 days.
Selected times are based on the MobileIron Core system time.
5. Enter a time in the Purge daily drop-down menu to purge data and logs at a specific time each day. The
default is 3 a.m.
6. Purge data using one of the following options:
l Manual: click Apply to configure settings then click Purge Now to begin manual purging.
l Automatic: set the Auto Purge to On, configure settings, click Apply> OK.
Configuring audit log purge
You specify how long audit logs are retained on MobileIron Core. Determining how long to retain data is a balance
between having data you need and having the available server resources to run your Core. The default value is 90
days.
Procedure
To set how long audit logs are kept:
1. Log into the System Manager.
2. Go to Settings > Data Purge > Audit Logs Purge Configuration.
3.
Select the number of days Core retains log information. Select from the following options:
Configuring audit log purge

MobileIron Core 11.0.0.0 System Manager Guide| 48
l Last three months (the default)
l Last one month
l Last two months
l Last three months
l Last four months
l Last six months
l Last twelve months
4. Click Apply > OK to save the changes.
Manually purging DB data using CLI commands
Procedure
To use CLI commands to clean up the disk storage:
1. Use ssh to log in to MobileIron Core.
2. Enter enable to access EXEC PRIVILEGED CLI mode.
3. Enter the “enable secret” password.
4.
Enter dbcleanup purge_data to clean up the database.
If Core services are not already stopped, this command stops them and restarts them when it finishes the
clean up.
5.
Enter dbcleanup app_inventory to clean up unused and duplicate app inventory information in the data
base.
If Core services are not already stopped, this command stops them and restarts them when it finishes the
clean up.
6. Enter diskcleanup retired_devices to clean up retired devices from the disk.
7. Enter diskcleanup trashed_apps to clean up deleted apps from the disk.
8. If Core services had been stopped, restart Core.
Setting up the system storage alert
You can set up a System Event to alert you when system storage reaches the level specified. You can use this
alert, for example, to indicate the need for manual purging or to prompt personnel to confirm successful auto-
purging.
Procedure
To set up the system storage alert:
1. Log onto the Admin Portal.
2. Click Logs > Event Settings.
Manuallypurging DB data using CLI commands

MobileIron Core 11.0.0.0 System Manager Guide| 49
3. Click Add New > System Event.
4. Select System storage threshold has been reached.
Services
Use the Settings > Services options to enable or disable the following MobileIron services:
l Core: Core MobileIron service.
l Splunk Forwarder: Splunk Forwarder service.
l
Reporting Database Exporter: MobileIron RDB (Reporting Database).
Enabling the Reporting Database Exporter allows the Reporting Database to extract the relevant
MobileIron Core data.
l Migrator:Enabling this service is part of the procedures for migrating from MobileIron Core to MobileIron
Cloud. It retrieves device information from MobileIron Core. Enable this service only if MobileIron
Professional Services instructs you to.
Managing Services
Procedure
To manage these services:
1. Log into the System Manager.
2. Go to Settings > Services.
3. Select Enable or Disable next to any of the services.
4.
Click the link to open a window to any running service.
You might need to log into the service.
The Running link for Splunk Forwarder is not a live link to the service. When you disable the Splunk
Forwarder service, you also disable the connection to the Splunk indexers configured in Settings > Data
Export > Splunk Indexer.
If you re-enable the Splunk Forwarder service, Core re-connects to the indexers configured in Settings >
Data Export > Splunk Indexer.
5. Click Apply > OK to save the changes.
Services

3
MobileIron Core 11.0.0.0 System Manager Guide| 50
Security Settings
l Security overview
l Identity Source: Local Users
l Identity Source: Password Policy
l Certificate Mgmt
l Access Control Lists: Networks and Hosts
l Access Control Lists: Network Services
l Access Control Lists: ACLs
l Access Control Lists: Portal ACLs
l Advanced: Host Header Validation
l Advanced: HSTS
l Advanced: Incoming SSL Configuration
l Advanced: ModSecurity
l Advanced: Outgoing SSL Configuration
l Advanced: SAML
l Advanced: Trusted Front End
l Advanced: Portal Authentication
l Advanced: SSH Configuration
Security overview
System Manager Security menu options contains menu items for configuring MobileIron Core access. The
following table summarizes the tasks associated with each menu item.
Settings Menu Task
Identity Source > Local Users Create, delete, and manage local users for System Manager.
Identity Source > Password Policy Set the password requirements for System Manager local users.
Certificate Mgmt
View and manage certificates for:
l Portal HTTPS
TABLE 10. SECURITY MENU ITEMS

MobileIron Core 11.0.0.0 System Manager Guide| 51
Settings Menu Task
l Client TLS
l iOS Enrollment
Access Control Lists > Networks &
Hosts
Create and manage entries for networks and hosts
Access Control Lists > Network Services Create and manage entries for network services
Access Control Lists > ACLs Compile access control lists
Access Control Lists > Portal ACLs Compile access control lists for specific MobileIron Core
components
Advanced settings -- Most configurations do not require changing the following settings.
Advanced > Host Header Validation Enhances the security of HTTP traffic
Advanced > HSTS Configure HTTP Strict Transport Security
Advanced > Incoming SSL Configuration Select protocols and cipher suites other than the defaults for
incoming SSL/TLS connections
Advanced > ModSecurity Configure protection against certain types of future public
security vulnerabilities
Advanced > Outgoing SSL Configuration Select protocols and cipher suites other than the defaults for
outgoing SSL/TLS connections.
Advanced > Outgoing SSL Configuration Select protocols and cipher suites other than the defaults for
outgoing SSL/TLS connections.
Advanced > SAML Allow local admin users to use single-sign on for the Admin Portal
and self-service user portal. This feature also allows
administrators to automatically redirect authentication for the
Admin Portal and the user portal to your external Identity Provider
(IdP).
Advanced > Trusted Front End Configure a Trusted Front End between devices and Core.
Advanced > Admin/Self-Service User
Portal Authentication
Select whether device users authenticate to the user portal, and
whether administrators authenticate to the Admin Portal, with a
password, a certificate, or either.
Advanced > SSH Configuration Configure SSH to enable Public Key Authentication and
Password Authentication.
TABLE 10. SECURITY MENU ITEMS (CONT.)
Security overview
MobileIron Core 11.0.0.0 System Manager Guide| 52
Identity Source: Local Users
System Manager maintains a user database that is separate from the Admin Portal database. The user you specify
when you install MobileIron Core is created as a separate user in each database. All users in the System Manager
database are local users with the following privileges that cannot be changed:
l Command Line Interface (CLI)
l System Manager access
IMPORTANT: Local users in the System Manager database are separate users from the local users that
you define in the Admin Portal.
Use the Security > Identity Source > Local Users menu options to perform the following tasks using:
l Adding local System Manager users
l Editing local System Manager users
l Deleting local System Manager users
Adding local System Manager users
Procedure
To add a local user to the System Manager database:
1. Log into System Manager.
2. Go to Security > Identity Source > Local Users.
3. Click the Add button to open the Add New User window.
4.
Modify one or more of the fields, as necessary.
Refer to Add New User window table for details.
5. Click Apply > OK.
Add New User window
The following table summarizes fields and descriptions in the Add New Users window:
Fields Description
User ID Enter the unique identifier to assign to this user. The user ID is case sensitive.
First Name Enter the user’s first name.
Last Name Enter the user’s last name.
Password Enter a password for the user.
TABLE 11. ADD NEW USER FIELDS
Identity Source: LocalUsers

MobileIron Core 11.0.0.0 System Manager Guide| 53
Fields Description
Valid passwords are determined by the password policy for System Manager local
users.
For details, see:
l System Manager local user password policy overview
l Setting password policy
Enter a password for the user based on the Password Policy configured by the
administrator in the System Manager (Security > Identity Source > Password
Policy). However the following password requirements cannot be changed:
l cannot be the same as the user ID
l cannot contain the Grave accent character
l cannot contain the space character
l cannot have 4 or more repeating characters
l users cannot change a password more than once during a 24 hour period
Confirm Password Confirm the password for the user.
Space This field is not configurable. It is set to the global space.
Email Enter the user’s email address.
EDIPI Department of Defense customers only:
Enter the user's the Department of Defense identification number, also known as the
Electronic Data Interchange Personal Identifier.
This field is required if your configuration on Security > Advanced > Portal
Authentication specifies certificate authentication for access to the System Manager
using a common access card (CAC).
TABLE 11. ADD NEW USER FIELDS (CONT.)
Related topics
Advanced: Portal Authentication
Editing local System Manager users
Procedure
1. Log into the System Manager.
2. Select Security > Identity Source > Local Users.
3. Select the user ID of the entry to display the information for that user.
4.
Make your changes.
Refer to Add New User window table for details.
Editing local System Manager users

MobileIron Core 11.0.0.0 System Manager Guide| 54
You cannot change the user ID.
5. Click Apply > OK.
Deleting local System Manager users
Procedure
1. Log into the System Manager.
2. Select Security > Identity Source > Local Users.
3. Select one or more check boxes for the users you want to delete.
4.
Click Delete.
You cannot delete the user you logged in with.
5. Click Yes > OK.
Identity Source: Password Policy
Use the Security > Identity Source > Password Policy menu items to configure complex password
requirements for local users. This section includes the following topics:
l System Manager local user password policy overview
l Setting password policy
l Local user password complexity enforcement details
l Local user password strength enforcement details
System Manager local user password policy overview
You can specify the password policy for System Manager local users.
The password policy includes the following:
l
Enforcement type, which is one of the following:
o
Local user password complexity enforcement
o
Local user password strength enforcement
l
Core enforces the password complexity or strength when:
o
You add a new local user in the System Manager.
o
Local users change their password.
l
Number of failed attempts
After the local user fails to enter the correct password after the specified number of attempts, Core does
not allow the user to login until the specified auto-lock time has expired.
Deleting local System Manager users

MobileIron Core 11.0.0.0 System Manager Guide| 55
l
Password history enforcement
When you enforce password history, local users cannot use the previous 4 passwords when changing
their password.
Local user password complexity enforcement
You can enforce password complexity requirements on local user passwords. Complex requirements prevent local
users from using passwords that are weak and therefore easy to guess. However, requirements that are too
complex make using the user ID and password inconvenient for the user because they have to enter a more
complicated or longer password. Therefore, when you choose the complexity requirements, consider both your
security needs and you local user convenience.
You specify the following password complexity requirements:
l Minimum and maximum password length
l
Minimum number of character classes in a password
Character classes are:
o
Lower case alphabetic characters
o
Upper case alphabetic characters
o
Numeric characters 0 through 9
o
Special characters, which are ! = ( { [ _ : - ; ~ , ) } ] @ # ^ | $
In addition to the requirements that you specify, Core enforces the following requirements:
l The password cannot have a Grave accent (back tick) character.
l The password cannot contain the space character.
l The password cannot have 4 or more repeating characters.
l The password cannot be the same as the user ID.
Related topics
l Setting password policy
l Local user password strength enforcement details
Local user password strength enforcement
You can specify the local user password strength to enforce how strong a password must be. Setting the password
strength prevents local users from using passwords that are weak and therefore easy to guess. However, setting
the password strength too high makes using the user ID and password inconvenient for the user because they
have to enter a more complicated or longer password. Therefore, when you choose the password strength
requirement, consider both your security needs and your local user convenience.
In addition to your specified password strength, the System Manager enforces the following requirements:
Localuser password complexityenforcement

MobileIron Core 11.0.0.0 System Manager Guide| 56
l The password cannot have a Grave accent (back tick) character.
l The password cannot contain the space character.
l The password length must be 128 or less.
l The password cannot be the same as the user ID.
Related topics
l Setting password policy
l Local user password strength enforcement details
Setting password policy
Procedure
To set the password policy for System Manager local users:
1. Log into System Manager.
2. Select Security > Identity Source > Password Policy.
3.
Select one of these options:
l
Enable Password Complexity Enforcement
Modify one or more of the default fields, as necessary.
See System Manager local user password policy overview.
l
Enable Password Strength Enforcement
Modify one or more of the default fields, as necessary.
See Local user password strength enforcement details.
4. Click Apply > Yes > OK.
Note The Following:
l Click Reset to Default followed by OK to reset the password policy to the default values.
l Changing the password policy or resetting to default values can result in local users being disconnected or
cause a disruption in service.
Local user password complexity enforcement details
The following table summarizes the fields of the System Manager local user password policy when using password
complexity enforcement:
Setting password policy

MobileIron Core 11.0.0.0 System Manager Guide| 57
Field Description Default value
Enable Password
Complexity Enforcement
Select this field when you want to apply password
complexity requirements to local user passwords.
Selected
Minimum number of
character classes in
password
This field is only available when you selected Enable
Password Complexity Enforcement.
Select the minimum number of different character classes
(lower case, upper case, numeric, and special character) that
you require in a password.
For each character class, you select whether it counts
towards the minimum number. The minimum number must
be less than or equal to the number of character classes you
select.
For example, if the minimum number of character classes is
2, you can select 2 or more of the character classes. In this
case, if you select Lower Case, Upper Case, and
Numeric, the password must contain at least 2 of those
character classes.
3
Lower Case Select this option if the lower case character class counts
towards the minimum number of character classes that you
require in a password.
The lower case character class includes the lower case
alphabetic characters ‘a’ through ‘z’.
Selected
Upper Case Select this option if the upper case character class counts
towards the minimum number of character classes that you
require in a password.
The lower case character class includes the upper case
alphabetic characters ‘A’ through ‘Z’.
Selected
Numeric Select this option if the numeric character class counts
towards the minimum number of character classes that you
require in a password.
The numeric character class includes the characters ‘0’
through ‘9’.
Selected
Special Character Select this option if the special character class counts
towards the minimum number of character classes that you
require in a password.
The special character class includes these characters:
! = ( { [ _ : - ; ~ , ) } ] @ # ^ | $
Not selected
Min Password Length Select the minimum number of characters in a password. 8
TABLE 12. SYSTEM MANAGER LOCAL USER PASSWORD COMPLEXITY ENFORCEMENT FIELDS
Localuser password complexityenforcement details

MobileIron Core 11.0.0.0 System Manager Guide| 58
Field Description Default value
Valid values are 6 through 16.
Max Password Length Select the maximum number of characters in a password.
Valid values are 21 through 128.
32
Number of Failed
attempts
Specify the number of failed attempts that a local user can
make when entering his password.
After this number of attempts, Core does not allow the user
to login until the specified auto-lock time has expired. After
the auto-lock time expires, each failed login attempt results
in Core not allowing the user to login until the auto-lock time
expires again.
Valid values are 1 through 16.
5
Auto-Lock Time Specify how much time in seconds the local user must wait
before he can log in after exceeding the number of failed
attempts.
Valid values are 0 through 3600 seconds.
30
Enforce Passcode History
(Last 4 passwords)
Select Enable if you do not want to allow a local user to use
the previous 4 passwords when changing his password.
To allow a local user to use the previous 4 passwords, select
Disable.
Enable
TABLE 12. SYSTEM MANAGER LOCAL USER PASSWORD COMPLEXITY ENFORCEMENT FIELDS (CONT.)
Related topics
l System Manager local user password policy overview
l Setting password policy
Local user password strength enforcement details
The following table summarizes the fields of the System Manager local user password policy when using password
strength enforcement:
Localuser password strengthenforcement details

MobileIron Core 11.0.0.0 System Manager Guide| 59
Field Description Default value
Enable Password
Strength Enforcement
Select this field when you want to apply password strength
requirements to local user passwords.
Not selected
Number of Failed
attempts
Specify the number of failed attempts that a local user can
make when entering his password.
After this number of attempts, Core does not allow the user
to login until the specified auto-lock time has expired. After
the auto-lock time expires, each failed login attempt results
in Core not allowing the user to login until the auto-lock time
expires again.
Valid values are 1 through 16.
5
Auto-Lock Time Specify how much time in seconds the local user must wait
before he can log in after exceeding the number of failed
attempts.
Valid values are 0 through 3600 seconds.
30
Enforce Passcode History
(Last 4 passwords)
Select Enable if you do not want to allow a local user to use
the previous 4 passwords when changing his password.
To allow a local user to use the previous 4 passwords, select
Disable.
Enable
Password Strength Select a value between 0 and 100, where 0 is the weakest
requirement, and 100 is the strongest requirement.
You can enter a value or move the slider.
For details, see Local user password strength value
descriptions.
35
TABLE 13. SYSTEM MANAGER LOCAL USER PASSWORD STRENGTH ENFORCEMENT FIELDS
Related topics
l System Manager local user password policy overview
l Setting password policy
Local user password strength value descriptions
The following table describes the System Manager local user password strength values:
Localuser password strengthvalue descriptions

MobileIron Core 11.0.0.0 System Manager Guide| 60
Strength
value
Description Examples
0 - 20 Weak: risky password
l Few characters: zxcvbn
l Sequences: abcdefghijk987654321
l Names: briansmith4mayor
l Words: viking
l Words with number substitutions:
ScoRpi0ns
21 - 40 Fair: protection from throttled online
attacks
Throttled online attacks are attacks to
guess the passcode which are:
l on the device
l rate-limited
Rate-limited attacks are limited to
some number of attempts per time
period.
l Few characters but with special
characters: qwER43@!
l Words plus numbers: temppass22
l Names plus numbers: ryanhunter2000
l Words with special character and
number substitutions: R0$38uD99
l Names with capitalization:
verlineVANDERMARK
41 - 60 Good: protection from unthrottled
online attacks
Unthrottled online attacks are attacks to
guess the passcode which are:
l on the device
l not rate-limited
l Longer words with special character and
number substitutions: Tr0ub4dour&3
l Longer phrases with numbers and
special characters:
neverforget13/3/1997
l Longer letter, number, and special
character combinations:
asdfghju7654rewq
OEUIDHG&*()LS_
TABLE 14. SYSTEM MANAGER LOCAL USER PASSWORD STRENGTH VALUE DESCRIPTIONS
Localuser password strengthvalue descriptions

MobileIron Core 11.0.0.0 System Manager Guide| 61
Strength
value
Description Examples
61 - 80 Strong: moderate protection from
offline slow-hash scenario
An offline slow-hash scenario is a
sophisticated algorithm for guessing a
passcode. The algorithm runs offline from
the device after copying passcode-related
files from the device.
l Longer random letters and numbers:
zevusqr3
esqu3Wil
tgbvdnjuk
l Longer phrases with numbers and
special characters:
Compl3xChar$
81 - 100 Very strong: strong protection from
offline slow-hash scenario
l Very long random characters:
eheuczkqyq
rWibMFACxAUGZmxhVncy
Ba9ZyWABu99
[BK#6MBgbH88Tofv)vs$w
l Long phrases:
correcthorsebatterystaple
l Long phrases with substitutions:
coRrecth0rseba++ery9.23.2007staple$
TABLE 14. SYSTEM MANAGER LOCAL USER PASSWORD STRENGTH VALUE DESCRIPTIONS (CONT.)
Related topics
l System Manager local user password policy overview
l Setting password policy
Certificate Mgmt
Use the Security > Certificate Mgmt menu items to fulfill certificate requirements your organization may have for
the MobileIron appliance or the TLS client. With these options, you can:
l Generate a self-signed certificate
l Generate a CSR for a certificate authority
l Upload required certificates
When you update a certificate, you are prompted to confirm that you want to
proceed because the HTTP service needs to be restarted, resulting in service
disruption.
This section includes the following topics:
Certificate Mgmt

MobileIron Core 11.0.0.0 System Manager Guide| 62
l Certificates you configure in the System Manager
l Generate a self-signed certificate
l Certificate signing request (CSR) requirements
l Generate a certificate signing request (CSR)
l Upload client certificate (CSR) window
l Uploading certificates
l Viewing certificates
Certificates you configure in the System Manager
You configure the following certificates on the System Manager at Security > Certificate Mgmt:
Certificates you configure inthe System Manager

MobileIron Core 11.0.0.0 System Manager Guide| 63
Certificate
Portal HTTPS
Port 443 and 8443
l The identify certificate and its certificate chain, including the private key, that
identifies MobileIron Core, allowing a client (such as a browser or app) to trust
MobileIron Core.
l
Used on port 443 for these clients:
o
the Admin Portal
o
the self-service user portal.
o
Mobile@Work for iOS and Android device check-ins when using mutual
authentication
o
Mobile@Work for macOS device check-ins
o
iOS MDM and macOS MDM check-ins
o
Windows device check-ins
o
Apps@Work on Android and iOS
l Used on port 8443 for the System Manager.
l Must be a publicly trusted certificate from a well-known Certificate Authority if
you are using mutual authentication.
l Typically the same certificate as the Client TLS and iOS Enrollment
certificates.
l Presented to client as part of the TLS handshake when client initiates a
request to Core.
Mobile@Work for Android requires that the Portal
HTTPS certificate supports CRLs (Certificate
Revocation Lists).
Client transport layer
security (TLS)
Port 9997
l The identify certificate and its certificate chain, including the private key, that
identifies MobileIron Core, allowing Mobile@Work for iOS and Android to trust
MobileIron Core.
l Used on port 9997 for Mobile@Work for iOS and Android device check-ins
when not using mutual authentication.
l Typically the same certificate as the Portal HTTPS and iOS Enrollment
certificates.
l Presented to Mobile@Work for iOS or Android as part of the TLS handshake
when Mobile@Work initiates a request to Core.
NOTE: Beginning September 1, 2020, Apple requires that valid
Transport Layer Security (TLS) certificates expire in 397 days or
TABLE 15. CERTIFICATES YOU CONFIGURE IN THE SYSTEM MANAGER
Certificates you configure inthe System Manager

MobileIron Core 11.0.0.0 System Manager Guide| 64
Certificate
less. From Core 10.8.0.0 through the latest release supported by
MobileIron, the lifespan of self-signed TLS certificates are limited
to fewer than 398 days.
iOS Enrollment
l The identify certificate and its certificate chain, including the private key, that
identifies MobileIron Core. Core uses the identity certificate to sign the Apple
MDM configurations that it sends to iOS and macOS devices.
l Typically the same certificate as the Client TLS and Portal HTTPS
certificates.
TABLE 15. CERTIFICATES YOU CONFIGURE IN THE SYSTEM MANAGER (CONT.)
Generate a self-signed certificate
You can generate a self-signed certificate for:
l the MobileIron iOS Mobility Management Best Practices
l the MobileIron Sentry configurations
l The Portal HTTPS certificate, the Client TLS certificate, or the iOS Enrollment certificate.
Procedure
1. Log into System Manager.
2. Go to Security > Certificate Mgmt.
3. Select Manage Certificate in either the Portal HTTPS row, the Client TLS row, or the iOS Enrollment
row.
4. Select Certificate Options > Generate Self-Signed Certificate.
5.
Click one of the following self-signed certificate options:
l Generate Self Signed RSA Certificate
l Generate Self Signed ECDSA Certificate
Related topics
Certificates you configure in the System Manager
Certificate signing request (CSR) requirements
The following table summarizes the requirements and related information for each component of a MobileIron
deployment.
Generate a self-signed certificate

MobileIron Core 11.0.0.0 System Manager Guide| 65
Component Requirements
Appliance Private key file
Certificate file
Root CA certificate file
Without password
Standalone Sentry Private key file
Certificate file
Root CA certificate file
Without password
Client Private key file
Certificate file
Root CA certificate file
Without password
TABLE 16. CSR REQUIREMENTS
Generate a certificate signing request (CSR)
Procedure
1. Log into System Manager.
2. Go to Security > Certificate Mgmt.
3. Select Manage Certificate in either the Portal HTTPS row, the Client TLS row, or the iOS Enrollment
row.
4. Select Certificate Options > Generate CSR.
5.
Fill in the form, as necessary.
Refer to Upload client certificate (CSR) window table for details.
6.
Click Generate.
The system displays a message similar to the following message.
Generate a certificate signing request (CSR)
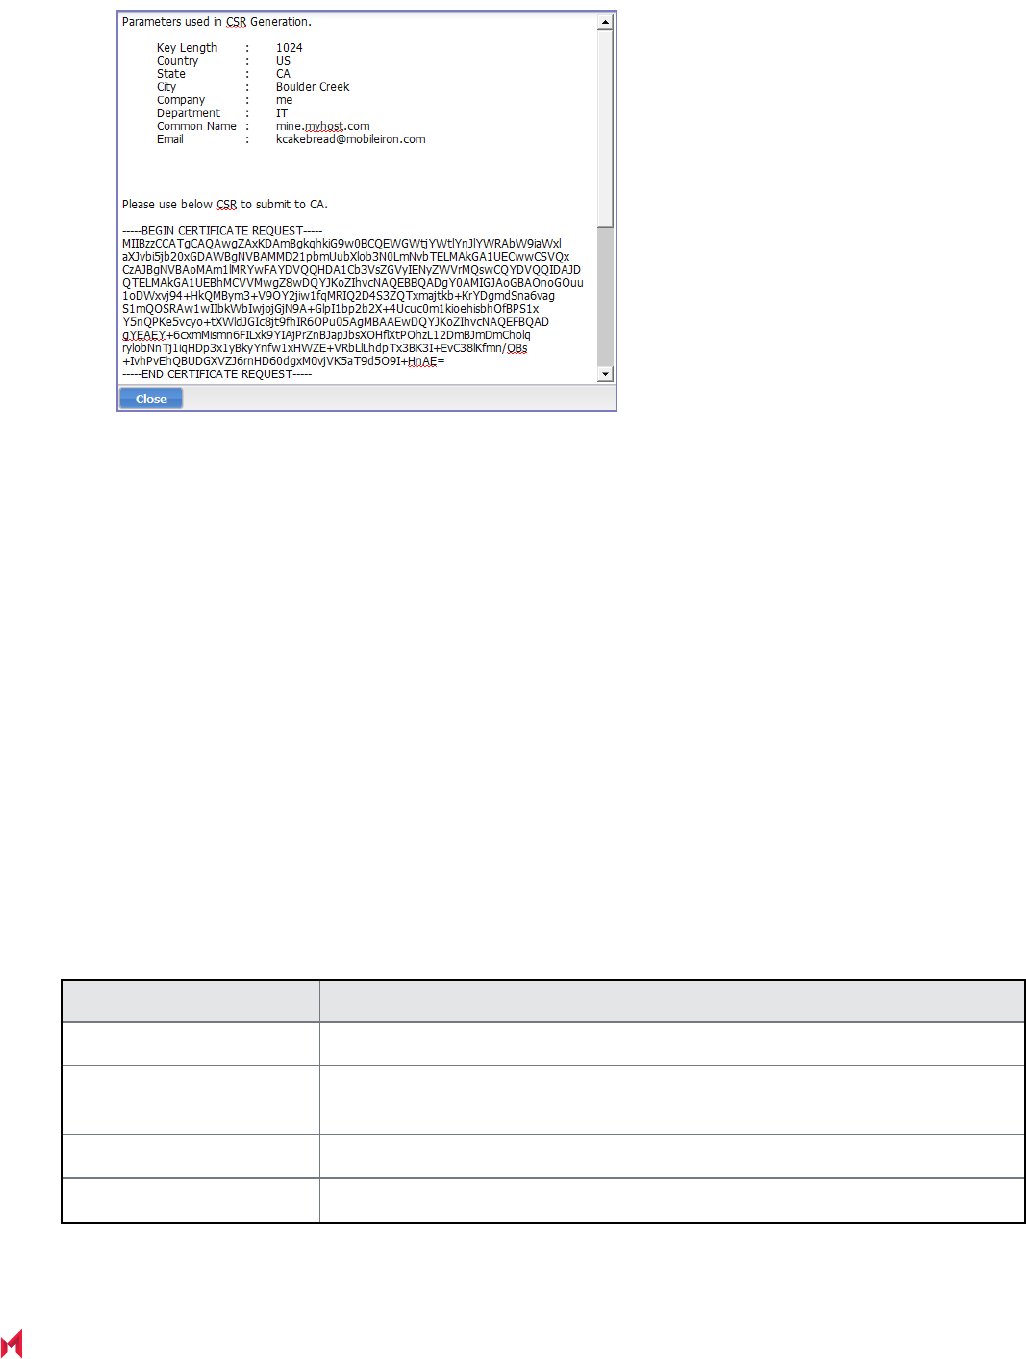
MobileIron Core 11.0.0.0 System Manager Guide| 66
7. Open a text file in a text editor or application.
8. Copy the content between BEGIN CERTIFICATE REQUEST and END CERTIFICATE REQUEST and
paste it into the text file.
9. Open a second text file.
10. Copy the content between BEGIN RSA PRIVATE KEY and END RSA PRIVATE KEY and paste it into
the second text file.
11. Click Close.
12. Submit the text file you created in step 8.
Related topics
Certificates you configure in the System Manager
Upload client certificate (CSR) window
The following table summarizes fields and descriptions in the Upload client certificate window:
Fields Description
Common Name Enter the server host name.
E-Mail Enter the email address of the contact person in your organization who should
receive the resulting certificate.
Company Enter the name of the company requesting the certificate.
Department Enter the department requesting the certificate.
TABLE 17. UPLOAD CLIENT CERTIFICATE FIELDS
Upload client certificate (CSR)window

MobileIron Core 11.0.0.0 System Manager Guide| 67
Fields Description
City Enter the city in which the company is located.
State Enter the state in which the company is located.
Country Enter the two-character abbreviation for the country in which the company is
located.
Key Length Select 2048 or 3072 to specify the length of each key in the pair. Longer keys
provide stronger security, but may impact performance.
TABLE 17. UPLOAD CLIENT CERTIFICATE FIELDS (CONT.)
Uploading certificates
You can upload a certificate after you receive the CA certificate from the certifying authority.
Procedure
1. Log into System Manager.
2. Go to Security > Certificate Mgmt.
3. Select Manage Certificate in either the Portal HTTPS row, the Client TLS row, or the iOS Enrollment
row.
4. Select Certificate Options > Upload Certificate.
5.
Select a certificate based on the following information:
Fields Description
Key file The file created in Step in Generate a certificate signing request (CSR)
Server certificate The CA certificate file you received from the certifying authority.
CA certificate A generic CA certificate file.
6. Click Upload Certificate.
Related topics
Certificates you configure in the System Manager
Viewing certificates
Use the Security > Certificate Mgmt menu items to view both Portal HTTPS or Client-TLS certificates.
Uploading certificates

MobileIron Core 11.0.0.0 System Manager Guide| 68
Procedure
1. Log into System Manager.
2. Go to Security > Certificate Mgmt.
3. Select View Certificate in either the Portal HTTPS row, the Client TLS row, or the iOS Enrollment row.
Related topics
Certificates you configure in the System Manager
Access Control Lists: Networks and Hosts
Use the Security > Access Control Lists > Networks & Hosts options to manage the servers and subnets you
will use to compile Access Control Lists (ACLs) for MobileIron Clients.
This section includes the following topics:
l Adding a host or subnet mask
l Add Network/Hosts window
Adding a host or subnet mask
Use the Security > Access Control Lists > Networks & Hosts options to add a host or subnet mask for
compiling ACLs.
Procedure
1. Log into System Manager.
2. Go to Security > Access Control Lists > Networks & Hosts.
3. Click the Add to open the Add Network/Host window.
4.
Modify one or more of the fields, as necessary.
Refer to Add Network/Hosts window table for details.
5.
Click Apply > OK.
This host or network will now be available for ACLs configured in the ACLs screen.
Add Network/Hosts window
The following table summarizes fields and descriptions in the Add Network/Hosts window:
Access Control Lists: Networks and Hosts

MobileIron Core 11.0.0.0 System Manager Guide| 69
Fields Description
Name Enter a name to use to identify this host or network.
Description Enter additional text to provide supporting information about this host or network.
Type Select Subnet or Host from the dropdown menu.
Network/Host Enter the IP address for this network or host.
TABLE 18. ADD NETWORK/HOSTS FIELDS
Access Control Lists: Network Services
Use the Security > Access Control Lists > Networks Services options to manage available services.
MobileIron pre-populates this list with common services.
This section includes the following topics:
l Adding a service
l Add Network Services window
Adding a service
Procedure
1. Log into System Manager.
2. Go to Security > Access Control Lists > Networks Services.
3. Click Add to open the Add Services window.
4.
Fill out the form, as required.
Refer to Add Network Services window table for details.
5. Click Apply > OK.
Add Network Services window
The following table summarizes fields and descriptions in the Add Network Services window:
Access Control Lists: Network Services

MobileIron Core 11.0.0.0 System Manager Guide| 70
Fields Description
Name Enter a name to use to identify this service.
Description Enter additional text provide supporting information about this service.
Type Select TCP, UDP, or IP from the dropdown menu.
Source Port Enter the number of the source port for this service. Enter 0 to allow any source port.
Destination Port Enter the number of the destination port for this service. Enter 0 to allow any destination
port.
TABLE 19. ADD NETWORK SERVICES FIELDS
Access Control Lists: ACLs
Use the Security > Access Control Lists > ACLs options to compile and manage the rules that define inbound
and outbound access for network hosts and services.
Each ACL consists of one or more access control entries (ACEs). You need to complete the following tasks to
configure ACLs:
1. Configure entries for each network and host requiring an ACL.
2. Configure entries for any network services requiring an ACL.
3. Create an ACL.
This section includes the following topics:
l Adding an ACL
l Add ACE window
l Editing an ACL
l Copying an ACL
l Deleting an ACL
Adding an ACL
Procedure
1. Log into System Manager.
2. Go to Security > Access Control Lists > ACLs.
3. Click Add to open the Add ACL window.
4.
Complete the form with the following information:
Access Control Lists: ACLs

MobileIron Core 11.0.0.0 System Manager Guide| 71
l Name: Enter a name to use to identify this ACL.
l Description: Enter additional text provide supporting information about this ACL.
5. Click Submit to enable the lower portion of the window and continue.
6.
Click Add to add an access control entry (ACE) to the ACL.
Each ACE consists of a combination of the network hosts and services you configured for use in ACLs.
7.
Modify one or more of the fields, as necessary.
Refer to Add ACE window for details.
8. Click Apply > OK.
Add ACE window
The following table summarizes fields and descriptions in the Add ACE window:
Fields Description
Source Network Select the network from which access will originate. This list is populated with
the networks and hosts you created for use with ACLs. See “Access Control
Lists: Networks and Hosts” on Access Control Lists: Networks and Hosts.
Destination Network Select the network being accessed. This list is populated with the networks
and hosts you created for use with ACLs. See “Access Control Lists:
Networks and Hosts” on Access Control Lists: Networks and Hosts.
Service Select the network service to which this entry permits or denies access. This
list is populated with the services you created for use with ACLs. See
“Access Control Lists: Network Services” on Access Control Lists: Network
Services.
Action Select Permit or Deny from the drop down list.
Connections Per Minute Enter the number of connections to allow per minute.
Description Enter text to describe the purpose of this entry.
TABLE 20. ADD ACE FIELDS
Editing an ACL
Procedure
1. Log into System Manager.
2. Go to Security > Access Control Lists > ACLs.
3.
Complete one or more of the following modifications to the ACE:
l Delete: Select an ACE and click Delete.
l Add: Click Add to add an ACE.
Add ACE window

MobileIron Core 11.0.0.0 System Manager Guide| 72
l Insert: Select the ACE above the new ACE and click Insert.
4. Click Apply > OK.
Copying an ACL
Procedure
To start a new ACL based on an existing one:
1. Log into System Manager.
2. Go to Security > Access Control Lists > ACLs.
3. Select the ACL you want to copy.
4. Click the Copy button.
5. Enter a name for the new ACL.
6. Click OK > OK.
Deleting an ACL
Procedure
1. Log into System Manager.
2. Go to Security > Access Control Lists > ACLs.
3. Select one or more of the check boxes next to an ACL you want to delete.
4. Click Delete > Yes.
Access Control Lists: Portal ACLs
Use the Security > Access Control Lists > Portal ACLs options to further restrict access to various portals
within MobileIron Core.
This section includes the following topics:
l Enabling an ACL Portal
l Portal ACLs window
Enabling an ACL Portal
Procedure
1. Log into System Manager.
2. Go to Security > Access Control Lists > Portal ACLs.
Copying an ACL

MobileIron Core 11.0.0.0 System Manager Guide| 73
3.
Select the portal you want to enable.
Refer to Portal ACLs window for details.
4.
Enter the IP address or network/mask pair to specify servers or networks that may access this
component. Separate the entries with spaces.
Examples:
l 100.0.0.0 150.0.0.0
l 101.0.0.0 10.0.0.0/255.255.255.0
You must use the expanded form of the mask. Do not specify an entry similar to 10.0.0.0/24.
If your MobileIron Core is behind a NAT, enter the IP of the NAT network.
Remember that the Sentry must be able to access Core. If it does not have access, then the ActiveSync
Devices page will not display devices.
5. Click Apply > OK.
Portal ACLs window
The following table summarizes fields and descriptions in the Portal ACLs window:
Fields Description
User Portal Enables device users to register their devices, view device information, and
manage their devices.
Admin Portal The Admin Portal.
System Manager Portal The System Manager.
Sentry Connection The MobileIron Sentry installed for ActiveSync access control.
API Connection The MobileIron Web Services API.
iOS MDM The iOS MDM service for profile management.
iOS iReg URL The iReg service that enables provisioning iOS devices without installing the
MobileIron iOS app.
OAuth API Enables or disables the OAuth API. You can control access to the OAuth API
by defining IP addresses, ranges of IP addresses and subnets based on the
values they enter into the field. Addresses can be internal (non-routable) or
external (routable). With this control, you can limit access to OAuth API from
routable IP addresses or restrict access to specific machines for security
reasons.
App Storefront Connection The app management service for iOS.
TABLE 21. PORTAL ACLS FIELDS
PortalACLs window

MobileIron Core 11.0.0.0 System Manager Guide| 74
Advanced: Host Header Validation
Use the Security > Advanced > Host Header Validation options to enhance security of incoming HTTP traffic in
MobileIron Core, by validating HTTP host headers. When you enable this feature, incoming HTTP host headers
must contain either the specified internal hostname or the allowed external hostnames.
This section includes the following topics:
l Selecting host header validation
l Strict Host Header Validation options
Selecting host header validation
Procedure
To validate host headers in your MobileIron Core HTTP traffic:
1. Log into System Manager.
2. Go to Security > Advanced > Host Header Validation.
3. Go to the Strict Host Header Validation options.
4.
Modify the fields, as necessary.
Refer to Strict Host Header Validation options table for more information.
5. Click Apply > OK.
Strict Host Header Validation options
The following table summarizes the Strict Host Header Validation options:
Fields Description
Enable Strict Host Header
Validation
Check this option to enable HTTP host header validation.
Internal Server Names Enter the names of one or more internal servers that are valid in the HTTP
host header.
External Server Name (Optional) Specify one or more external server names that are trusted in the
HTTP host header.
TABLE 22. STRICT HOST HEADER VALIDATION OPTIONS
Advanced: Host Header Validation

MobileIron Core 11.0.0.0 System Manager Guide| 75
Advanced: HSTS
Use Security > Advanced > HSTS to enable HTTP Strict Transport Security (HSTS). HSTS provides an
additional layer of security for HTTPS. It helps prevent man-in-the-middle attacks by greatly reducing the ability to
intercept requests and responses between a user and a web application server.
When you enable HSTS on Core, web browsers enforce a secure HTTPS connection for all communication with
Core. If Core uses a self-signed certificate or if the portal certificate on Core has expired, a warning message is
displayed in the browser and users cannot access the resource. Users do not have the option to bypass the
warning message to access the MobileIron resource. By default, HSTS is disabled.
MobileIron recommends caution before enabling HSTS. Enabling HSTS may cause browsers to block access to
MobileIron resources if a self-signed certificate is in use or the certificate has expired.
The following MobileIron services are impacted by HSTS:
l MobileIron Core Admin Portal
l MobileIron Core System Manager
l MobileIron Core Self-Service User Portal
When you enable HSTS, provisional protocol access over port 8080 must be disabled. Access will be allowed only
for HTTPS over port 443.
This section includes the following topics:
l Before enabling HSTS
l Enabling HSTS
l Disabling HSTS
Before enabling HSTS
Before enabling HSTS ensure the following:
l MobileIron Core uses a root or intermediate certificate from a publicly trusted CA.
l You have policies and processes in place that ensure that the certificate is current and has not expired.
l Ensure that port 443 is open.
l
Provisioning protocol must be set as HTTPS, and the provisioning port must be set as 443.
Provisioning protocol and port are set in the MobileIron System Manager, under Settings > Port Settings.
Advanced: HSTS

MobileIron Core 11.0.0.0 System Manager Guide| 76
Enabling HSTS
Procedure
1. Log into System Manager.
2. Go to Security > Advanced > HSTS.
3.
Make the following selections:
Status: select Enabled from the drop down list.
Max Age: enter a number.
The number indicates, in seconds, the length of time HSTS will be enabled on the browser. After the set
time, the browser will not enforce HSTS connections.
4. Click Apply > OK.
Disabling HSTS
You can also disable HSTS using MobileIron Core command line interface (CLI). For information about using the
MobileIron Core CLI to disable HSTS, see "hsts-disable" in the MobileIron Core Command Line Interface (CLI)
Reference.
Procedure
1. Log into System Manager.
2. Go to Security > Advanced > HSTS.
3.
Change the Max Age to 0.
When you set Max Age to 0, MobileIron Core sends the HSTS header with the 0 value to the browser. This
effectively results in the expiration of the HSTS policy and allows immediate access without requiring
trusted SSL certificates.
For additional information see Security Bulletin: HTTP Strict Transport Security (HSTS) in Core 9.0.
Advanced: Incoming SSL Configuration
For incoming SSL/TLS connections, MobileIron Core supports:
l TLS protocol version TLS v1.2 (TLS v1.0 and TLS v1.1 are not supported)
l a default set of disabled and selected cipher suites.
Use the Security > Advanced > Incoming SSL Configuration options to configure the cipher suites to use for
incoming SSL/TLS connections to Core. These incoming connections include connections initiated to Core from:
l devices
l browsers (to the Admin Portal or System Manager)
Enabling HSTS

MobileIron Core 11.0.0.0 System Manager Guide| 77
l external servers
Use this feature to also:
l configure MobileIron Core to be PCI-DSS 3.1 compliant.
l change the cipher suites for incoming SSL/TLS connections if you have specific security or performance
requirements.
IMPORTANT: Do not change the cipher suites unless you have specific security or performance
requirements. Most customers do not need to take any actions.
This section includes the following topics:
l Protocols and cipher suites on Core first-time installation
l Advanced: Incoming SSL Configuration
l Protocol version negotiation for incoming SSL/TLS connections
l Verify server requirements for incoming SSL/TLS connections
l Configuring incoming SSL/TLS connections
l Changing to the default set of cipher suites for incoming connections
Protocols and cipher suites on Core first-time installation
On first-time installation, MobileIron Core supports:
l Protocol version TLSv1.2
l Default and selected cipher suites as displayed in the System Manager at Security > Advanced >
Incoming SSL Configuration.
Do not change the cipher suites until you have determined the cipher suites required for incoming connections to
Core.
Protocol versions for incoming connections on upgrade
When you upgrade to this MobileIron Core version, the selected and disabled protocol versions are as follows,
regardless what they were set to before the upgrade:
l Selected: TLSv1.2
l Disabled: None
TLSv1.2 is the only supported protocol and cannot be moved to the disabled
list.
Protocols and cipher suites on Core first-time installation

MobileIron Core 11.0.0.0 System Manager Guide| 78
Cipher suites for incoming connections on upgrade
When upgrading MobileIron Core, Core uses the disabled and selected sets of cipher suites that you used in the
MobileIron Core from which you upgraded. The exception to this rule is when a Core release removes cipher suites.
In that case, the removed cipher suites are no longer available to select after upgrade.
Note that Core has a default set of selected and disabled cipher suites. Core uses these default sets after
upgrades only if you use the Reset to Default button. The default sets have changed in various Core releases.
Therefore, if your upgrade path took you through a release that changed the default sets, use the Reset to Default
button only with caution as described in Changing to the default set of cipher suites for incoming connections.
The default sets changed in:
l Core 9.4
l
Core 10.2.0.0 in which the following cipher suites were removed:
o
TLS_ECDHE_ECDSA_WITH_3DES_EDE_CBC_SHA
o
TLS_ECDHE_RSA_WITH_3DES_EDE_CBC_SHA
o
SSL_RSA_WITH_3DES_EDE_CBC_SHA
o
TLS_RSA_WITH_3DES_EDE_CBC_SHA
o
TLS_ECDHE_ECDSA_WITH_RC4_128_SHA
o
TLS_ECDHE_RSA_WITH_RC4_128_SHA
o
SSL_RSA_WITH_RC4_128_SHA
o
TLS_RSA_WITH_RC4_128_SHA
o
SSL_DHE_RSA_WITH_3DES_EDE_CBC_SHA
o
TLS_DHE_RSA_WITH_3DES_EDE_CBC_SHA
NOTE: If you used these cipher suites for incoming connections from your external servers, make
sure your external servers are configured with cipher suites that MobileIron Core supports.
l
Core 10.3.0.0 in which the following cipher suites were moved to the disabled list:
o
TLS_RSA_WITH_AES_256_GCM_SHA384
o
TLS_RSA_WITH_AES_128_GCM_SHA128
o
TLS_RSA_WITH_AES_256_CBC_SHA256
o
TLS_RSA_WITH_AES_128_CBC_SHA128
o
TLS_RSA_WITH_AES_256_CBC_SHA
o
TLS_RSA_WITH_AES_128_CBC_SHA
Protocol version negotiation for incoming SSL/TLS connections
Because MobileIron Core supports only TLSv1.2, incoming SSL/TLS connections fail if they are from a server that
does not support TLSv1.2.
Cipher suites for incoming connections on upgrade

MobileIron Core 11.0.0.0 System Manager Guide| 79
Verify server requirements for incoming SSL/TLS connections
Before changing cipher suites used for incoming connections to MobileIron Core, verify the requirements of
external servers that make connection requests to Core. The System Manager screen at Security > Advanced >
Incoming SSL Configuration indicates which cipher suites are disabled and selected.
The Disabled and Selected sections are described below:
Fields Description
Disabled The protocol or cipher suite is available in Core, but it is disabled. Therefore, Core will
not use it in any incoming connections.
Putting protocols and cipher suites in the Disabled Column disables them when the
configuration is saved.
TLSv1.2 is the only supported protocol and cannot be
moved to the disabled list.
Selected Core can use the protocol or cipher suite in an incoming connection.
Putting protocols and cipher suites in the Selected Column enables them when the
configuration is saved.
TABLE 23. DISABLED AND SELECTED LISTS
Configuring incoming SSL/TLS connections
MobileIron recommends that you use the default cipher suites for incoming SSL/TLS connections. Most customers
do not need to change them. However, if you have specific security or performance requirements, you can change
the defaults. Before changing the cipher suites used in incoming SSL/TLS connections, understand the
requirements of external servers that make connection requests to Core.
Prerequisites for configuring incoming SSL/TLS connections
The following conditions must be met to configure incoming SSL/TLS connections:
l Configure incoming SSL/TLS connections only from the primary Core for HA configurations. Configuring
incoming SSL/TLS connections from the second or third instance of Core is not supported since the
Tomcat service will not be running in the second and third Core.
l The administrator (local user) configuring the incoming SSL/TLS connections in the System Manager must
also be an administrator (local user) in the Admin Portal.
Configuring the cipher suites for incoming SSL/TLS connections
You can configure the cipher suites for incoming SSL/TLS connections.
Verify server requirements for incoming SSL/TLS connections

MobileIron Core 11.0.0.0 System Manager Guide| 80
You cannot disable the protocol TLSv1.2. If you move it to the Disabled list and
click Apply, MobileIron Core displays an error message. Move TLSv1.2 back to the
Selected list before re-clicking Apply.
Procedure
1. Log into System Manager.
2. Go to Security > Advanced > Incoming SSL Configuration.
3. Go to the Cipher Suites section.
4. Click and drag, or select and move using the arrows, cipher suites between the Disabled and Selected
lists to select the cipher suites to use for incoming SSL/TLS connections.
5.
List the cipher suites in order, from highest preference to lowest by dragging each cipher suite up or down
in the Selected list.
Core uses the listed order in determining which, of the supported cipher suites, to use. Therefore,
MobileIron suggests you list the strongest cipher suites first.
6.
Click Apply > OK.
MobileIron Tomcat service, which supports web requests to and from Core, restarts automatically.
Changing to the default set of cipher suites for incoming connections
When you upgrade MobileIron Core, the set of incoming SSL/TLS protocols and cipher suites are the ones
described in Advanced: Incoming SSL Configuration.
You can change your cipher suite set to a set of your choice. You can also change to the default MobileIron Core
set using the Reset to Default on the System Manager’s Security > Advanced > Incoming SSL Configuration
screen.
Most customers do not need to make any changes. However, you can change Core to use the Core default set of
cipher suites if you have specific security requirements.
Do not click Reset to Default unless:
l You have specific security or performance requirements to use the MobileIron Core set of cipher suites.
Most customers do not need to take any action.
l You have identified the cipher suites required for your external servers, and have confirmed that they are
included in the default set of cipher suites.
For example, after an upgrade, an external server that depends on a legacy cipher suite that is not in the default
set of cipher suites can connect to MobileIron Core. However, after you click Reset to Default, that server will
not be able to connect to Core.
Procedure
To change the configuration to the Core default set of cipher suites:
Changing to the default set of cipher suites for incoming connections

MobileIron Core 11.0.0.0 System Manager Guide| 81
1. Log into System Manager.
2. Go to Security > Advanced > Incoming SSL Configuration.
3. Click Reset to Default.
4.
Click Apply > OK.
MobileIron Tomcat service, which supports web requests to and from Core, restarts automatically.
Advanced: ModSecurity
Use Security > Advanced > ModSecurity to enable an additional layer of protection against future security
vulnerabilities. ModSecurity is an open source web application firewall (www.modsecurity.org). If certain types of
public security vulnerabilities impact Core in the future, MobileIron can notify customers to enable ModSecurity. In
these cases, MobileIron will provide a URL of a rules file hosted by MobileIron. The file contains ModSecurity rules
that protect Core from security vulnerabilities and you can protect your Core without upgrading to a new Core
release.
Do not enable ModSecurity unless MobileIron notifies you to do so.
This section includes the following topics:
l Enabling ModSecurity
l Configuring Detection Only mode
l Viewing ModSecurity logs
Enabling ModSecurity
If a future public security vulnerability impacts MobileIron Core, MobileIron will contact you to do the following:
Procedure
1. Log into System Manager.
2. Go to Security > Advanced > ModSecurity.
3. Go to the ModSecurity Configuration options.
4. Set Status to Enabled.
5. Set Remote Rule Server URL to the URL that MobileIron provided to you.
6.
Set Audit Logging to Enabled.
Enabling audit logging means any activity relating to the security vulnerability is logged.
7. Click Apply > OK.
Advanced: ModSecurity

MobileIron Core 11.0.0.0 System Manager Guide| 82
Configuring Detection Only mode
Sometimes MobileIron will direct you to configure ModSecurity to detect a specific type of attack on MobileIron
Core without performing any action to block it.
Procedure
1. Log into System Manager.
2. Go to Security > Advanced > ModSecurity.
3. Go to the ModSecurity Configuration options.
4. Set Status to Detection Only.
5. Set Remote Rule Server URL to the URL that MobileIron provided to you.
6.
Set Audit Logging to Enabled.
Enabling audit logging means any activity relating to the security vulnerability is logged.
7. Click Apply > OK.
Viewing ModSecurity logs
When you have enabled ModSecurity, or configured it in detection only mode, Core logs related information.
Procedure
1. Log into System Manager.
2. Go to Security > Troubleshooting > Logs.
3. Go to the Export Logs section.
4. Select Show Tech.
5. Go to Type and select Download.
6. Click Download.
The log files containing ModSecurity information are:
l modsec_audit.log if you enabled ModSecurity
l error_log.log if you configured ModSecurity in detection only mode
Advanced: Outgoing SSL Configuration
For outgoing SSL/TLS connections, MobileIron Core supports:
l TLS protocol version TLS v1.2 (TLS v1.0 and TLS v1.1 are not supported)
l a default set of disabled and selected cipher suites.
Configuring Detection Only mode

MobileIron Core 11.0.0.0 System Manager Guide| 83
Use the Security > Advanced > Outgoing SSL Configuration options to configure the cipher suites to use for
outgoing SSL/TLS connections from Core to external servers. Use this feature to also:
l configure MobileIron Core to be PCI-DSS 3.1 compliant
l change the cipher suites and for outgoing SSL/TLS connections if you have particular security or
performance requirements
The configuration impacts connections to all external servers. Examples of external servers are SCEP servers and
Apple Push Notification Service (APNS).
IMPORTANT: Do not change the cipher suites unless you have specific security or performance
requirements. Most customers do not need to take any actions.
MobileIron Core uses a Server Name Extension (SNI) when making outgoing TLS
connections. SNI is used by TLS clients (in this case Core) to indicate to a TLS
server which hostname the client is attempting to reach. In the case where a
single server is responding to multiple hostnames, using a SNI allows the server to
respond with the correct TLS certificate to match the client's request. No Core
configuration is required for using SNI.
This section includes the following topics:
l Protocols and cipher suites on Core first-time installation
l Protocols and cipher suites on Core upgrades
l Protocol version negotiation for outgoing SSL/TLS connections
l Determining which servers use which protocol versions and cipher suites
l Configuring outgoing SSL/TLS connections
l Changing to the default set of cipher suites for outgoing connections
l External servers connected to with outgoing SSL connections
Protocols and cipher suites on Core first-time installation
On first-time installation, MobileIron Core supports:
l Protocol version TLSv1.2
l Default and selected cipher suites as displayed in the System Manager at Security > Advanced >
Outgoing SSL Configuration.
Do not change the cipher suites until you have determined the cipher suites required for your external servers. See
Determining which servers use which protocol versions and cipher suites for details.
Protocols and cipher suites on Core first-time installation

MobileIron Core 11.0.0.0 System Manager Guide| 84
Protocols and cipher suites on Core upgrades
Protocol versions for outgoing connections on upgrade
When you upgrade to this MobileIron Core version, the selected and disabled protocol versions are as follows,
regardless what they were set to before the upgrade:
l Selected: TLSv1.2
l Disabled: None
TLSv1.2 is the only supported protocol and cannot be moved to the disabled
list.
Cipher suites for outgoing connections on upgrade
When upgrading MobileIron Core, Core uses the disabled and selected sets of cipher suites that you used in the
MobileIron Core from which you upgraded. The exception to this rule is when a Core release removes cipher suites.
In that case, the removed cipher suites are no longer available to select after upgrade.
Note that Core has a default set of selected and disabled cipher suites. Core uses these default sets after
upgrades only if you use the Reset to Default button. The default sets have changed in various Core releases.
Therefore, if your upgrade path took you through a release that changed the default sets, use the Reset to Default
button only with caution as described in Changing to the default set of cipher suites for outgoing connections.
The default sets changed in:
l Core 9.0
l
Core 10.2.0.0 in which the following cipher suites were removed:
o
TLS_ECDHE_ECDSA_WITH_3DES_EDE_CBC_SHA
o
TLS_ECDHE_RSA_WITH_3DES_EDE_CBC_SHA
o
SSL_RSA_WITH_3DES_EDE_CBC_SHA
o
TLS_RSA_WITH_3DES_EDE_CBC_SHA
o
TLS_ECDHE_ECDSA_WITH_RC4_128_SHA
o
TLS_ECDHE_RSA_WITH_RC4_128_SHA
o
SSL_RSA_WITH_RC4_128_SHA
o
TLS_RSA_WITH_RC4_128_SHA
o
SSL_DHE_RSA_WITH_3DES_EDE_CBC_SHA
o
TLS_DHE_RSA_WITH_3DES_EDE_CBC_SHA
NOTE: If you used these cipher suites for outgoing connections to your external servers, make
sure your external servers are configured with cipher suites that MobileIron Core supports.
Protocols and cipher suites on Core upgrades

MobileIron Core 11.0.0.0 System Manager Guide| 85
l
Core 10.3.0.0 in which the following cipher suites were moved to the disabled list:
o
TLS_RSA_WITH_AES_256_GCM_SHA384
o
TLS_RSA_WITH_AES_128_GCM_SHA128
o
TLS_RSA_WITH_AES_256_CBC_SHA256
o
TLS_RSA_WITH_AES_128_CBC_SHA128
o
TLS_RSA_WITH_AES_256_CBC_SHA
o
TLS_RSA_WITH_AES_128_CBC_SHA
Related topics
l Determining which servers use which protocol versions and cipher suites
l Changing to the default set of cipher suites for outgoing connections
Protocol version negotiation for outgoing SSL/TLS connections
Because MobileIron Core supports only TLSv1.2, outgoing SSL/TLS connections fail if they are to a server that
does not support TLSv1.2.
Determining which servers use which protocol versions and cipher suites
MobileIron Core uses only the TLSv1.2 protocol for outgoing connections to external servers. If an external server
is not configured to use TLSv1.2, connections to it from Core will fail. Change the external server to use TLSv1.2.
MobileIron provides a utility that can determine the TLS protocols used in outgoing connections. See
https://community.mobileiron.com/docs/DOC-9256.
Regarding cipher suites, before you change which cipher suites to use to connect with external servers, make sure
you know what the external servers require.
The System Manager screen at Security > Advanced > Outgoing SSL can help inform you of this information.
The Disabled and Selected lists mean the following:
Protocol version negotiation for outgoing SSL/TLS connections

MobileIron Core 11.0.0.0 System Manager Guide| 86
Fields Description
Disabled The cipher suite is available in Core, but it is disabled. Therefore, Core will not use it in
any connections to external servers.
If the cipher suite is colored red, it is a legacy cipher suite that was in a Core version
prior to 9.0 that was in your upgrade path. It is not in the set of the current Core version.
Selected Core can use the cipher suite in a connection to an external server.
If the cipher suite is colored red, it is a legacy cipher suite that was in a Core version
prior to 9.0 that was in your upgrade path. It is not in the set of the current Core version.
TABLE 24. AVAILABLE AND SELECTED LISTS
An asterisk (*) on a protocol or cipher suite means the following:
Asterisk (*) Description
Asterisk (*) on a
Disabled cipher
suite protocol
The cipher suite is required by an external server. A connection attempt failed because
the external server does not support any of the selected cipher suites.
Hover your mouse over the cipher suite. The display lists the external servers to which
connections failed because that protocol or cipher suite was not in the Selected set.
Example:
2 endpoints have negotiated this protocol or cipher since
4 Feb 2016 01:53:04 GMT
Endpoints:
mdmenrollment.apple.com/17.146.232.35:443
accounts.google.com/216.58.192.45:443
Asterisk (*) on a
Selected cipher
suite or protocol
The protocol or cipher suite was used in a connection to an external server.
Hover your mouse over the protocol or cipher suite. The display lists the external
servers that have connected to Core using that protocol or cipher suite.
Example:
1 endpoints have negotiated this protocol or cipher since
4 Feb 2016 01:53:04 GMT
Endpoints:
appgw.mobileiron.com/199.127.91.250:443
TABLE 25. ASTERISK, PROTOCOL, CIPHER SUITE
To populate the usage information indicated by the asterisks:
Determining which servers use which protocol versions and cipher suites

MobileIron Core 11.0.0.0 System Manager Guide| 87
l Run MobileIron Core for a two or three days, giving time to attempt most outgoing SSL/TLS connections.
l
In the Admin Portal, go to Services > Overview and click Verify All.
This action makes connection attempts to many external servers.
After the usage information has been populated, you can determine:
l Cipher suites in the Disabled list that you must move to the Selected list because at least one external
server requires it. Alternatively, you can reconfigure the external server to support a selected cipher suite.
l Cipher suites in the Selected list that you can move to the Disabled list, because no external servers use
it. Typically, this is because you are using a stronger cipher suite.
Note The Following:
l MobileIron Core clears the asterisks and associated usage information once a week.
l The weekly collection period begins when you restart MobileIron Core, or when you click Apply to change
the cipher suite choices.
l To see up-to-date asterisk information, click on Security > Advanced > Outgoing SSL Configuration.
Configuring outgoing SSL/TLS connections
MobileIron recommends that you use the default cipher suites for outgoing SSL/TLS connections. Most customers
do not need to change them. However, if you have specific security or performance requirements, you can change
the choices. Before changing the cipher suites used in outgoing SSL/TLS connection, see Determining which
servers use which protocol versions and cipher suites for details.
Prerequisites for configuring outgoing SSL/TLS connections
The following conditions must be met to configure outgoing SSL/TLS connections:
l Configure outgoing SSL/TLS connections only from the primary Core for HA configurations. Configuring
outgoing SSL connections from the second or third instance of Core is not supported since the Tomcat
service will be down in the second and third Core.
l The administrator configuring the outgoing SSL/TLS connections in the System Manager must also be an
administrator in the Admin Portal.
Configuring the cipher suites for outgoing SSL/TLS connections
You can configure the cipher suites for outgoing SSL/TLS connections.
You cannot disable the protocol TLSv1.2. If you move it to the Disabled list and
click Apply, MobileIron Core displays an error message. Move TLSv1.2 back to the
Selected list before reclicking Apply.
Configuring outgoing SSL/TLS connections

MobileIron Core 11.0.0.0 System Manager Guide| 88
Procedure
To change the cipher suites for outgoing SSL/TLS connections:
1. Log into System Manager.
2. Go to Security > Advanced > Outgoing SSL Configuration.
3. Go to the Cipher Suites section.
4. Click and drag cipher suites between the Disabled and Selected lists to select the cipher suites to use for
outgoing SSL/TLS connections.
5.
List the cipher suites in order, from highest preference to lowest by dragging each cipher suite up or down
in the Selected list.
Each external server uses the listed order in determining which cipher suite to use of the cipher suites that
it supports. Therefore, MobileIron suggests you list the strongest cipher suites first.
6.
Click Apply > OK.
MobileIron Core's Tomcat service, which supports web requests to and from Core, automatically restarts.
Changing to the default set of cipher suites for outgoing connections
When you upgrade MobileIron Core, the set of outgoing SSL/TLS protocols and cipher suites on your
MobileIron Core are the ones described in Protocols and cipher suites on Core upgrades.
You can change the cipher suite set to a set of your choice. You can also change to the default MobileIron Core set
using the Reset to Default on the System Manager’s Security > Advanced > Outgoing SSL screen.
Most customers do not need to make any changes. However, you can change Core to use the Core default set of
cipher suites if you have specific security requirements.
Do not click Reset to Default unless:
l You have specific security or performance requirements to use the MobileIron Core set of cipher suites.
Most customers do not need to take any action.
l You have identified the cipher suites required for your external servers, and have confirmed that they are
included in the default set of cipher suites.
For example, after an upgrade, an external server that depends on a legacy cipher suite that is not in the default
set of cipher suites can connect to MobileIron Core. However, after you click Reset to Default, that server will
not be able to connect to Core.
Therefore, see Determining which servers use which protocol versions and cipher suites before you click Reset
to Default.
Procedure
To change the configuration to the MobileIron Core default set of strong cipher suites:
Changing to the default set of cipher suites for outgoing connections

MobileIron Core 11.0.0.0 System Manager Guide| 89
1. Log into System Manager.
2. Go to Security > Advanced > Outgoing SSL Configuration.
3. Click Reset to Default.
4.
Click Apply > OK.
MobileIron Tomcat service, which supports web requests to and from Core, restarts automatically.
External servers connected to with outgoing SSL connections
Core uses outgoing SSL/TLS connections to various external servers. MobileIron Core uses the TLSv1.2 protocol
for these connections. If an external server is not configured to use TLSv1.2, change the external server to use
TLSv1.2.
Some of these external servers are:
l Standalone Sentry
l Connector
l SCEP servers
l LDAP servers
l MobileIron Gateway
l Apple Push Notification Service (APNS)
l Content Delivery Network servers
l MobileIron support server (support.mobileiron.com)
l Outbound proxy for Gateway transactions and system updates
l SMTPS servers
l Public app stores (Apple, Google, Windows)
l Apple License servers
l Apple Device Enrollment servers
l Android for Work servers
Related topics
l Determining which servers use which protocol versions and cipher suites
l Configuring outgoing SSL/TLS connections
Advanced: SAML
Security Assertion Markup Language (SAML) is an open standard that allows identity providers (IdP) to pass
authorization credentials to service providers (SP).
This section contains the following topics:
External servers connected to with outgoing SSL connections

MobileIron Core 11.0.0.0 System Manager Guide| 90
l Configuring SAML/IdP support
l Deactivating or deleting the IdP metadata file
Use this feature to allow local administrator users to use single-sign on for the Admin Portal and self-service user
portal. This feature also allows administrators to automatically redirect authentication for the Admin Portal and the
user portal to your external IdP.
Enabling SAML restarts Core, which disrupts services until the configuration is complete. Therefore, access to the
Admin Portal and self-service user portal is not available until after the SAML/IdP configuration is successfully
completed. Furthermore, user name/password authentication and certificate authentication to the Admin Portal and
the self-service user portal will be disabled.
SAML is not supported on the System Manager portal. However, when SAML is enabled, local users can
authenticate to the System Manager with a user ID and password, but not with certificate authentication.
If you set up SAML after setting the Admin Portal to run on port 8443, automatic
redirection to the Admin Portal and to the self-service user portal will succeed. If
you set up SAML after setting the Admin Portal to 443 redirection will not
succeed until you reconfigure the Admin Portal to run on port 8443.
You must reconfigure SAML using the System Manager if both of the following are true:
l You upgraded to this version of Core from a version of Core prior to
10.0.0.0.
l You had configured SAML using the command line on Core. Note
that configuring SAML from the command line is not supported from
Core 9.7 through the current Core release.
Contact MobileIron Technical Support if you have authentication failures in this scenario.
Configuring SAML/IdP support
This topic describes how to configure SAML over IdP. For more details, refer to Microsoft documentation.
Before you begin
l Create at least one SAML user, with associated permissions.
l Sign up with an external IdP.
l Be able to export the metadata file from the IdP.
Procedure
1. Log into the System Manager Portal.
2. Go to Security > Advanced > SAML.
Configuring SAML/IdP support

MobileIron Core 11.0.0.0 System Manager Guide| 91
3. Click the box to Enable SAML.
4.
Read the warning message and click Yes to restart Core and turn on SAML.
This can take a few minutes. The Configuration Status changes from Restarting Tomcat… to In
Progress, followed by Completed.
5. Click Download to download the XML metadata file from MobileIron Core that was created as part of the
Core restart process.
6.
Save this file locally.
7.
After downloading and saving the metadata from Core, upload the Core metadata files to your IdP:
a. Export those metadata files from your idP, and upload them to Core.
b. Click Done > OK.
c.
Verify the IdP hostname/URL and modify it, if necessary.
System Manager extracts the hostname or URL from the IdP metadata file and auto-populates these
fields.
8. Click Apply.
If you do not complete configuring SAML, reboot Core by selecting
Maintenance > Reboot > Reboot in the System Manager.
Deactivating or deleting the IdP metadata file
This topic describes how to deactivate or delete the SAML/IdP option.
Procedure
1. Log into the System Manager Portal.
2. Go to Security > Advanced > SAML.
3. Click the box to Disable SAML to deactivate SAML or click Delete to delete the SAML file.
There is no option to delete the IdP metadata file - they upload a new one which replaces the previous one
Related topics
l Advanced: Portal Authentication
Advanced: Trusted Front End
Contact MobileIron Professional Services or a MobileIron certified partner to set up this deployment.
MobileIron Core can support a TLS inspecting proxy using an Apache server to handle HTTPS requests from your
devices to MobileIron Core when using mutual authentication. This proxy is also known as a Trusted Front End. It
Deactivating or deleting the IdP metadata file

MobileIron Core 11.0.0.0 System Manager Guide| 92
intercepts and decrypts HTTPS network traffic and when it determines that the final destination is MobileIron Core,
it re-encrypts and forwards the traffic to Core. The devices that register to Core (using port 443) must send HTTPS
requests to the TFE rather than to MobileIron Core. Also, the TFE must be provisioned with digital certificates that
establish an identity chain of trust with a legitimate server verified by a trusted third-party certificate authority.
Note The Following:
l If you are using SAML to allow local administrator users to use single-sign on for the Admin Portal and self-
service user portal, after IDP authentication, the user is redirected to Core's URL, not the Trusted Front
End's URL. The Trusted Front End is only for communication with devices.
l If you are not using an Apache server for your Trusted Front End, work with MobileIron Professional
Services or a MobileIron certified partner to determine if you can set up this deployment.
Before you begin
Work with MobileIron Professional Services or a MobileIron certified partner to set up this deployment.
1. Enable mutual authentication for Apple and Android devices as described in "Mutual authentication
between devices and MobileIron Core" in the MobileIron Core Device Management Guide.
2. In your devices' sync policies in the Admin Portal, set Server IP/Host Name to your Trusted Front End.
This configuration makes devices send requests to the Trusted Front End instead of Core.
3. If you use an external host, which is configured in the Admin Portal, in Settings > General > Enterprise,
make sure your external host is configured to forward requests to the Trusted Front End. Changing the
external host requires a Core restart, which you can do in the System Manager, in Maintenance >
Reboot.
4. Set up your Trusted Front End to forward HTTPS requests from devices on port 443 to MobileIron Core.
Procedure
1. In Security > Advanced > Trusted Front End, select Enable TFE use for communication from
devices to MobileIron Core.
2. Click Apply.
3.
Click Download CA Certficates.
A file called tfe-ca-certs.zip downloads. It contains the certificates that establish an identity chain of trust
with a legitimate server verified by a trusted third-party certificate authority. These certificates allow the
Trusted Front End and Core to validate the identity certificate that the device presents.
4. Provision your Trusted Front End with the downloaded certificates.
5.
Your MobileIron contact has an example configuration file for Apache called ssl.conf. If you are using the
Apps@Work web clip for iOS devices, and you are using it on a port other than 7443, modify the value
7443 in ssl.conf.
If you are not using Apache as your Trusted Front End server, work with MobileIron Professional Services
or a MobileIron certified partner to determine if you can set up this deployment.
6. Install ssl.conf on your Trusted Front End.
Advanced: Trusted Front End

MobileIron Core 11.0.0.0 System Manager Guide| 93
Related topics:
l "Mutual authentication between devices and MobileIron Core" in the MobileIron Core Device Management
Guide.
Advanced: Portal Authentication
Use Security > Advanced > Portal Authentication to set up the authentication method for:
l device users to access the self-service user portal
l administrators to access the Admin Portal
l administrators to access the System Manager
The authentication methods provided on this screen are not available if you
enable SAML in the System Manager in Security > Advanced > SAML. For the
Admin Portal and self-service user portal, authentication uses SAML. For the
System Manager, local users authenticate to the System Manager using a user
ID and password.
Related topics
l Self-service user portal authentication
l Admin Portal authentication
l Certificates required for certificate authentication to Core portals
l Certificate attribute mapping used in certificate authentication to the Core portals
l Using $EDIPI$ in certificate authentication
l Entrust URL for getting derived credentials
l Configuring password authentication to a Core portal
l Configuring certificate authentication to the user portal
l Configuring certificate authentication to the Admin Portal
l Configuring certificate authentication to the System Manager
l Configuring the Entrust URL for getting derived credentials
l Replacing the certificate for authentication
Self-service user portal authentication
Device users can authenticate to the self-service user portal using one or both of the following methods, according
to how you configure MobileIron Core:
Advanced: Portal Authentication

MobileIron Core 11.0.0.0 System Manager Guide| 94
l
a user name and password
These are the credentials a device user uses to register a device with MobileIron Core. This authentication
method is the default.
l
an identity certificate from a smart card
When using this authentication method, you can also set up the Entrust URL for getting derived
credentials.
See “User portal authentication options” in the Device Management Guide for supported platforms for
authenticating with a smart card.
NOTE: Certificate authentication is also supported in FIPS mode.
The device user can be:
l an LDAP user
l an Admin Portal local user as set up in the Admin Portal in Devices & Users > Users.
Related topics
l Configuring password authentication to a Core portal
l Configuring certificate authentication to the user portal
Admin Portal authentication
Admin Portal administrators are set up as local users in the Admin Portal in Devices & Users > Users. They can
authenticate to the Admin Portal using one or both of the following methods, according to how you configure
MobileIron Core:
l
a user name and password
These are the credentials for the local user as set up in the Admin Portal in Devices & Users > Users.
This authentication method is the default.
l
an identity certificate from a smart card
See “Logging in to the Admin Portal with a smart card” in Getting Started with MobileIron Core for
supported platforms for authenticating with a smart card.
NOTE: Certificate authentication is also supported in FIPS mode.
Related topics
l Configuring password authentication to a Core portal
l Configuring certificate authentication to the Admin Portal
System Manager authentication
System Manager administrators are set up as local users in the System Manager in Security > Local Users. They
can authenticate to the System Manager using one or both of the following methods, according to how you
Admin Portalauthentication

MobileIron Core 11.0.0.0 System Manager Guide| 95
configure MobileIron Core:
l
a user name and password
These are the credentials for the local user as set up in the System Manager in Security > Local Users.
This uthentication method is the default.
l
an identity certificate from a smart card
Using an identity certificate from a smart card is supported only on desktop computers. It is not supported
on mobile devices. Also, it is not supported with Firefox.
NOTE: Certificate authentication is also supported in FIPS mode.
Related topics
l Configuring password authentication to a Core portal
l Configuring certificate authentication to the Admin Portal
Certificates required for certificate authentication to Core portals
To allow certificate authentication tp MobileIron Core portals (the Admin Portal, the System Manager, and the self-
service user portal), use the MobileIron Core System Manager to upload a PEM-formated file to Core. The PEM-
formatted file contains either:
l the issuing certificate authority (CA) certificate
l the supporting certificate chain
MobileIron Core does not check the certificate’s validity. Make sure the certificate that you upload is valid. That is,
make sure it is not expired and not revoked.
When users sign in to a Core portal, they provide an identity certificate from a smart card. The Core portal
authenticates the user’s identity certificate against the certificate that you uploaded to Core. The same uploaded
certificate is used for authentication to all the Core portals.
For authentication of local users, set the User ID of the local user to the user
identity from the identity certificate.
Related topics
l Configuring certificate authentication to the user portal
l Configuring certificate authentication to the Admin Portal
l Configuring certificate authentication to the System Manager
Certificates required for certificate authentication to Core portals

MobileIron Core 11.0.0.0 System Manager Guide| 96
Certificate attribute mapping used in certificate authentication to the Core portals
When the user presents an identify certificate for authentication, MobileIron Core authenticates the identity
certificate against the issuing CA certificate or certificate chain you uploaded to Core. As part of that
authentication, Core makes sure the user identity in the identity certificate is a valid Core user. You configure
which field in the identity certificate and which Core substitution variable must match.
Therefore, when you upload the certificate used for authenticating user's identity certificate, you also configure the
following mapping information:
l
which field from the identity certificate the authentication uses as the user identity. The choices are:
o
the NT Principal Name
o
the RFC822 email name
Your choice must match the Subject Alternative Name type you chose for generating the identity
certificate.
NOTE: For the NT Principal Name, MobileIron Core uses the User Principal Name in the Subject
Alternative Name (SAN) in the identity certificate.
l
the Core substitution variable, against which the authentication compares the user identity.
Allowed variables depends on the Core Portal as given in the following table:
Supported variables Admin Portal and Self-
Service User Portal
System Manager
$USERID$ (default) Yes Yes
$EMAIL$ Yes Yes
$USER_UPN$ Yes No
$EDIPI$
For the Department of Defense
only. See Using $EDIPI$ in
certificate authentication.
No
Yes
$USER_CUSTOM1$ Yes No
$USER_CUSTOM2$ Yes No
$USER_CUSTOM3$ Yes No
$USER_CUSTOM4$ Yes
No
TABLE 26. SUPPORTED VARIABLES IN CORE
Your choice depends on the Core variable you chose to populate the Subject Alternative Name in the
identity certificate.
l You can map up to two attributes. If a second attribute is configured, both fields in the identity certificate
must match with the Core substitution value.
Certificate attribute mapping used in certificate authentication to the Core portals

MobileIron Core 11.0.0.0 System Manager Guide| 97
Note The Following:
l The same user identity mapping to a Core variable is used for authentication to both the user portal and the
Admin Portal.
l You separately configure the user identity mapping to a Core variable for System Manager authentication.
l Using $USER_UPN$ and $USER_CUSTOM1$ through $USER_CUSTOM4$ is only applicable for
LDAP users.
l
Consider the case in which you specify the NT Principal Name as the field to use from the identity
certificate, and you specify $USERID$, $EMAIL$, or $USER_UPN$ as the Core substitution variable to
match. MobileIron Core accepts both of the following formats as a match:
o
DOMAIN\userid
o
userid@domain
That is, the NT Principal Name and the Core substitution variable can have different formats, but match as
long as the domain and userid match.
l Core versions prior to 10.0.0.0 always compared the User Principal Name in the Subject Alternative Name
in the identity certificate to Core’s list of values for the $USERID$ variable. It accepted as a match either
of the formats DOMAIN\userid and userid@domain. If no match was found, Core compared the RFC822
email address in the Subject Alternative Name to Core’s list of values for the $EMAIL$ variable. If you are
upgrading from one of those prior Core releases, Core continues the same behavior until you apply a new
configuration in the System Manager in Security > Advanced > Portal Authentication.
l If you use a custom LDAP variable ($USER_CUSTOM1$ through $USER_CUSTOM4$) to compare the
user identity to, the variable must resolve to only one field from the certificate. Otherwise, the
authentication will fail.
Related topics
l Configuring certificate authentication to the user portal
l Configuring certificate authentication to the Admin Portal
l Configuring certificate authentication to the System Manager
l Using $EDIPI$ in certificate authentication
Using $EDIPI$ in certificate authentication
Using the MobileIron Core substitution variable $EDIPI$ is applicable only to Department of Defense customers.
You enter it when adding a System Manager local user. The variable contains the Department of Defense
identification number, also known as the Electronic Data Interchange Personal Identifier.
Therefore, if you are a Department of Defense customer setting up authentication to the System Manager using a
certificate on a Common Access Card (CAC), you must follow these steps:
Using $EDIPI$ in certificate authentication

MobileIron Core 11.0.0.0 System Manager Guide| 98
Procedure
1.
Enter a value into the EDIPI field when you create a System Manager local user.
Make sure the format of the $EDIPI$ value for each local user matches the format of the EDIPI value in the
NT Principal Name in the user's identity certificate.
2.
Use the $EDIPI$ variable as the attribute against which the authentication compares the user identity.
Although using $EDIPI$ is required for CAC cards, MobileIron Core does not enforce the selection when
you configure portal authentication. Core also does not ensure that you have entered a EDIPI value for the
System Manager local users.
Entrust URL for getting derived credentials
When using certificate authentication to the self-service user portal, you can set up MobileIron Core so that users
can get their Entrust derived credentials when they get their Core registration PIN. Specifically, in the System
Manager, you provide Core with the Entrust IdentityGuard Self-Service Module (SSM) URL. This URL is a deep
link that points directly to the page on the Entrust self-service portal where a user can get a derived credential.
When the user requests a derived credential on the user portal, the user portal redirects the user to the URL you
provided. The user interacts with the Entrust self-service portal to get a derived credential, after which the Entrust
self-service portal redirects the user back to the MobileIron Core user portal. The user uses the PIV-D Entrust app
on a mobile device to activate the derived credential.
Related topics
l MobileIron Core Derived Credentials Guide
Configuring password authentication to a Core portal
You can configure the following:
l Allow device users to authenticate with their user name and password to the self-service user portal.
l Allow administrators to authenticate with their user name and password to the Admin Portal.
l Allow administrators to authenticate with their user name and password to the System Manager.
This authentication method is the default MobileIron Core setting.
Procedure
1. Log into System Manager.
2. Go to Security > Advanced > Portal Authentication.
3. Select Password Authentication.
Entrust URL for getting derived credentials

MobileIron Core 11.0.0.0 System Manager Guide| 99
4. Under Password Authentication, select one or more of Self-Service User Portal, Admin Portal, or
System Manager.
5. Click Apply > OK.
Related topics
l Self-service user portal authentication
Configuring certificate authentication to the user portal
You can allow device users to authenticate to the self-service user portal with the identity certificate on a smart
card.
Before you begin: Have the PEM-formatted issuing CA certificate or certificate chain available to upload to
MobileIron Core if you have not already uploaded it for authentication to another portal.
Procedure
1. Log into System Manager.
2. Go to Security > Advanced Portal Authentication.
3. Select Certificate Authentication.
4. Under Certificate Authentication, select Self-Service User Portal.
5.
Click Upload Issuing CA Certificate. to open the Upload Issuing CA Certificate window.
NOTE: MobileIron Core uses the same issuing CA certificate or certificate chain for
authentication to all Core portals. If you have already uploaded the file, skip this step.
Continue to selecting certificate attribute mapping.
6. Click Choose File, and select the PEM-formatted file that contains either the issuing CA certificate or the
supporting certificate chain.
7. Click Upload Certificate > OK.
8.
In Select Certificate Attribute Mapping:
a. In the Map from attribute dropdown, select the user identity type in the identity certificate to use for
authenticating the user.
b. In the Map to attribute dropdown, select the Core variable with which to compare the user identity.
NOTE: MobileIron Core uses the same attribute mapping for authentication to both the user
portal and the Admin Portal. If you already set this mapping, skip this step.
9.
Click Apply > OK.
IMPORTANT: Clicking Apply changes Core authentication behavior to compare the Map from
attribute user identity type to the Map to attribute Core variable. The behavior in
Core versions prior to 10.0.0.0 compared the User Principal Name to $USERID$ and
the RFC822 email to $EMAIL$.
Configuring certificate authentication to the user portal

MobileIron Core 11.0.0.0 System Manager Guide| 100
Related topics
l Certificates required for certificate authentication to Core portals
l Certificate attribute mapping used in certificate authentication to the Core portals
Configuring certificate authentication to the Admin Portal
You can allow administrators to authenticate to the Admin Portal with the identity certificate on a smart card.
Before you begin: Have the PEM-formatted issuing CA certificate or certificate chain available to upload to
MobileIron Core if you have not already uploaded it for authentication to another portal.
Procedure
1. Log into System Manager.
2. Go to Security > Advanced > Portal Authentication.
3. Select Certificate Authentication.
4. Under Certificate Authentication, select Admin Portal.
5.
Click Upload Issuing CA Certificate. to open the Upload Issuing CA Certificate window.
NOTE: MobileIron Core uses the same issuing CA certificate or certificate chain for
authentication to all Core portals. If you have already uploaded the file, skip this step.
Continue to selecting certificate attribute mapping.
6. Click Choose File, and select the PEM-formatted file that contains either the issuing CA certificate or the
supporting certificate chain.
7. Click Upload Certificate > OK.
8.
In Select Certificate Attribute Mapping:
a. In the Map from attribute dropdown, select the user identity type in the identity certificate to use for
authenticating the user.
b. In the Map to attribute dropdown, select the Core variable with which to compare the user identity.
NOTE: MobileIron Core uses the same attribute mapping for authentication to both the user
portal and the Admin Portal. If you already set this mapping, skip this step.
9.
Click Apply > OK.
NOTE: MobileIron Core uses the same attribute mapping for authentication to both the user
portal and the Admin Portal. If you already set this mapping, skip this step.
NOTE: MobileIron Core uses the same attribute mapping for authentication to both the user portal and
the Admin Portal. If you already set this mapping, skip this step.
Related topics
l Certificates required for certificate authentication to Core portals
l Certificate attribute mapping used in certificate authentication to the Core portals
Configuring certificate authentication to the Admin Portal

MobileIron Core 11.0.0.0 System Manager Guide| 101
Configuring certificate authentication to the System Manager
You can allow administrators to authenticate to the System Manager with the identity certificate on a smart card.
Before you begin: Have the PEM-formatted issuing CA certificate or certificate chain available to upload to
MobileIron Core if you have not already uploaded it for authentication to another portal.
Procedure
1. Log into System Manager.
2. Go to Security > Advanced > Portal Authentication.
3. Select Certificate Authentication.
4. Under Certificate Authentication, select System Manager.
5. Select PIV or CAC, depending on whether the identity certificate to authenticate is on a personal identity
verification (PIV) card or common access card (CAC).
6.
Click Upload Issuing CA Certificate. to open the Upload Issuing CA Certificate window.
NOTE: MobileIron Core uses the same issuing CA certificate or certificate chain for
authentication to all Core portals. If you have already uploaded the file, skip this step.
Continue to selecting certificate attribute mapping.
7. Click Choose File, and select the PEM-formatted file that contains either the issuing CA certificate or the
supporting certificate chain.
8. Click Upload Certificate > OK.
9.
In Select Certificate Attribute Mapping:
a. In the Map from attribute dropdown, select the user identity type in the identity certificate to use for
authenticating the user.
b. In the Map to attribute dropdown, select the Core variable with which to compare the user identity. If
you selected CAC when choosing CAC versus PIV, you must select $EDIPI$.
10. Click Apply > OK.
Related topics
l Certificates required for certificate authentication to Core portals
l Certificate attribute mapping used in certificate authentication to the Core portals
l Using $EDIPI$ in certificate authentication
Configuring the Entrust URL for getting derived credentials
Before you begin: Set up certificate authentication to the self-service user portal as described in Configuring
certificate authentication to the user portal. To configure the Entrust URL for getting derived credentials:
1. Log into System Manager.
2. Go to Security > Advanced > Portal Authentication.
Configuring certificate authentication to the System Manager

MobileIron Core 11.0.0.0 System Manager Guide| 102
3.
Select Derived Mobile Smart Credential (Self-Service User Portal Only).
The field Entrust IdentityGuard SSM URL appears.
4.
Enter the Entrust IdentityGuard Self-Service Module (SSM) URL.
This URL is a deep link that points directly to the page on the Entrust self-service portal where a user can
get a derived credential.
5. Click Apply > OK.
Related topics
l MobileIron Core Derived Credentials Guide using the PIV-D Entrust App
Replacing the certificate for authentication
After you have uploaded a PEM-formated file to Core, you can replace it when necessary. For example, if the
existing issuing CA certificate is about to expire, upload a replacement.
MobileIron Core uses the same issuing CA certificate or certificate chain for
authentication to all Core portals.
Procedure
1. Log into System Manager.
2. Go to Security > Advanced > Portal Authentication.
3. Click Replace CA Certificate.
4. Click Choose File, and select the PEM-formatted file that contains either the replacement issuing CA
certificate or the supporting certificate chain.
5. Click Upload Certificate > OK.
6. Click Save > OK.
Related topics
l Certificates required for certificate authentication to Core portals
Advanced: SSH Configuration
Use Security > Advanced > SSH Configuration to configure ciphers, key exchange algorithms and hmacs. The
System Manager portal allows you to upload the public keys then enable or disable public key and password
authentications. By default, both Public Key Authentication and Password Authentication options are enabled
and SSH configurations are applied to both SSH client and server. Configurations persist after a Backup and
Restore procedure is completed.
Replacing the certificate for authentication

MobileIron Core 11.0.0.0 System Manager Guide| 103
When enabled, SSH public key authentication is attempted first. A valid public key for an authorized administrator
account must be uploaded. Otherwise, password authentication is used.
The public key authentication is specified by the administrator and is valid only
for the user uploading the key. For example, if <admin> is the user uploading the
key, then ssh for admin@<ip> will be successful.
The default (non-FIPS) SSH, FIPS SSH, and CC (Common Criteria) SSH configurations have different sets of
ciphers, key exchange algorithms and hmacs options, as described in Default SSH configuration, FIPS SSH
configuration, and CC SSH configurations.
Default SSH configuration
The following table lists the available options for the default SSH configuration:
Configuration Available Selected
Cipher
aes256-cbc, aes128-cbc,
chacha20-poly1305
aes256-gcm, aes128-gcm, aes256-ctr,
aes128-ctr
Key Exchange
Algorithms
ecdh-sha2-nistp521, ecdh-sha2-nistp384,
ecdh-sha2-nistp256, curve25519-sha256
diffie-hellman-group-exchange-sha256,
diffie-hellman-group-exchange-sha1,
diffie-hellman-group14-sha1
HMAC
hmac-sha2-512, hmac-sha2-256,
hmac-sha1
TABLE 27. DEFAULT SSH CONFIGURATION OPTIONS
FIPS SSH configuration
The following table lists the available options for the default FIPS SSH configuration:
Configuration Available Selected
Cipher
aes256-gcm, aes128-gcm, aes256-ctr,
aes128-ctr
Key Exchange
Algorithms
diffie-hellman-group-exchange-sha256
HMAC
hmac-sha2-512, hmac-sha2-256
TABLE 28. FIPS SSH CONFIGURATION OPTIONS
Default SSH configuration

MobileIron Core 11.0.0.0 System Manager Guide| 104
CC SSH configurations
The following table lists the available options for the default Common Criteria (CC) SSH configuration:
Configuration Available Selected
Cipher
aes256-gcm, aes128-gcm, aes256-ctr,
aes128-ctr
aes256-cbc, aes128-cbc
Key Exchange
Algorithms
diffie-hellman-group-exchange-sha256 diffie-hellman-group14-sha1
HMAC
hmac-sha2-512, hmac-sha2-256,
hmac-sha1
TABLE 29. CC SSH CONFIGURATION OPTIONS
CC SSH configurations

4
MobileIron Core 11.0.0.0 System Manager Guide| 105
Maintenance Settings
l Clear configuration
l System Storage
l Reboot
l System backup
l Optimize database
Maintenance overview
System Manager Maintenance menu options contains menu items for configuring MobileIron Core access. The
following table summarizes the tasks associated with each menu item.
Settings Menu Task
Software Updates Upgrade, configure, and manage software versions. Refer to the
appendix in this document, Upgrading MobileIron Core Releases,
for details.
Export Configuration Export system configuration files for backup.
Import Configuration
Import backed up system configuration files.
Clear Configuration Clear unsaved configuration settings and return to the default
configuration.
System Storage Monitor disk storage availability.
Reboot Reboot the MobileIron server, clear the current configuration
settings, and to restart all server modules.
System Backup Test connectivity to the backup server, schedule daily backups,
and perform an immediate backup.
Optimize Database Optimize Core database performance by cleaning up
fragmentation in the database.
TABLE 30. MAINTENANCE MENU ITEMS

MobileIron Core 11.0.0.0 System Manager Guide| 106
Software updates
Use the Maintenance > Software Updates feature to upgrade, configure, and manage software versions. Refer to
Upgrading MobileIron Core Releases for details.
Self Diagnosis
Self diagnosis is a powerful, automated maintenance tool that provides rapid responses to fixing important issues
and reducing the need for patch releases.
This features allows System Manager to perform regularly scheduled self diagnosis on Core. When self diagnosis
is enabled, System Manager automatically downloads the latest Core diagnosis scripts from MobileIron, runs the
scripts, diagnoses potential issues, and reports errors to the administrators in the Self Diagnosis details table.
When fixes are available, administrators are immediately provided with the fixes that they can apply on their own,
without waiting for a patch release.
Core issues this automated diagnosis features diagnoses range from informational to critical, depending on the
nature of the issue. For instance, a possible informational issue might be that you have too many retired devices in
the system, which could result in performance problems. A critical issue could be that your certificate is about to
expire. You could see a message that you are going to run out of disk space. It could be either informational or
critical depending on how much disk space you have remaining.
When self diagnosis is enabled, it will:
l Run at random times on random days (Saturday or Sunday) each weekend.
l Provide issue IDs that are useful for troubleshooting by MobileIron Support.
l Provide a description and log of each issue for administrators to understand the issue. Logs are saved in
the following directory: /var/log/messages.
l Provide a link to KB articles for an explanation of the fix.
l Provide the ability for administrators to apply a fix and view the history of each applied fix.
Before you can use self diagnosis, you must allow traffic between the MobileIron server that hosts and pushes
diagnostic scripts and patches to Core. Whitelist the hostname and port when configuring your firewall. After
enabling self diagnosis, you can still run it at any time as well as disable it. Internet access is required to use this
feature as it must contact MobileIron to download diagnostic scripts.
Self diagnosis does not support backup and restore. If fixes were applied to a
system that was backed up, you must re-apply the fixes after the system has
been restored.
Software updates

MobileIron Core 11.0.0.0 System Manager Guide| 107
Related topics
l Self Diagnosis window
l Using self diagnosis
Self Diagnosis window
Access this feature by logging in from the System Manager Portal then clicking Maintenance > Self Diagnosis to
open the Self Diagnosis windows. The window includes the following options:
l Self Diagnosis table
l History button
l Run Diagnosis option
l Preferences options
Self Diagnosis table
The self diagnosis table is updated each time diagnosis scripts are run (either on the automated schedule or by
clicking Run Diagnosis). The table shows all the issues that were found during the diagnosis, relevant KB articles,
and any available fixes that apply to the current version of the software, if any.
The following table summarizes the fields in the Self Diagnosis window.
Fields Description
ID The issue identifier, which is useful for troubleshooting by MobileIron Support.
Description This is a short description that explains the issue.
KB Article This links to a knowledge-based support article that provides useful information to
understand the issue or details for administrators to fix the issue.
Status The options are: N/A, SUCCESS (after clicking Apply Fix and it is successful), or FAILED
(after clicking Apply Fix and the fix was not successful). Call support if a fix fails.
Action The options are:
l View Details to open the log report of the issue.
l Apply Fix to update the software with a patch to fix one or more issues. The
response will be SUCCESS or FAILED. Call MobileIron Support if a fix attempt
fails.
TABLE 31. SELF DIAGNOSIS TABLE FIELDS
Self Diagnosis window

MobileIron Core 11.0.0.0 System Manager Guide| 108
History button
The History options provide the history of fixes, presented in a table with sortable columns. The following history
records are available to you when you click:
l Current Release: to display a history of applied fixes for the current release on that Core instance (9.6.0.0,
for example)
l Complete History: to display a history of applied fixes for all releases on that Core instance (9.6.0.0,
9.6.0.1, and 9.7.0.0, for example).
Each history table provides the following information.
l Execution Time: the format is based on how the clock on the Core instance is configured
l ID: the same identifier listed for the issue, as it is listed on the Self Diagnosis table.
l Version: the version to which the fix was applied.
l Operation: the values will be INSTALL or SYSTEM CLEANUP.
l Status: the status of the applied fix and the values are SUCCESS or FAILED.
l KB Article: the knowledge base article listed for the issue, as it is listed on the Self Diagnosis table.
l Comment: any available system-generated information regarding the operation.
Run Diagnosis option
When enabled, self diagnosis runs automatically. However, you can also run self diagnosis on the system at any
time. Click the Run Diagnosis button to immediately trigger a new diagnosis outside the scheduled time. This
action downloads the latest diagnosis scripts from MobileIron and reports any findings in the Self Diagnosis table.
The Run Diagnosis button is disabled until the self diagnosis features has been
enabled.
Preferences options
The Preferences option to add the following two modes above the Self Diagnosis table:
l
Enabled
o
Turns on self diagnosis.
o
Displays the time of the most recent self-diagnostics.
o
Displays the result of the most recently run self-diagnostics.
l
Disabled: turns off self diagnosis, (default)
o
Turns off self diagnosis.
o
Provides instructions to enable it.
History button

MobileIron Core 11.0.0.0 System Manager Guide| 109
Related topics
l Self Diagnosis
l Using self diagnosis
Using self diagnosis
The self diagnosis feature runs automatically at random times during random weekend days, but you can also run it
between schedules. Self diagnosis is disabled, by default. This topic describes how to use the feature, including
enabling the self diagnosis schedule.
If you are using HA, the fix will be applied to the primary server, but not to the
secondary server. You must manually apply the fix to the secondary server.
Before you begin
Before you can use this feature, you must:
l Have access to the Internet to download diagnostic scripts from MobileIron.
l
Allow traffic between the MobileIron server that hosts and pushes diagnostic scripts and patches to Core.
Whitelist the hostname and port of the script server when configuring your firewall.
o
Hostname: clm.mobileiron.com
o
Port: 443
Procedure
1. Log into the System Manager.
2. Click Maintenance > Self Diagnosis.
3.
In the Self Diagnosis window, select one or more of the following options:
l Click History > Current Release to view a history of the fixes applied to the current Core release
(9.6.0.0, for example).
l Click History > Complete History to view a complete history of the fixes applied for all Core
releases (9.6.0.0, 9.6.1.0, and 9.7.0.0, for example).
l Click Run Diagnosis to immediately download and run the latest diagnosis scripts.
l Click Preferences > Enabled to schedule the automated self diagnosis.
l Click Preferences > Disabled to turn off the scheduled for diagnosis.
l Click Save to save any changes to the Preference options.
l Click Save on the top right corner for a global save that persists changes on reboot.
4.
In the Self Diagnosis table, select one or more of the following options:
Using self diagnosis

MobileIron Core 11.0.0.0 System Manager Guide| 110
l Click View Details to open a log of the issue, if no fix is available.
l Click Apply Fix to apply the fix for the selected issue.
If the fix is successfully applied, the Status column displays SUCCESS.
If the fix is not successfully applied, the Status column displays FAILED. Call MobileIron Support.
Related topics
l Self Diagnosis
l Self Diagnosis window
Export configuration
Use the Maintenance > Export Configuration feature to back up the system configuration.
Procedure
To export the MobileIron Server configuration settings to XML format:
1. Log into System Manager.
2. Go to Maintenance > Export Configuration.
3. Click Export.
Import a configuration
Use the Maintenance > Import Configuration feature to back up the system configuration.
Procedure
To import a MobileIron Server configuration from a local XML file or FTP site:
1. Log into System Manager.
2. Go to Maintenance > Import Configuration > Select File.
3. Click Choose File.
4. Select the file.
5. Click Import.
Clear configuration
Use the Maintenance > Import Configuration feature to clear unsaved configuration settings and return to the
default configuration.
Export configuration

MobileIron Core 11.0.0.0 System Manager Guide| 111
Procedure
To clear the configuration:
1. Log into System Manager.
2. Go to Maintenance > Clear Configuration.
3. Click Clear Configuration.
System Storage
Use the Maintenance > System Storage options to monitor disk storage availability. Running out of disk space
can result in corrupting the MobileIron Core database. Therefore, this feature ensures that:
l You are aware when disk space availability is becoming too low. Once warned, you can clean up the Core
database and avoid database corruption.
l Core services are automatically stopped when disk space availability reaches the lowest threshold,
thereby avoiding database corruption when no more disk space is available.
MobileIron Core can send you an email when it detects that its available disk storage space has dropped below
thresholds that you define. Specifically, when the available space is less than a:
l Warning Threshold: to receive a warning email.
l Stop Threshold: to receive an email and after a five minute delay, Core stops its critical services if you
selected that option.
When notified, you can use existing CLI commands to clean up the Core database, thereby freeing up disk space.
The CLI commands are:
l dbcleanup purge_data
l dbcleanup app_inventory
l diskcleanup retired_devices
l diskcleanup trashed apps
Using these commands is described in the Increasing available disk storage section of this chapter.
Hover over the System Storage bar to see a popup indicating the actual
storage usage and capacity.
Although the Event Center system event System storage threshold has been reached (set in the Admin
Portal’s Logs > Event Settings) you will still receive a notification, no automatic action results from the event
being triggered. Without immediate action, the possibility of running out of disk space and database corruption is
more likely.
System Storage

MobileIron Core 11.0.0.0 System Manager Guide| 112
This section includes the following topics:
l Configuring system storage thresholds
l Stopped Core services
l Increasing available disk storage
l Restart Core services
Configuring system storage thresholds
Use Maintenance > System Storage to set the disk storage capacity thresholds and use System Manager to
enable automatically stopping critical Core services.
Procedure
To configure the disk storage capacity thresholds:
1. Log into System Manager.
2. Go to Maintenance > System Storage.
3. Go to the System Storage options and check the box next to Check free space capacity every.
4. Select how many days between each check.
5.
Select the time of day for each check.
IMPORTANT: The system uses GMT (Greenwich Mean Time). Select a time that is during your
work hours so that you see the notification emails at a time of day when you can
take actions.
6.
Enter the email addresses for receiving the notifications.
Separate email addresses with commas.
7.
Select a Warning Threshold.
For example, if this value is set to 20%, an email notification is sent when disk storage availability drops to
less than 20% of disk storage capacity.
8.
Select a Stop Threshold.
For example, if this value is set to 10%, an email notification is sent when disk storage availability drops to
less than 10% of the threshold:
9.
Select Stop all critical Core services when stop threshold is met.
Refer to the Stopped Core services table for more information.
Core delays stopping the services until five minutes after the threshold is met. You cannot cancel the stop
action once it is triggered.
10.
Click Save.
You will receive emails when a threshold is met.
Example
Configuring system storage thresholds

MobileIron Core 11.0.0.0 System Manager Guide| 113
Warning Threshold email
Storage has reached a warning threshold of 50%.
Total Size : 197300M
Used Size : 92621
Available Size : 94651
Note: Cleanup the disk space using CLI commands.
Stop Threshold email
Storage has reached a stop threshold of 45%. CORE services will be stopped in 5 minutes,
if not already stopped
Total Size : 197300M
Used Size : 137503M
Available Size : 49769M
Note: Cleanup the disk space using CLI commands. Reboot Core to restart the services
Stopped Core services
When disk storage availability drops below the stop threshold, and you have selected the option to stop critical
services, Core stops are listed in the following table:
Service stopped Impact to stopping the service
Core Stopping this service stops:
l Communication with devices
l Communication between Core and Sentry
l Admin Portal
l User Portal
However, the following are still running:
l System Manager
l CLI
RDB Exporter Core does not send data to the Reporting Database
TABLE 32. CORE SERVICES STOPPED
Increasing available disk storage
When the warning threshold or stop threshold is reached, use CLI commands to clean up the disk storage.
Procedure
1. Use ssh to log in to MobileIron Core.
2. Enter enable to access EXEC PRIVILEGED CLI mode.
3. Enter the “enable secret” password.
Warning Threshold email

MobileIron Core 11.0.0.0 System Manager Guide| 114
4.
Enter dbcleanup purge_data to clean up the database.
If Core services are not already stopped, this command stops them and restarts them when it finishes the
clean up.
5.
Enter dbcleanup app_inventory to clean up unused and duplicate app inventory information in the data
base.
If Core services are not already stopped, this command stops them and restarts them when it finishes the
clean up.
6. Enter diskcleanup retired_devices to clean up retired devices from the disk.
7. Enter diskcleanup trashed_apps to clean up deleted apps from the disk.
8. Restart Core if any Core services were stopped.
Restart Core services
You can use the following methods to restart Core services:
l System Manager
l CLI command
Restarting Core services using System Manager
Procedure
1. Log into System Manager.
2. Go to Maintenance > Reboot.
3. Click Reboot > Yes.
Restarting Core services using the CLI
Procedure
1. Use ssh to log in to MobileIron Core.
2. Enter enable to access EXEC PRIVILEGED CLI mode.
3. Enter the “enable secret” password.
4. Enter reload.
Reboot
Use Maintenance > Reboot to reboot the MobileIron server, clear the current configuration settings, and to restart
all server modules.
Restart Core services

MobileIron Core 11.0.0.0 System Manager Guide| 115
Procedure
1. Log into System Manager.
2. Go to Maintenance > Reboot.
3. Click Reboot > Yes.
System backup
Use this option to testing connectivity to the backup server, scheduling daily backups, and performing an
immediate backup.
A Core system backup does not include the Splunk forwarder configuration
within Core. Therefore, after the system is restored, you must manually
configure Splunk forwarder.
This section contains the following topics:
l Prerequisites for configuring system backups
l Enabling backups
l System backup status
l Configuring system backup settings
l System Backup Configuration group
l Running an immediate system backup
l Restore a system backup
l Create local backup
l Restore System
Prerequisites for configuring system backups
This section lists the prerequisites for configuring system backups.
l Sufficient disk space at the destination to store the archive
l Protocol-specific requirements described in the following table:
System backup

MobileIron Core 11.0.0.0 System Manager Guide| 116
Protocol Prerequisites
NFS Port 2049 open from MobileIron Core to the NFS server.
The NFS option assumes that user authentication is not required for the specified
server. Therefore, MobileIron recommends using IP ACLs to restrict NFS mounts to
MobileIron Core.
SCP Port 22 open from Core to the backup location.
FTP Port 21 open from Core to the FTP server.
CIFS Ports 137 (UDP), 138 (UDP), 139 (TCP), and 445 (TCP) open from Core to the
Windows share server.
SMB v2.0 through the latest version as supported by MobileIron.
TABLE 33. SYSTEM BACKUP PREREQUISITES
Enabling backups
Procedure
To enable the configured backup schedule:
1. Log into System Manager.
2. Go to Maintenance > System Backup.
3. Go to the System Backup Control group.
4. Select Enable for the System Backup option.
System backup status
Use the Use the Maintenance > System Backup Status group to track status of the backup. Starting a backup,
activates the Backup is running indicator in the System Backup Status section. When it completes, a brief
status message displays the following information:
l date and time of the backup
l backup type (LOCAL, FTP, NFS, CIFS, or SCP)
l whether the backup was scheduled (automatic) or run now (manual)
l whether the backup was successful
Enabling backups

MobileIron Core 11.0.0.0 System Manager Guide| 117
FIGURE 3. SYSTEM BACKUP WINDOW
MobileIron Core executes a set of validations to verify that the backed up
database is not corrupted. If any of the validations fail, the status message
indicates that the backup failed. The same validations occur whenever a
backup is attempted. For example, the validations occur when backing up
Core in a High Availability environment
System backup email notifications
Email notifications about a successful or failed backup contain the following information:
l the time of the success or failure
l the size of the backup
l time taken to perform the backup
l backup type (FTP, SCP, NFS, or CIFS)
l backup server IP address or name
l path of backup location on the backup server
l the reason for a backup failure
Possible failure reasons given are:
l Mount fail
l Server not available
l Authentication failure
l Not enough disk space on the server
l Not enough disk space on Core
l Failed to access the directory
System backup email notifications

MobileIron Core 11.0.0.0 System Manager Guide| 118
Use this information to take actions to ensure the success of subsequent backups. For example, if you are notified
that you are out of disk space on your backup server, you can remove old files from the backup server.
Example
The following are examples of emails for successful and failed backups:
FIGURE 4. SUCCESSFUL BACKUP EMAIL EXAMPLE
FIGURE 5. UNSUCCESSFUL BACKUP EMAIL EXAMPLE
Configuring system backup settings
Complete the following steps to configure the destination and schedule for backups:
1. Log into System Manager.
2. Go to Maintenance > System Backup.
3. Scroll to the System Backup Configuration group.
4.
Modify the fields, as necessary.
Refer to the System Backup Configuration group table for more information.
5.
Click Test Connectivity.
A message displays indicating whether the connectivity test succeeded or failed.
Configuring system backup settings

MobileIron Core 11.0.0.0 System Manager Guide| 119
6.
Click Save > OK if the connectivity test succeeded.
If the connectivity test failed, check the server information you entered, correct, and retry.
System Backup Configuration group
The following table summarizes fields and descriptions in the System Backup Configuration group:
Fields Description
Notification Email Enter the email address that should receive backup/restore notifications. By default,
notifications are sent only if the backup fails.
Send email on
successful backup
Select this option to include notifications for success in addition to notifications for
failure.
Start time (GMT) Select the time (GMT) at which a daily backup should occur, based on the system time
set in the System Manager.
Only Backup the
System Locally
Select this option if you want to create a system backup that you can download onto
your local machine. Creating and storing a backup locally is useful before installing a
Core update.
If you select this option, the backup server fields are disabled.
See Create local backup.
Backup using Select from the following protocols:
l FTP
l SCP
l NFS
l CIFS
The selected protocol determines which of the following fields display.
Server Enter the domain name or IP address for the server to be used.
For example:
l 10.102.0.50
l mybackupserver.mycompany.com
User Enter the user name for the account to be used.
For CIFS, you might also need to specify the domain (e.g., MYDOMAIN\myuserid).
TABLE 34. SYSTEM BACKUP CONFIGURATIONS FIELDS
System Backup Configuration group

MobileIron Core 11.0.0.0 System Manager Guide| 120
Fields Description
Password Enter the password for the account to be used.
Password
Confirmation
Confirm the password for the account to be used.
Server Path Enter any additional path necessary to specify the location on the host server.
For example, if you want to write backups to the Backups/Core folder on the specified
server, you would enter /Backups/Core in this field.
Be sure to include the leading forward slash (/), or the backup will fail.
TABLE 34. SYSTEM BACKUP CONFIGURATIONS FIELDS (CONT.)
Running an immediate system backup
To start an immediate system backup:
1. Log into System Manager.
2. Go to Maintenance > System Backup.
3. Scroll down to the Run System Backup Now section.
4. Click Run.
Backup filename format
The name of the resulting file has the following format:
<Core_FQDN>-backup-YYYY-MM-DD--HH-MM-SS.tgz
where <Core_FQDN> is the fully-qualified domain for Core.
Viewing backup logs
You can view system backup logs on demand and download them like other system logs,
Procedure
1. Log into System Manager.
2. Go to Troubleshooting > Logs.
3. Go to the View Module Logs section.
4. Click the SystemBackup link.
Restore a system backup
You can restore a system backup (data and configuration) or reset the existing Core to the factory default state if
the following requirements are met:
Running an immediate system backup

MobileIron Core 11.0.0.0 System Manager Guide| 121
l The MobileIron Core version used to create the backup must be used to restore the backup.
l Confirm that the location of the backup file is easily accessible to ensure that the upload process does not
time out. Uploading the file should complete within 15 minutes.
Restoring a system backup
To restore a system backup:
1. Log into System Manager.
2. Go to Maintenance > System Backup.
3. Scroll down to the Restore System section.
4. Click Choose File.
5. Select the backup file.
6.
Click Restore.
When the process is complete, a message displays prompting you to reboot.
7. If prompted to save the configuration, click Yes.
8. If you chose to configure a second MobileIron Core instead of resetting the original, power down the
original to prevent IP conflicts.
9. Select Maintenance > Reboot > Reboot.
Restoring only data
Some situations call for restoring the data from a backup without restoring the system configuration. These
situations include:
l confirming that expected data is included in backups
l disaster recovery
To address these situations, use the Exclude System Configs on Restore option.
Restoring only data

MobileIron Core 11.0.0.0 System Manager Guide| 122
FIGURE 6. RESTORE SYSTEM WINDOW
Restoring a system in this manner does not provide a replacement MobileIron Core. You can use this restored
system to view data or as the basis for a replacement system.
Create local backup
You can either schedule a backup or run an immediate backup of your MobileIron Core instance and store it locally.
Creating and storing a backup locally is useful before installing a Core update.
Configuring local backup
You can run an immediate backup or set up a scheduled backup using the follow these steps to create a local
backup.
Procedure
1. Log into System Manager.
2. Go to Maintenance > System Backup.
3. Go to the System Backup Configuration group.
4. Scroll to the Backup Location Preferences section.
5. Check Only Backup the System Locally.
6.
Do one of the following actions:
Create localbackup

MobileIron Core 11.0.0.0 System Manager Guide| 123
o
From Start Time (GMT), select an hour (GMT time) to run the backup at a specified time.
o
In Run System Backup Now, click Run to run the backup immediately.
7. Click Save.
8. After the backup is run, click Download Backup in System Backup Status.
Restore System
Use a locally downloaded file on your desktop to restore the system or one that has been copied to a remote
fileserver.
To restore the system.
1. Log into System Manager.
2. Go to Maintenance > System Backup.
3. Scroll to the Restore System group.
4. Select Exclude System Configs on Restore.
5. This allows you to restore the backup to a new system without effecting the existing system. This can also
be used to test a backup and restore procedure without effecting the main system. If do not select to
Exclude System Configs on Restore the system will reboot to the IP and host configuration that was in
the backup file.
6. Select Restore to upload your backup file and add it to the system.
7. When you are prompted reboot, go to Maintenance > Reboot and click Reboot.
Optimize database
Use the Maintenance > Optimize database feature to optimize Core database performance by cleaning up
fragmentation in the database. Fragmentation of the Core database can lead to Core performance degradation. The
System Manager display for optimizing the database to clean up fragmentation makes it easy for you to improve
Core performance.
This section includes the following topics:
l Optimizing the database
l Optimizing the database
Optimizing the database
Core services stop when you optimizing the database. Therefore, MobileIron recommends running database
optimization during a maintenance period. See Stopped Core services for a list of all the services that are stopped
when you optimize the database.
After the optimization is completed, Core services are restarted.
Restore System

MobileIron Core 11.0.0.0 System Manager Guide| 124
Optimizing the database can take a long time. The duration can depend on:
l the size of the database, which depends on number of users, devices, apps, policies, and so on, in Core.
l the level of fragmentation that you specify.
l the number of tables that exceed the fragmentation level you specify. and their level of fragmentation.
Do not reboot Core while database optimization is running
Rebooting while database optimization is running can result in a corrupted database. Do not reboot. If you believe
that the optimization run is not ending (hung), contact MobileIron Technical Support.
Optimize the database after deleting retired devices
You can delete retired devices in the Admin Portal in Settings > System Settings > Users & Devices > Delete
Retired Devices or by using the MobileIron Core web services API. Deleting retired devices removes device
records from the database. If the action deletes many retired devices, significant disk space is freed, which means
a database optimization will reduce fragmentation and improve Core performance.
Therefore, MobileIron recommends that if you have a large number of retired devices to delete, delete them during a
maintenance period, and follow the action with database optimization.
Optimizing the database
Procedure
1. Log into System Manager.
2. Go to Maintenance > Optimize database.
3.
Set Optimize Table Fragmentation Level to a value between 10% and 60%.
The fragmentation level indicates the percent of disk space allocated for a database table that is not in use
(free table space / total table space). A higher percentage means higher fragmentation.
The screen displays all database tables with a fragmentation higher than the specified value.
Set a higher level, such as 60%, to display, and then optimize, only the most fragmented tables. Use a
lower level, such as 10%, to display, and then optimize, all (or almost all) tables.
See Optimization tables table for details.
4.
Click Run Now to clean up fragmentation in the displayed tables.
The display indicates:
o
Do not reboot Core while the optimization is running. A reboot during optimization could corrupt your
database. The optimization can take many minutes, even hours. You can monitor the process by
selecting View Status Logs.
Do not reboot Core while database optimization is running

MobileIron Core 11.0.0.0 System Manager Guide| 125
Contact MobileIron Technical Support if the optimization does not finish.
o
Running database optimization stops Core services.
When the optimization completes Core services are restarted.
The display updates the list of tables and their fragmentation information.
After optimizing the database, smaller tables sometimes still show a significant
fragmentation level. This fragmentation level is normal. It occurs because of the
small size of the table and the minimum allocation size for tables.
Optimization tables
The following table summarizes the fragmentation options.
Tables Information
Allocated Size (MB) The total amount of disk space that is allocated to the table.
Free Size (MB) The amount of the disk space allocated to the table that is not in use.
Fragment % The percent of disk space allocated to the table that is not in use (Free Size /
Allocated Size). A higher percentage means higher fragmentation.
TABLE 35. FRAGMENTATION LEVEL OPTIMIZE TABLE
Optimization tables
5
MobileIron Core 11.0.0.0 System Manager Guide| 126
Troubleshooting
l Queue Activation
l In-Memory Queue Monitor
Troubleshooting overview
Troubleshooting menu options provide you with the opportunity to investigate possible problems with MobileIron
operation. In most cases, you will use this page under the direction of MobileIron Technical Support.
The following table summarizes the tasks associated with each menu item.
Settings Menu Task
Logs Enable, disable, clear, view, and export logs.
Network Monitor Produce a TCP dump for one of the MobileIron Server physical
interfaces.
Service Diagnostic
Check the health of the following services:
l Support_Site
l MapQuest
l DNS
l NTP
l Email
System Monitor Monitor Core performance over a period of time.
Queue Activation Performance troubleshooting with MobileIron Technical Support.
In-Memory Queue Monitor Provides MobileIron Technical Support with information about
tasks in the queue in your Core memory.
TABLE 36. TROUBLESHOOTING MENU ITEMS
Working with logs
Use the Troubleshooting > Logs options to:

MobileIron Core 11.0.0.0 System Manager Guide| 127
l Set log levels for Stunnel and HTTPD logs
l Enable debugging for MobileIron modules
l Disable debugging for MobileIron modules
l Clear logs
l View logs
l Export logs
Setting the log level for Stunnel and HTTPD logs
Setting the Stunnel log level
In Troubleshooting > Logs, in the section Stunnel/HTTPD Log Management, you can set the log level for
Stunnel. Stunnel is a library that MobileIron Core uses for TLS encryption. These logs are captured in the
/var/log/mi_messages file. The default log level is Emergency. Typically, you do not need to change the Stunnel
log level. MobileIron recommends that you contact MobileIron Technical Support before changing the log level.
Setting the httpd log level
In Troubleshooting > Logs, in the section Stunnel/HTTPD Log Management, you can set the log level for
events related to incoming HTTP/HTTPS requests. These logs are captured in the files in /var/log/httpd/https_
error_log and /var/log/httpd/portal_error_log. The default log level is Warning. Typically, you do not need to change
the httpd log level. MobileIron recommends that you contact MobileIron Technical Support before changing the log
level.
Changing the log level to Debug or Trace causes many events to be logged.
Core maintains up to 5 100MB files for each of the log files in /var/log/httpd.
When the maximum is exceeded, Core deletes the oldest file.
Enabling debugging for MobileIron modules
You can specify which MobileIron modules you want to place in debug mode. Placing a module in debug mode
causes more detailed messages to be recorded in the corresponding log.
Procedure
1.
Under Troubleshooting > Logs, select the check boxes for the modules you want to place in debug
mode:
MICS MobileIron Configuration Service (the service that supports System Manager)
MIFS MobileIron File Service (the service that supports the rest of MobileIron Core)
Setting the log level for Stunnel and HTTPD logs

MobileIron Core 11.0.0.0 System Manager Guide| 128
2.
For MIFS (MobileIron File Service), which represents the rest of MobileIron Core, select:
a. In the MIFS Debugging section, use the Package drop-down to select an area to include in the log.
b. Use the Log level drop-down to select the level of detail you want to include.
c. Click the + icon to add additional packages and log levels.
3. Click Apply.
Disabling debugging
You can disable all debugging or you can select the modules for which you want to disable debugging.
Disabling all debugging
To disable all debugging, which stops MobileIron Core from writing detailed information to all logs, click Stop All
Debugging under Troubleshooting > Logs. For MIFS packages, clicking this button sets the log level to Info for
all selected packages.
Disabling debugging for MICS or the employee portal
Procedure
1. Log into System Manager.
2. Go to Troubleshooting > Logs.
3. Go to the Log Management group.
4. Clear the checkbox next to each module you want to remove from debug mode.
5. Click Apply > OK.
Disabling debugging for MIFS packages
Procedure
To disable debugging for MIFS packages under Troubleshooting > Logs:
1. Remove the package from the list (sets lowest level of logging)
2. Set the log level to OFF (turns off all logging for the selected package)
Clearing logs
Clearing logs enables you to discard information for previous events, making it easier to isolate the information you
need.
Disabling debugging

MobileIron Core 11.0.0.0 System Manager Guide| 129
Procedure
1. Log into System Manager.
2. Go to Troubleshooting > Logs.
3. Go to the Log Management group.
4. Click Clear All Logs.
Log Names
The Troubleshooting screen enables you to view the contents of debug logs directly from the console. Debugging
must be enabled. The following table lists the available logs:
Log Name Description
MICS MobileIron Configuration Service-related log files (i.e., the service that supports
System Manager).
MIFS MobileIron File Service-related log files.
System Core status logs-related log files.
Device Searchable device log files (search by mobile number or user).
MI MobileIron back-end system-related log files.
Catalina MobileIron application loading status-related log files.
Catalina2 MobileIron application loading status-related log files.
SystemBackup MobileIron System Backup process-related log files. See System backup.
High Availability HA service-related log files, if configured.
LDAP Lightweight Directory Access Protocol (LDAP) integration-related log files.
CertActivity Certificate activity-related log files.
CertCheckJobStatus Certificate status-related log files.
DEP
Apple Automated Device Enrollment-related log files.
VPP
Apple volume purchase plan-related log files.
SSP Self-service user portal-related log files.
TABLE 37. VIEWING LOGS
Log Names

MobileIron Core 11.0.0.0 System Manager Guide| 130
Viewing logs
Procedure
1. Log into System Manager.
2. Go to Troubleshooting > Logs.
3. Go to View Module Logs section
4.
Click the link for the log you want to view.
The window scrolls dynamically as Core adds entries to the log. The most recent log entries are at the top.
5.
Click x to close the log view.
If you close the log view window and then re-open it, the displayed window shows only log entries made
since you closed the window.
Viewing only new log entries
Procedure
To remove existing log entries from the log view window and view only new log entries:
1. Log into System Manager.
2. Go to Troubleshooting > Logs.
3. Go to View Module Logs section
4. Click the Clear Window button.
Viewing logs by device or user
Procedure
1. Log into System Manager.
2. Go to Troubleshooting > Logs.
3. Go to View Module Logs section
4. Click the Device link.
Viewing logs

MobileIron Core 11.0.0.0 System Manager Guide| 131
5. Select User or Phone to specify whether you want to view logs by user or device.
6. Enter the user name or phone number.
7. Click View Log.
Exporting logs
You can upload logs directly to the default support site or a designated alternate site. The default support site is
configured in Settings > Log Upload.
Typically, you will use the default HTTPS Server Configuration, which automatically includes the user name you
entered in Maintenance > Software Updates. Confirm with MobileIron Technical Support that the entries on this
display are correct.
Procedure
To upload logs:
1. Select Troubleshooting > Logs.
2. Scroll down to the Export Logs section.
3. Select the log to download.
4.
Select a database option.
Show tech logs can include database information that some companies consider too sensitive to send to
MobileIron Customer Support. Therefore, you can use the Database Options to specify whether to include
data and whether to remove potentially sensitive information from the output.
The following options are available:
l
Sanitize: Remove sensitive information. This is the default selection. If you select the Sanitize
option, the following data is removed:
o
email addresses
o
device tokens
o
unlock tokens
o
phone numbers
o
last locations
o
unsent alerts
o
events
l Standard: Sensitive information included.
l No Database: All database information omitted.
5.
Select SFTP Upload, HTTPS Upload or Download from the Type drop-down list, depending on the
method you want to use.
NOTE: For Self-service user portal (SSP) log files, Download is the only supported Export option.
Exporting logs

MobileIron Core 11.0.0.0 System Manager Guide| 132
6.
If you received a MobileIron support ticket number associated with this export, enter it in the Support
Ticket Number field.
7.
If you selected SFTP Upload or HTTPS Upload, select the Alternate Location check box and configure
a backup location or user authentication in case transmission to the primary server or user fails.
If you receive technical support from a MobileIron partner instead of directly from MobileIron, then you will
need to obtain an alternate location from your vendor.
The following additional fields for the alternate location are displayed:
o
Host/IP or URL (e.g., https://support.mobileiron.com)
o
User Name
o
Password
o
Confirm Password
8. Click SFTP Upload, HTTPS Upload or Download.
Network monitor
The Network Monitor screen lets you produce a TCP dump for one of the MobileIron Server physical interfaces.
The information provided might assist in troubleshooting device connectivity problems. Click Download to store
the results in a pcap file.
Enabling debugging
In order to view the contents of debug logs directly from the console, you must enable debugging.
To enable debugging:
1. Log into System Manager.
2. Go to Troubleshooting > Logs to open the Span Monitor Configuration details pane.
3.
Modify one or more of the fields, as necessary.
Refer to the Span Monitor Configuration table for more information.
4. Click Download to store the results in a pcap file.
Span Monitor Configuration
The following table summarizes fields and descriptions in the Span Monitor Configuration details pane:
Network monitor

MobileIron Core 11.0.0.0 System Manager Guide| 133
Option Description
Interface Select the physical interface for which you want to produce a tcp dump.
Filter Not implemented.
Snap Length Not implemented.
Max no. of Packets Specifies the number of packets after which the capture should stop. The default
value is 1000. Acceptable range of values is 1 to 1000000.
TABLE 38. SPAN MONITOR CONFIGURATION FIELDS
Service diagnosis
You can use the Service Diagnosis page under Troubleshooting to check the health of the following services:
l Support_Site
l MapQuest
l DNS
l NTP
l Email
Click the Verify All button to recheck all listed services, or click the Verify button next to a specific service to
verify just that service.
LDAP sync history
To confirm that LDAP synchronization has been performed as expected, click LDAP Sync History.
Related topics
l "Managing LDAP users" in Getting Started with MobileIron Core
System monitor
The System Manager provides the capability to monitor Core performance over a period of time. Core collects the
performance information into log files. MobileIron Technical Support uses these files to diagnose Core performance
issues.
The files contain information about:
l CPU usage
l memory usage
Service diagnosis

MobileIron Core 11.0.0.0 System Manager Guide| 134
l threads
l tomcat performance
l database performance
l mysql logs
You can download the files, or upload them to an external server that MobileIron Technical Support specifies.
To monitor Core performance when working with MobileIron Technical Support, go to the System Manager to
Troubleshooting > System Monitor.
You can run the system monitor daily and on demand. If you are experience Core performance issues, collecting
system monitor logs can help MobileIron Technical Support diagnose the issue.
Running the system monitor
Procedure
1.
Configuring the server to upload the log files to
You can skip this step if you plan to download the log files from running the system monitor to the computer
on which you are running the System Manager. Only the log files from the most recent system monitor run
are available.
2. Configuring the system monitor
Configuring the server to upload the log files to
When you run the system monitor, you can either:
l download the resulting log files to the computer on which you are viewing the System Manager.
l upload the resulting log files to an SFTP or HTTPS server.
Procedure
If you want to upload the files to an SFTP or HTTPS server, do the following:
1. Log into System Manager.
2. Go to Settings > Log Upload.
3.
To upload system monitor logs to an HTTPS server, enter the URL of the HTTPS server.
Typically, you enter https://support.mobileiron.com/uploads/ when working with MobileIron Technical
Support.
Using an SFTP server is not supported.
4.
Enter the User Name and Password for the appropriate server.
When working with MobileIron Technical Support, they will provide the credentials.
Running the system monitor

MobileIron Core 11.0.0.0 System Manager Guide| 135
If you upgraded Core, the credentials you entered on Maintenance > Software Updates are automatically
filled into this display.
5. Enter the password again in Confirm Password.
6. Click Apply for the server configuration you just entered.
Configuring the system monitor
Procedure
1. Log into the System Manager.
2. Go to Troubleshooting > System Monitor.
3.
Select On for the Status field to enable the system monitor.
Selecting Off disables the system monitor. When disabled, the daily system monitor runs do not
occur, and you cannot select Run Now.
4.
For Iterations, enter a value between 1 and 9999.
This number specifies how many times to collect system data. MobileIron Technical Support will tell you
waht value to use.
5.
For Intervals (Seconds), enter a value between 1 and 100.
This number specifies the number of seconds between each iteration. MobileIron Technical Support will
tell you waht value to use.
6. For Run daily at, select the time of day you want to run the system monitor.
7.
For Export Type, select one of the following:
l Download - The latest system monitor log files will be available for download.
l HTTPS Upload - System monitor files will be uploaded to the server you specify in Settings > Log
Upload.
Another option is SFTP Upload, but this option is not supported.
8. Click Apply.
9. If you want to run the system monitor immediately, click Run Now.
The system monitor files
MobileIron Core collects the system monitor log files into an archive file:
system-monitor-<Core host name>-<date and time>.tar.gz
Example
system-monitor-myCore.mycompany.com-2016-01-19-17-31-04.tar.gz
The tar file contains these log files:
l miiostat.log
l mitop.log
Configuring the system monitor

MobileIron Core 11.0.0.0 System Manager Guide| 136
l monitor-mysql-process-<date>.log
l monitor-threads-<date>.log
l mivmstat.log
l monitor-mysql-innodb-<date>.log
l monitor-mysql-locks-<date>.log
l tomcat-catalina.out
Queue Activation
Use Queue Activation for performance troubleshooting with MobileIron Technical Support. They can use the
following display for troubleshooting if you contact them regarding performance issues on Core. The new display is
at Troubleshooting > Queue Activation.
This display provides MobileIron Technical Support information about what is running on MobileIron Core. The
information indicates possible causes of performance issues due to high load.
To access the Queue Activation information:
1. Log into System Manager.
2. Select Troubleshooting > Queue Activation.
3.
Click the link next to Real-time Queue Activation Data to display one of the following data views:
o
Real-time Data
o
Historical Data
In-Memory Queue Monitor
This display provides MobileIron Technical Support with information about tasks in the queue in your Core memory.
To use this display:
1. Log into System Manager.
2. Select Troubleshooting > In-Memory Queue Monitor to see the Summary View.
The summary table includes the following columns:
- Queue Name
- Current Size
- Enqueued Delta
- Dequeued Delta
- Enqueued Total
- Dequeued Total
3. Click Detailed View to see the same details from a selected queue.
The detail table includes the following columns:
- Time Reported
- Current Size
Queue Activation

MobileIron Core 11.0.0.0 System Manager Guide| 137
- Enqueued Delta
- Dequeued Delta
- Enqueued Total
- Dequeued Total
4. Click a queue name from the dropdown to select a queue from the list to see its details.
In-Memory Queue Monitor

6
MobileIron Core 11.0.0.0 System Manager Guide| 138
Upgrading MobileIron Core Releases
l Upgrading overview
l Upgrade planning notes
l Upgrade Core using System Manager
l Updating Core using the CLI
l MobileIron OS and platform updates
Upgrading overview
Use the Maintenance > Software Updates feature to upgrade, configure, and manage software versions. The
information in this chapter describes how to upgrade MobileIron Core releases. MobileIron Core software uses the
term “updates” to refer to upgrading software from one release to another. It also uses the term “update” for getting
the latest information or linking to 3rd party upgraded software. Because there can be slight and subtle differences
between these concepts, this documentation will use the same terminology found in the System Manager UI and
call-out distinctions, when necessary.
Refer to the MobileIron Core and Enterprise Connector Release and Upgrade Notes for the latest build information,
available on the Support Community site here: https://community.mobileiron.com/welcome. Refer to the
Documentation resources section in Chapter 1, which provides instructions on how to access MobileIron product
documentation.
Upgrade planning notes
Upgrading software requires preparation and planning. Read this section before beginning upgrading Core, for
important information that will help you plan your upgrade. This section includes the following topics:
l First-generation physical appliances
l Upgrade URLs
l Preparing the Windows Phone app
l Activating Apple Device Enrollment after upgrading
l LDAP group user and group names for IBM Domino server
l SMS option in Privacy policy

MobileIron Core 11.0.0.0 System Manager Guide| 139
First-generation physical appliances
Upgrading is not supported for first-generation physical appliances. For information on how to determine whether
you have a first-generation appliance, see https://help.mobileiron.com/customer/articles/MI_Article/How-to-
Identify-Your-MobileIron-Appliance.
Upgrade URLs
The upgrade procedure presented in this chapter assumes you are using the default upgrade URL. If you intend to
specify an alternate URL, be sure to include the build number of the target upgrade. Go to Maintenance >
Software Updates> software repository configuration > Default and enter the alternate URL.
Preparing the Windows Phone app
The following information applies to Windows Phone apps that have been rebranded for distribution by MobileIron
partners only.
If you have Windows Phone devices currently enrolled, complete the following steps after the upgrade to ensure
that the Windows Phone app is silently deployed to those devices.
Procedure
1. Log into the MobileIron Core Admin Portal.
2. Go to Apps > App Distribution Library.
3. Go to the Select Platform list.
4. Select Windows Phone.
5. Select the entry for the Windows Phone app.
6. Select Actions > Apply to Label.
7. Select the Windows Phone label.
8. Click Apply > OK.
Activating Apple Device Enrollment after upgrading
Apple Device Enrollment lets you purchase Apple devices in bulk and register them with both Apple and your
MobileIron Core easily and quickly. To use Apple Device Enrollment, after upgrading from MobileIron VSP 6.0 or
earlier, you must assign the role for administering Apple Device Enrollment accounts to one or more
Super Administrators or Global Administrators (administrators assigned to the Global space).
Procedure
To assign administration of Apple Device Enrollment accounts to a Super Administrator or Global Administrator:
First-generation physicalappliances

MobileIron Core 11.0.0.0 System Manager Guide| 140
1. Log into the MobileIron Core Admin Portal.
2. Go to Admin > Admins.
3. Select a Global or Super Administrator.
4. Select Actions > Edit Roles.
5. Select Manage device enrollment (iOS only).
6. Click Save.
LDAP group user and group names for IBM Domino server
A dynamic label problem exists after upgrading from a MobileIron Core version prior to 7.0, if:
l An LDAP group name is the same as an LDAP username in a different LDAP group
l An LDAP user with the duplicate name is assigned to a dynamic label
If these conditions exist, the LDAP user with the duplicate name is no longer associated with the dynamic label
after the upgrade. To resolve this issue, either rename the user before upgrading, or associate the LDAP user with
the dynamic label again after the upgrade.
SMS option in Privacy policy
Upgrading from releases prior to Core 7.0 resets the SMS option in the Privacy policy to None. If you had
previously configured the SMS option to Sync Content, edit the Privacy policy after the upgrade and reset the
SMS option to Sync Content.
Upgrade Core using System Manager
When you upgrade MobileIron Core it is important to properly set up the environment and all necessary
components. Read and complete each section before upgrading Core using System Manager.
l CDN preparation
l VM requirements
l Backup availability
l Updating Core
CDN preparation
Software downloads are supported through both:
l support.mobileiron.com
l a content development network (CDN)
LDAP group user and group names for IBM Domino server

MobileIron Core 11.0.0.0 System Manager Guide| 141
A CDN can improve software download speed. When you request an upgrade without specifying a URL, the
download proceeds using a CDN by default. If the upgrade cannot proceed via CDN, then the upgrade
automatically redirects to support.mobileiron.com.
Make the following preparations to support upgrade via CDN:
l Firewall rules must include HTTPS outbound to support-cdn.mobileiron.com (the CDN URL).
l We recommend allowing all outbound HTTPS traffic in your firewall rules because the location of data
hosted on a CDN can change.
l An outbound connection to the Internet is necessary to ensure reliability.
VM requirements
Before upgrading a virtual MobileIron Core, confirm that your VM instance meets requirements. See the latest
MobileIron On-Premise Installation Guide for these requirements.
Backup availability
It is always prudent to create backups prior to upgrading. You have different options for performing a backup:
l Use the Backup and Restore feature in System Manager.
l If MobileIron Professional Services has implemented backups for your system, make sure you have a
recent successful backup.
l If you are using a virtual MobileIron Core, consider creating a .vmdk backup.
Updating Core
Procedure
To upgrade MobileIron Core software using the System Manager:
1. Log into System Manager.
2. Go to Maintenance > Software Updates to display the Software Updates options.
3. Go to the Software repository configuration group.
4. Enter the credentials assigned by MobileIron Support.
5. Click Apply > OK.
6. Click Check Updates to show a list of the available updates.
7. Select the update you want.
8. Click Download Now if you want to download the update now and complete the installation at a later time.
9.
Refresh the screen and click Check Updates.
After the download is complete, the status for the update changes to Downloaded.
10.
Click Validate to validate the database and select one of the following options:
VM requirements

MobileIron Core 11.0.0.0 System Manager Guide| 142
l Validate Database structure (schema) to verify that the existing database has the right database
structure to proceed with upgrade.
l
Validate the Database structure and Data to copy the database to a temporary database to run the
validation then click Yes to stop core services, (required for validation).
Validating the database with data can take up to 4 hours, depending on the database size.
The Validation Status include the following options:
l Not Running
l Validation Running
l Validation Failed
l Validation is Successful
If the validation fails, do not proceed with the upgrade and contact MobileIron Support.
NOTE: This step is option, but highly recommended. It alerts you to any problems that can
happen during the upgrade process and can avoid the upgrade if the Validate DB
returns errors. When the DB validations has no errors, then you can proceed with
upgrading the environment.
11. Refresh the screen and click Check Updates.
12. After the software update has been staged for installation, the status for the update changes to Reboot to
Install. You can now install the update by rebooting the system. If the status of an update is not Reboot to
Install, rebooting the system will not install the update.
13. Select Maintenance > Reboot to reboot MobileIron Core.
14. To successfully install the update, you must reboot after the status is Reboot to install.
15.
Click Stage for Install when you are ready to install.
If you have already downloaded the selected update, the system stages the update for installation.
If you did not previously download the selected update, it is downloaded and staged for installation.
16.
Refresh the screen and click Check Updates.
After the software update has been staged for installation, the status for the update changes to Reboot to
Install. You can now install the update by rebooting the system. If the status of an update is not Reboot to
Install, rebooting the system will not install the update.
17.
Select Maintenance > Reboot to reboot MobileIron Core.
To successfully install the update, you must reboot after the status is Reboot to install.
18. Continue with Verifying the upgrade is complete.
Verifying the upgrade is complete
To verify that the upgrade is complete:
1.
Go to the MobileIron Core System Manager:
https://<FQDN>:8443/mics
Verifying the upgrade is complete

MobileIron Core 11.0.0.0 System Manager Guide| 143
2. Select Maintenance > Software Updates.
3. Confirm that the current version is correct.
IMPORTANT: Under no circumstances should you restart the upgrade. Contact MobileIron Technical
Support if you need assistance. Once this upgrade procedure is complete, it may take up
to 5 minutes for MobileIron Client apps to display in the App Catalog page.
Viewing upgrade status
Go to the following URL to see the progress of an upgrade: https://FQDN:8443/upgrade/status.
Updating Core using the CLI
Use the MobileIron Core CLI as an alternate way to upgrade Core. When you upgrade MobileIron Core it is
important to properly set up the environment and all necessary components. Read and complete each section
before upgrading Core using the CLI:
1. Configuring your update repo
2. Initiating the upgrade
3. Rebooting Core
Configuring your update repo
Procedure
To configure your update repo:
1. Log into the CLI using the administrator account you created during installation.
2.
Enter the following command to switch to EXEC Privileged mode:
enable
3.
Enter the password for enabling the EXEC Privileged mode.
The command line prompt changes:
#
4.
Enter the following command to enable CONFIG mode:
configure terminal
5.
Enter the following command to specify the URL and credentials for the repo:
software repository https://support.mobileiron.com/mi/vsp/<version and build number>/mobileiron-
<version and build number> <username><password>
Example
software repository https://support.mobileiron.com/mi/vsp/9.0.0.0-96/mobileiron-9.0.0.0-96 <username>
<password>
Viewing upgrade status

MobileIron Core 11.0.0.0 System Manager Guide| 144
In the above command, <username> and <password> are your company's download/documentation
credentials as provided by MobileIron Technical Support.
For the URL of the Core release to which you want to upgrade. see
“MobileIronCore upgrade URL” in the release notes for that Core release.
Initiating the upgrade
Under no circumstances should you restart the upgrade. Contact MobileIron Technical Support if you need
assistance.
Procedure
1.
Enter the following command to exit CONFIG mode:
end
2.
To list the updates available, enter the following command:
software checkupdate
3. Confirm that there are no errors displayed.
4.
Enter the following command to download the latest available updates:
software update
Rebooting Core
Procedure
1.
After all the listed updates are installed, enter the following command to reload the appliance:
reload
The following message displays:
System configuration may have been modified. Save? [yes/no]
2.
Enter no.
The following message displays:
Proceed with reload? [yes/no]
3.
Enter yes.
The reboot might take up to 15 minutes to complete.
The following error might display on the console and should be resolved after you complete the remaining
upgrade steps:
modprobe: FATAL: Could not load /lib/modules/2.6.18.c15/modules.dcp: No such file or directory
4.
To confirm that the upgrade is complete, make sure you can log into the Admin Portal:
https://<FQDN>/mifs
Initiating the upgrade

MobileIron Core 11.0.0.0 System Manager Guide| 145
MobileIron OS and platform updates
Core can update several types of data without requiring a Core upgrade:
l device operating system and version (iOS 9.0 or Android 6.0, for example)
l platform type (Android KNOX phone or Apple iPad, for example)
For example, when Apple makes a new iOS version available, you do not need to upgrade Core.
You can choose whether these updates occur automatically or require administrative action. The default value is
automatic update. The benefit is you can update your MobileIron instance to support updated devices, operating
systems and versions without upgrading Core. You can also choose between:
l Automatic data update
l Manual data update
Automatic data update
You can change data update control between automatic update and administrator control. The default setting is
automatic update.
To use automatic data updates, you must make sure a port is open for the App Gateway. To open a port for App
Gateway, see the On-Premise Installation Guide for MobileIron Core and Enterprise Connector for details. The
table containing the entry for App Gateway (appgw.mobileiron.com) is in the section “Internet/Outside Rules.”
Procedure
If you are using manual updates, but decide to resume automatic updates:
1. In System Manager, go to Maintenance > Software Updates.
2. In Device and Platform Updates, check Auto update device and platform support.
3. Click Save.
If you are using automatic updates, but need to use manual updates instead:
1. In System Manager, go to Maintenance > Software Updates.
2. In Device and Platform Updates, clear Auto update device and platform support.
3. Click Save.
Manual data update
If your organization has blocked the App Gateway, you will need to manually update device and platform
information:
MobileIron OS andplatform updates

MobileIron Core 11.0.0.0 System Manager Guide| 146
Procedure
To set up manual operating system and device data updates:
1. Log into System Manager.
2. Go to Maintenance > Software Updates.
3. Scroll down to the Device and Platform Updates options.
4.
Go to the end of the paragraph in Manually update OS, Device and other Core data and click the word
here to display a website containing the following information:
l Upload File: a link to download the file containing the update information
l Checksum: checksum for the file
l Time Stamp: time stamp for the file
5. Go to the release of the package you want to download.
6. Click Download Update File to download the file with the update information.
7. Return to System Manager > Maintenance > Software Updates > Device and Platform Updates.
8. Go to the Upload File option and click Choose File.
9. Navigate to the file you downloaded and click Open.
10. Copy the checksum from the website and paste it in Checksum field in System Manager.
11. Copy the time stamp from the website and paste it in Time Stamp field in System Manager.
12. Click Update.
13.
In Device and Platform Updates under Update available, click Update Now to immediately update
Core with the new information from the file.
If you do not update Core immediately, Core is updated either within:
l 15 minutes after Core is restarted
l within 24 hours of the next App Gateway update
Manual data update
