
© 1999-2017 Citrix Systems, Inc. All rights reserved. p.3https://docs.citrix.com
Citrix Receiver for Windows 4.4 LTSR
Mar 07, 2018
This pdf file includes the Citrix Receiver for Windows 4.4 LTSR documentation. You can save a local copy of this file and use it offline.
Use the built-in Search and Bookmark features to find what you need.
About this release
Mar 28, 2017
Citrix Receiver for Windows provides users with secure, self-service access to virtual desktops and apps provided by
XenDesktop and XenApp.
What's new in this release
EEnnhhaanncceedd RReeaallTT iimmee MMeeddiiaa EEnnggiinnee ((RRTTMMEE)) iinntteeggrraattiioonn
This release introduces enhancements to the Citrix Receiver for Windows installation paradigm by incorporating RTME
into a single download and installation package. Previously, users needed to install Citrix Receiver, then launch a separate
MSI installation package to integrate RTME functionality in Receiver.
This created a less desireable user experience which impeded widespread adopt ion of the HDX RealT ime Optimization
Pack in some organizations; BYOD users (and remote workers) needed t o install Citrix Receiver first , then return to the
Citrix download page t o invoke another separat e installer for the HDX RT ME. A single inst aller now combines the latest
Citrix Receiver f or Windows wit h the HDX RT ME installer.
Refer to the installation article for information about using the latest Citrix Receiver installer with HDX RTME in a single
executable.
SSeett tthee ttrraannssppaarreennccyy lleevveell uussiinngg sseessssiioonn rreelliiaabbiilliittyy ggrroouupp ppoolliiccyy
This release int roduces enhancements to session reliabilit y group policy. When configuring session reliabilit y group policy,
you can now set t he transparency level applied t o a published app (or deskt op) during the session reliabilit y reconnect ion
period. See SSeessssiioonn rreelliiaabbiilliittyy aanndd ggrroouupp ppoolliiccyy in the Configure Receiver wit h the Group Policy Object Template topic
for more inf ormation.
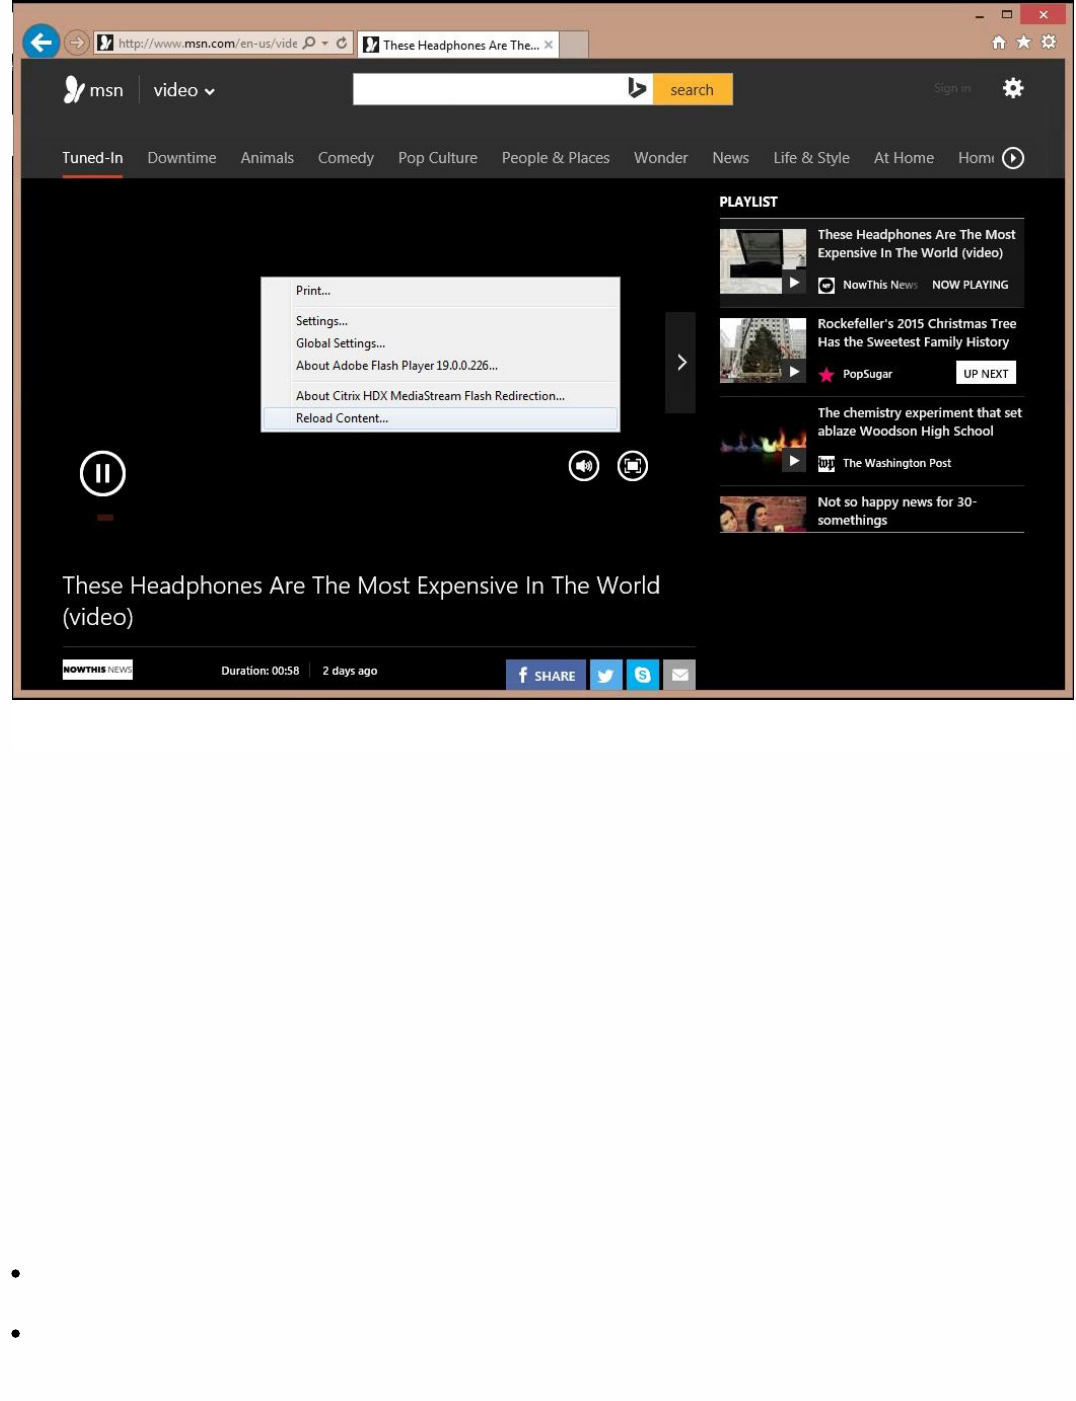
MMaannuuaall ffallllbbaacckk tto sseerrvveerr rreennddeerriinngg
At this release, Citrix Receiver implements manual fallback to server rendering on the client. In some situations when
viewing Flash content, a client may experience a black screen and have no way to view the Flash video. In most cases, if
Flash fails to render on the client, it will fall back to server-side rendering automatically. However, in some situations,
client-side rendering fails and it also fails to fallback.
To resolve such situations, Citrix Receiver for Windows now provides an option for a user to manually refresh the screen
and force server-side rendering of the Flash content. To manually fallback, place the cursor in the black Flash window and
right click to display a context menu containing an option to "Reload content". The image below illustrates this new
functionality.
Note
Video prevention policies set by the administrator will be enforced on the client. For more information, see Multimedia policy
settings and Flash Redirection policy settings.
© 1999-2017 Citrix Systems, Inc. All rights reserved. p.4https://docs.citrix.com
Upgrade SSL SDK libraries t o support NIST SP800-52Upgrade SSL SDK libraries t o support NIST SP800-52
Citrix Receiver now provides an upgraded SSL SDK library to include support for NIST SP800-52. This functionallity allows
Receiver to support the NIST SP800-52 compliance mode for TLS connections. For more information, see Enable NIST
SP800-52 compliance mode in the To set client permissions topic. For additional information on session reliability, see
Session reliabilit y and group policySession reliabilit y and group policy in the Configure Receiver with the Group Policy Object Template topic.
Improved upgrade processImproved upgrade process
This release of Citrix Receiver for Windows provides an updated installer that retains existing client settings, improving the
user experience when moving from previous versions of Citrix Receiver. In addition, the updated installer seamlessly upgrades
from previously installed versions.
Aut o-client reconnect and session reliabilit y improvement sAut o-client reconnect and session reliabilit y improvement s
These improvements enable better interoperability with CloudBridge and NetScaler Gateway. A session can reconnect using
auto-client reconnect and session reliability regardless of the connection path. The specific improvements for this release
are as follows:
Improved connection messages tells your users that the state of their connection and informs them of when they've
lost a connection and what do to.
A countdown timer (in minutes/seconds) now illustrates how long before a session times out. A session is terminated
when the countdown timer expires. By default, the timeout value is set to 2 minutes. You can change the default value

© 1999-2017 Citrix Systems, Inc. All rights reserved. p.5https://docs.citrix.com
in the T ransportReconnectMaxRetrySeconds ICA file setting.
Improved HDX perf ormanceImproved HDX perf ormance
Citrix Receiver has been updated to enhance client-side hardware acceleration. This feature improves HDX 3D Pro
performance on clients by enabling hardware acceleration. For more information about configuring this feature, refer to
the Hardware Decoding section in the User Experience article.
Enhancement s t o t he aut horizat ion plat f ormEnhancement s t o t he aut horizat ion plat f orm
Citrix Receiver for Windows now integrates functionality that improves how you can verify how clients connect to servers
using a specific TLS version, including verification about the specific encryption algorithm, mode, key size and whether
SecureICA is enabled. Using this feature, you can also view the current authentication certificate used by the client during
an active session. For more information, see the XenApp - XenDesktop article that discusses how cryptography is used.
Improved launch dialog messagesImproved launch dialog messages
This version improves how Citrix Receiver for Windows uses launch dialogs when informing users about system-related
changes and updates. It now provides simple notifications that replace bulky system level notifications when launching a
session.
Enhanced diagnost ic inf ormat ion collect ionEnhanced diagnost ic inf ormat ion collect ion
This release integrates an improved diagnostic tool you can use to quickly collect system information, and distribute the
information by creating a single compressed package that can be easily transferred or uploaded to services such as CIS.
Important: If you are using XenApp or XenDesktop 7.6, consider installing the VDA hotfix available at CTX142037,
CTX142094 and CT X142095. This hotfix solves issues with audio after session reconnect, graphics responsiveness, image
quality, and screen corruption in some situations.

© 1999-2017 Citrix Systems, Inc. All rights reserved. p.6https://docs.citrix.com
Fixed Issues
Jun 21, 20 17
Receiver for Windows 4.4 CU5 (4.4.5000)
Compared to: Citrix Receiver for Windows 4.4 CU4 (4.4.4000)
Receiver for Windows 4.4 CU5 (4.4.5000) contains all fixes that were included in Receiver for Windows 4.0, 4.0.1, 4.1, 4.1.2,
4.1.100, 4.1.200, 4.2, 4.2.100, 4.3, 4.3.100, 4.4, 4.4 CU1 (4.4.1000), 4.4 CU2 (4.4.2000), 4.4 CU3 (4.4.3000), and 4.4 CU4
(4.4.4000), plus the following, new fixes:
HDX 3D ProHDX 3D Pro
With HDX 3D Pro enabled on a VDA, using certain third-party applications can cause the VDA to disconnect.
To enable the fix, set the following registry keys:
On 32-bit Windows:
HKEY_LOCAL_MACHINE\SOFTWARE\Citrix\ICA Client\Engine\Configuration\Advanced\Modules\Thinwire3.0
Name: Tw2IgnoreValidationErrors
Type: REG_SZ
Value: T RUE
HKEY_LOCAL_MACHINE\SOFTWARE\Citrix\ICA Client\Engine\Configuration\Advanced\Modules\Thinwire3.0
Name: Tw2IgnoreExecutionErrors
Type: REG_SZ
Value: T RUE
On 64-bit Windows:
HKEY_LOCAL_MACHINE\SOFTWARE\Wow6432Node\Citrix\ICA
Client\Engine\Configuration\Advanced\Modules\Thinwire3.0
Name: Tw2IgnoreValidationErrors
Type: REG_SZ
Value: T RUE
HKEY_LOCAL_MACHINE\SOFTWARE\Wow6432Node\Citrix\ICA
Client\Engine\Configuration\Advanced\Modules\Thinwire3.0
Name: Tw2IgnoreExecutionErrors
Type: REG_SZ
Value: T RUE
[#LC7655]
Print ingPrint ing
When you change the default printer on the user device from printer A to printer B and then back to printer A, the
change might not be reflected in the active user session until you disconnect and reconnect the session.
[#LC7004]

© 1999-2017 Citrix Systems, Inc. All rights reserved. p.7https://docs.citrix.com
Session/Connect ionSession/Connect ion
If a USB device is listed as an unknown device on the user device, the USB device might not be available for redirection.
The issue occurs if the USB device is plugged in before the session starts.
[#LC5920]
When you assign a desktop group to an external client IP address according to the procedure described in Knowledge
Center article CTX128232, the published desktop might fail to start when you access through NetScaler Gateway. The
following error message might appear:
"Cannot start app"
[#LC5932]
A published application window might cover the complete screen when maximized using the Windows Aero Snap
feature.
[#LC6284]
When a user is running multiple sessions with Local App Access/HDX seamless apps enabled, applications and desktops
might get shuffled intermittently. With this fix, Local App Access/HDX seamless apps can be enabled in only one session
and is disabled for other, concurrent sessions of the same user.
[#LC6408]
When you launch Skype for Business from Citrix Receiver for Windows and attempt to make a video call or capture a
photo using the webcam on Microsoft Surface Pro 4 devices, the following error message might appear:
"Can’t connect to this camera. Close any active conversations or other programs that are using your camera, and then
try again."
[#LC6699]
Citrix Receiver for Windows might exit unexpectedly when disconnecting from a VDA that is using an integrated
webcam. The issue occurs when you disconnect from the VDA while the webcam is running.
[#LC6815]
Attempts by users connecting through NetScaler Gateway to a Store through Citrix Receiver for Windows might fail,
and the following error message appears:
"Cannot connect to server"
[#LC6859]
Windows Media live streams might fail to fetch content from the client.
[#LC6876]
The logon prompt might not appear when you attempt to refresh applications in Citrix Receiver for Windows after
logging off.
[#LC6891]

© 1999-2017 Citrix Systems, Inc. All rights reserved. p.8https://docs.citrix.com
When using the Epic Hyperspace software for medical dictation, the dictation recorder might become unresponsive on
the user device while recording.
[#LC7435]
File type association might fail to open the associated document when you set the registry value "DisableStubCreation"
to "true" under the registry key HKEY_LOCAL_MACHINE\SOFT WARE\Citrix\Dazzle on 32-bit Windows and
HKEY_LOCAL_MACHINE\SOFTWARE\Wow6432Node\Citrix\Dazzle on 64-bit Windows. The issue occurs when the
"%1" parameter is missing for the relevant file name extension under the registry key
HKEY_CURRENT_USER\SOFTWARE\Classes\Dazzle.
<appname>
.
<extension>
.1\shell\open\command.
[#LC7619]
When you add a store through the group policy settings or the command line and configure reconnect at Windows
logon, Citrix Receiver for Windows might not automatically reconnect at Windows logon.
[#LC7679]
Smart CardsSmart Cards
With the local security setting "Lock Workstation," located under the policy "Interactive logon: Smart card removal
behavior" set in a user session, the session might not be locked when you remove the smart card reader from that
session.
[#LC7571]
When the SCardListReaderGroup API is called in a user session from the server, Citrix Receiver for Windows might not
execute the API that is called on the client side.
[#LC7699]
User ExperienceUser Experience
This fix provides improved support for sounds that play for a short period of time when using high quality audio.
Not eNot e:
This fix does not take effect in sessions running on Windows Server 2008 R2.
For this fix to work, you must use Citrix Receiver 4.4 for Windows Long Term Service Release (LTSR) CU5 or later
versions and the VDA version of XenApp and XenDesktop 7.6 LTSR CU4 or later.
[#LC5842]
When using the customized phrase feature on the Input Method Editor (IME) language bar, certain characters might
randomly get dropped in a user session.
[#LC6155]
The application desktop toolbar (appbar) might no longer work if the operating system of the user device is Microsoft
Windows 10, and the appbar is started through a published desktop. The application might start, but the appbar does
not respond to subsequent actions.
[#LC6247]

© 1999-2017 Citrix Systems, Inc. All rights reserved. p.9https://docs.citrix.com
Occasionally, when using the Shift key along with any arrow key, the Shift key might not be released in a seamless
application.
[#LC6308]
In a multi-monitor environment, when you restore a seamless window from full-screen to its original size and then drag it
back to the original screen, the window might be clipped incorrectly. As a result, only a partial window is visible. The issue
occurs with seamless windows that that are wider than the monitor and thus partially off-screen.
[#LC6389]
When you start an application in seamless mode, a second progress bar might appear for a few seconds and then
disappear after the first progress bar disappears.
[#LC6642]
Double-tapping on a device's touchscreen might not work for some applications within a user session.
[#LC6698]
When you click the taskbar icons to switch the focus between the windows of a third-party application in a seamless
session, the corresponding window of the third-party application might fail to appear in the foreground.
[#LC6709]
When you change the resolution of the user device while one of the mouse buttons is in the down state, seamless apps
might not be able to receive the mouse up state for that mouse event. As a result, the mouse capture is lost.
[#LC7419]
When using a published version of the Microsoft Paint application with a touch-enabled device, an incorrect drawing
might appear. T he issue occurs when you move the window from the default position, causing the drawing to appear in
an incorrect position.
[#LC7479]
User Int erf aceUser Int erf ace
When applications are subscribed using the Self-Service plug-in and they have the "prefer" keyword configured on the
Citrix Delivery Controller, shortcuts and category folders for applications might fail to refresh on the user device. The
application shortcuts might not appear under the desktop or Start menu when they are moved or deleted. When the
shortcut is moved to a different folder, the existing shortcut and folder are not removed.
[#LC6533]
The Japanese characters that appear in the title and footer sections of the Citrix Receiver for Windows logon dialog box
might display incorrectly and can be incomplete. The number of characters that are cut off from the actual length
depends on the length of the server name.
[#LC6725]
MiscellaneousMiscellaneous

© 1999-2017 Citrix Systems, Inc. All rights reserved. p.10https://docs.citrix.com
The setting "RemoveICAFile" in the client-side Group policy settings or registry might not work when more than one
application is closed.
With this fix, there is a behavioral change when ica temp files are created and deleted. When you start multiple seamless
applications, the ica temp file for the first application is created, then for subsequent applications, the ica temp files are
created and deleted immediately. The ica temp file created for the first application launch is deleted when you close all
applications.
[#LC6810]
Receiver for Windows 4.4 CU4 (4.4.4000)
Compared to: Citrix Receiver for Windows 4.4 CU3 (4.4.3000)
Receiver for Windows 4.4 CU4 (4.4.4000) contains all fixes that were included in Receiver for Windows 4.0, 4.0.1, 4.1, 4.1.2,
4.1.100, 4.1.200, 4.2, 4.2.100, 4.3, 4.3.100, 4.4, 4.4 CU1 (4.4.1000), 4.4 CU2 (4.4.2000), and 4.4 CU3 (4.4.3000) plus the following,
new fixes:
HDX Seamless Local AppsHDX Seamless Local Apps
The user device instances of Outlook and Skype for Business might not close when the logoff policy of local app access
is set to terminate the instances.
[#LC6288]
Memory, CPU Opt imizat ionMemory, CPU Opt imizat ion
The CPU usage of the wfica.exe process might be very high in a double hop-scenario and cause VDAs to become slow or
unresponsive. The issue occurs when you launch desktop sessions from multiple user devices to a VDA for Server OS
while you start other published applications through Citrix Receiver for Windows in desktop sessions.
To enable the fix, set the following registry keys:
On 32-bit Windows
:
HKEY_LOCAL_MACHINE\SOFTWARE\Citrix\ICA Client\Engine\Configuration\Advanced\Modules\WFClient
Name: SlowHPCPolling
Type: REG_SZ
Value: 2-500
On 64-bit Windows
:
HKEY_LOCAL_MACHINE\SOFTWARE\Wow6432Node\Citrix\ICA
Client\Engine\Configuration\Advanced\Modules\WFClient
Name: SlowHPCPolling
Type: REG_SZ
Value: 2-500
[#LC5968]
Print ingPrint ing

© 1999-2017 Citrix Systems, Inc. All rights reserved. p.11https://docs.citrix.com
When the "Preview on client" option is enabled, printing multiple items in a short interval can result in corrupted data
printing while using EMF printer drivers.
[#LC6763]
Session/Connect ionSession/Connect ion
A system administrator can configure an application with an access policy rule using the "Set-BrokerAccessPolicyRule"
command. In certain scenarios, after setting some conditions through that command, attempts to subscribe the
application can fail when the store is configured for "Enable Classic Receiver Experience."
[#LC5053]
USB redirection might not work for fingerprint devices using a USB 3.0 port that supports "Selective Suspend" with power
state D2 before redirection. The devices might fail to wake up during redirection, which can cause the redirection to fail.
To enable the fix, set the following registry keys:
On 32-bit Windows
:
HKEY_LOCAL_MACHINE\SOFTWARE\Citrix\ICA Client\GenericUSB
Name: WakeupSelSusPid
Type: DWORD
Value: pid of the device
HKEY_LOCAL_MACHINE\SOFTWARE\Citrix\ICA Client\GenericUSB
Name: WakeupSelSusDisable
Type: DWORD
Value: 0 to enable and 1 to disable this feature
HKEY_LOCAL_MACHINE\SOFTWARE\Citrix\ICA Client\GenericUSB
Name: WakeupSelSusVid
Type: DWORD
Value: vid of the device
On 64-bit Windows
:
HKEY_LOCAL_MACHINE\SOFTWARE\Wow6432Node\Citrix\ICA Client\GenericUSB
Name: WakeupSelSusPid
Type: DWORD
Value: pid of the device
HKEY_LOCAL_MACHINE\SOFTWARE\Wow6432Node\Citrix\ICA Client\GenericUSB
Name: WakeupSelSusDisable
Type: DWORD
Value: 0 to enable and 1 to disable this feature
HKEY_LOCAL_MACHINE\SOFTWARE\Wow6432Node\Citrix\ICA Client\GenericUSB
Name: WakeupSelSusVid
Type: DWORD
Value: vid of the device
(vid = Vendor ID, pid = Product ID)
[#LC5132]
Attempts to launch a session might fail with the following error message:

© 1999-2017 Citrix Systems, Inc. All rights reserved. p.12https://docs.citrix.com
"The ICA file contains an invalid unsigned parameter."
Before you upgrade or replace the new ADMX file, set the ICA file signing related policy "Enable ICA File Signing" to "Not
configured."
Not eNot e: This Fix, #LC5338, works with StoreFront 3.9 and later versions.
[#LC5338]
Communication between an ICA session and the WarpDrive application might fail.
[#LC5718]
When you update the "Display name" or "Application name" in AppCenter or Citrix Studio, the original desktop shortcut
might be orphaned or broken instead of getting modified, and a new desktop shortcut with the updated application
name is created.
[#LC5757]
If a session is recovered with Session Reliability and Local App Access is enabled, the Desktop Viewer toolbar might no
longer be visible.
[#LC5883]
Attempts to start a user session immediately after terminating an ICA session might fail if the following registry key is
added:
HKEY_LOCAL_MACHINE\SOFTWARE\Citrix\ICA Client
Name: VdLoadUnLoadTimeOut
Type: REG_DWORD
Data: Any value in seconds (Decimal)
[#LC6122]
After updating to the Windows 10 Anniversary Update (Build 14393), single mouse clicks register as double clicks within an
ICA session.
[#LC6127]
When using the desktop lock appliance, the desktop might not launch and the following error message appears: "HDX
engine is not running. Contact Administrator."
[#LC6332]
Attempts to launch an application from StoreFront might fail after restarting the computer.
[#LC6413]
The keyboard and mouse might intermittently disconnect when switching between a wired network LAN and WiFi.
[#LC6594]
With Single Sign-on enabled, attempts to subscribe to applications might fail if one out of two or more farms is
unavailable, and the following error message appears:

© 1999-2017 Citrix Systems, Inc. All rights reserved. p.13https://docs.citrix.com
"Your apps are not available at this time. Please try again in a few minutes or contact your help desk with this
information: Cannot contact [
Server Name]
."
[#LC6762]
With this fix, selecting the "Reset Receiver" option in Citrix Receiver for Windows might not affect other users in a
double-hop scenario.
[#LC6822]
Attempts to restart an HP tablet with Citrix Receiver for Windows and the Checkpoint USB driver installed and
connected to a Thunderbolt USB-C docking station can cause the tablet to become unresponsive. Also, the tablet can
experience a fatal exception, displaying a blue screen.
[#LC6848]
User ExperienceUser Experience
When launching a published desktop session in seamless mode by connecting a remote desktop to a user device, the
keyboard shortcut dialog tip window might not appear.
[#LC6483]
User Int erf aceUser Int erf ace
After upgrading Citrix Receiver to version 4.3, certain application icons might not appear.
[#LC6371]
With local app access enabled, the desktop viewer toolbar might no longer be visible when you dock or undock the
device or switch networks.
Not eNot e: On systems with Fix #LC6719 installed, the issue can occur with sessions with local app access enabled and
running in the foreground, and in double-hop scenarios where the feature is enabled for both hops.
[#LC6719]
With local app access enabled, switching a VDA session between full-screen mode and windowed mode can cause
multiple instances of Citrix Receiver for Windows icons to appear on the taskbar.
[#LC6821]
MiscellaneousMiscellaneous
The setting "RemoveICAFile" might not be honored.
[#LC5840]
Receiver for Windows 4.4 CU3 (4.4.3000)
Compared to: Citrix Receiver for Windows 4.4 CU2 (4.4.2000)

© 1999-2017 Citrix Systems, Inc. All rights reserved. p.14https://docs.citrix.com
Receiver for Windows 4.4 CU3 (4.4.3000) contains all fixes that were included in Receiver for Windows 4.0, 4.0.1, 4.1, 4.1.2,
4.1.100, 4.1.200, 4.2, 4.2.100, 4.3, 4.3.100, 4.4, 4.4 CU1 (4.4.1000), and 4.4 CU2 (4.4.2000) plus the following, new fixes:
Local App AccessLocal App Access
Certain SoftPhone applications or Chrome might not display correctly when using Local App Access.
[#LC4327]
After disconnecting from a Local App Access (LAA) desktop and connecting to a full-screen non-LAA desktop, the client
side taskbar might show up above the full-screen non-LAA desktop.
[#LC5966]
When switching a session window from full screen to windowed, a dialog box stating the following does not appear:
"Session is windowed. Certain LAA features may not work in this mode."
When launching an app in windowed mode, a dialog box stating the following does not appear:
"App Launch failed. Session is in windowed mode. LAA app launch is prohibited in this mode. Please switch to full screen
to continue with the launch."
[#LC6291]
With Local App Access enabled, the desktop session is forced to launch in full screen mode.
[#LC6294]
Memory, CPU Opt imizat ionMemory, CPU Opt imizat ion
The SelfServicePlugin.exe process can consume high memory.
[#LC4509]
Session/Connect ionSession/Connect ion
File type association might not work when logging on using a roaming user profile and opening an published application.
[#LC5184]
When you dictate into SpeechMike along with another speech recognition application, the SpeechMike might stop
working.
[#LC5632]
Using the CleanUp.exe process with the silent switch on does not reload Citrix Receiver properly.
[#LC6039]
The HDX Engine might exit unexpectedly.
[#LC6047]

© 1999-2017 Citrix Systems, Inc. All rights reserved. p.15https://docs.citrix.com
Attempts to launch a desktop from a Wyse thin client through NetScaler Gateway 11 might result in the following error
message:
"Your client has experienced a problem with authentication to the server."
[#LC6145]
Sessions might hang or freeze when continuously moving the session window.
[#LC6403]
Smart CardsSmart Cards
With Citrix Receiver for Windows 4.4 installed, an application published on XenApp 6.5 might send a transaction request
to a smart card to end a non-active transaction. Citrix Receiver for Windows might incorrectly respond to this request by
causing the XenApp server to wait for the response forever or the transaction timeout value that is set can expire.
[#LC5772]
User ExperienceUser Experience
This fix provides improved support for sounds that play for a short period of time when using real-time mode for client
audio. This fix only applies to medium quality audio.
[#LC4941]
File type association might not connect the type of file to the correct icon and application when using Windows 8.1 and
Windows Server 2012 R2. With this fix, there are two group policies introduced under "SelfService."
1. Enable Default FTA - To enable or disable the default behavior of FTA
2. Enable FTA - To enable or disable the FTA feature
To get the proper file type association icon, disable the group policy "Enable Default FTA."
[#LC5485]
The file type association (FTA) icon might behave like the default Citrix Receiver for Windows FTA icon when you log on
to a published desktop or if you reset the Citrix Receiver for Windows configuration.
[#LC5730]
Surface Pro 4 and HP Elite webcams might not redirect to a session. Note: Webcam redirection might also fail if the
webcam doesn't support the screen resolution.
To fix this, use the following registry key:
HKEY_CURRENT_USER\Software\Citrix\HdxRealTime
Name: DefaultWidth
Type: Dword
Value: <Webcam supported resolution> Example (Surface Pro 4): 1920
HKEY_CURRENT_USER\Software\Citrix\HdxRealTime
Name: DefaultHeight
Type: Dword
Value: <Webcam supported resolution> Example (Surface Pro 4): 1080

© 1999-2017 Citrix Systems, Inc. All rights reserved. p.16https://docs.citrix.com
[#LC5750]
Desktops assigned on a client name basis are not enumerated correctly in the SelfService window. This issue occurs
when using the StoreFront Unified Experience.
[#LC5773]
Receiver for Windows 4.4 CU2 (4.4.2000)
Compared to: Citrix Receiver for Windows 4.4 CU1 (4.4.1000)
Receiver for Windows 4.4 CU2 (4.4.2000) contains all fixes that were included in Receiver for Windows 4.0, 4.0.1, 4.1, 4.1.2,
4.1.100, 4.1.200, 4.2, 4.2.100, 4.3, 4.3.100, 4.4, and 4.4 CU1 (4.4.1000) plus the following, new fixes:
HDX MediaSt ream Flash Redirect ionHDX MediaSt ream Flash Redirect ion
Flash content does not play correctly from ProofHQ.com when SOLFileHook is enabled.
[#LC4866]
When using Versions 22 or 18.0.0.360 of Adobe Flash Player and browsing websites with Flash content, the website URLs
are added to the dynamic blacklist and are rendered on the server rather than on the user device.
[#LC5626]
KeyboardKeyboard
With the Keyboard Shortcuts policy enabled and the wfica32 process running on a user device, the "Tip: Exiting Full
Screen Mode" dialog window might appear when connecting through a Remote Desktop connection. The dialog
window fails to accept keyboard and mouse input.
[#LC4445]
The local on-screen keyboard might appear in the Citrix Receiver for Windows session every time you enter text while
using a Microsoft Surface Pro device with an external USB or a wireless keyboard.
[#LC5093]
Local App AccessLocal App Access
With Local App Access enabled, if the applications are launched inside a remote session in full-screen or windowed mode,
the application icons might not be shown on the taskbar of the VDA session. T he endpoint might display multiple
application icons on the taskbar instead of one.
[#LC4217]
When launching a published desktop session with Local App Access enabled, the Desktop Viewer toolbar might
disappear.
[#LC5064]
When connected to a Local App Access-enabled VDA, the endpoint device's Task Switcher intermittently appears in the

© 1999-2017 Citrix Systems, Inc. All rights reserved. p.17https://docs.citrix.com
VDA session when you press ALT+TAB.
[#LC5084]
A Local App Access enabled desktop might not render correctly when changing from windowed mode to full-screen
mode.
[#LC5091]
When disconnecting from a VDA with Local App Access enabled, the taskbar might remain in the "Auto-hide" mode.
[#LC5183]
Session/Connect ionSession/Connect ion
Attempts to cancel the certificate prompt with the NetScaler client certificate authentication set to "Optional" can
cause the launching of a published application to fail with the Unknown client error 1110.
[#LC4169]
A multiple screen session with fast user switching might show the session only on one screen after reconnecting to the
client machine.
[#LC4382]
If you launch a seamless application from user device 1 and then connect to that user device from user device 2 over
RDP, the launched seamless application might go full-screen and overlap the taskbar of user device 1. The issue persists
even after minimizing and restoring the application window.
[#LC4682]
Sessions connected through NetScaler Gateway might become unresponsive while consuming high bandwidth.
[#LC4710]
When using certain third party software such Cisco WAAS, Citrix Receiver for Windows sessions might disconnect.
[#LC4805]
This fix addresses a memory issue in an underlying component.
[#LC4903]
After upgrading to Citrix Receiver for Windows 4.4, attempts to start applications might fail intermittently when you log
on for the first time until Citrix Receiver for Windows is restarted. The following error message appears:
"Cannot start app. Please contact your help desk."
[#LC4975]
Attempts to access apps through Citrix Receiver from StoreFront might fail from certain user devices. After adding the
store successfully, the following error message might appear during the enumeration process:
"Cannot Connect to Server
Please check your network and try again

© 1999-2017 Citrix Systems, Inc. All rights reserved. p.18https://docs.citrix.com
Try Again"
[#LC5039]
The Single Sign-on process (SSONSvr.exe) might exit unexpectedly or the credentials might not be passed through
automatically to the logon screen, causing a prompt to appear to enter the credentials manually.
[#LC5123]
Citrix Receiver ignores the proxy bypass list in Internet Explorer.
[#LC5131]
After installing Citrix Receiver for Windows and configuring a store through a registry entry or Group Policy Object (GPO),
when you log on for the first time after restarting the Virtual Machine (VM), applications might not enumerate.
[#LC5198]
With the "Automatically detect settings" option enabled in Microsoft Internet Explorer, application enumeration in Citrix
Receiver might be slow.
[#LC5224]
With Framehawk enabled, the scroll button on a mouse might not perform any action in a XenDesktop 7.8 VDA session.
The corresponding VDA side fix is available in XenDesktop 7.9.
[#LC5302]
Attempts to start applications by clicking the icons from the Start menu can fail intermittently even if you have already
logged on.
[#LC5306]
The wfica32.exe process might exit unexpectedly on the first hop session while using Citrix Receiver for Windows 4.4 and
when the user device is an Android device. The issue occurs while attempting to start a published application in a double-
hop scenario within the user session.
[#LC5391]
During the touch and drag gesture, the mouse button might remain in the down state when using a seamless EPIC
application. When you release the touch input outside the seamless EPIC application window, the session might become
unresponsive.
[#LC5644]
Syst em ExceptionsSyst em Exceptions
Citrix Receiver for Windows might exit unexpectedly with the following error message:
"Citrix HDX Engine has stopped working."
[#LC4100]
When you repeatedly play an .avi file in Windows Media Player, the wfica32.exe process can experience a deadlock and

© 1999-2017 Citrix Systems, Inc. All rights reserved. p.19https://docs.citrix.com
might exit unexpectedly.
[#LC4587]
When launching a published application over proxy, Citrix Receiver for Windows might exit unexpectedly with the
following error message:
"Citrix HDX Engine has stopped working."
[#LC5149]
The Citrix Authentication Manager (AuthMgrSvr.exe) might exit unexpectedly when you attempt to add an account
after installing Citrix Receiver for Windows 4.4 on Windows Vista.
[#LC5242]
User ExperienceUser Experience
With Local App Access enabled, the session window might be positioned outside the Desktop Viewer window when you
restore it from the maximized state.
[#LC2930]
During the touch and drag gesture, the touch input from Citrix Receiver for Windows might send certain unintended
mouse events to the server. This can cause the seamless EPIC application to become unresponsive.
[#LC5459]
User Int erf aceUser Int erf ace
Attempts to open unsubscribed content through StoreFront with Unified Experience might fail with the following error
message:
"Unable to launch your application because the required software is not installed."
[#LC4308]
On non-English language operating systems, the text of the Protocol error 1030 that appears in Receiver for Windows
might be garbled.
[#LC4687]
When using VLC Media Player with skin mode and with Local App Access enabled, the endpoint might display multiple
taskbar shortcuts instead of one.
[#LC4744]
The GoToMeeting icon does not display in the taskbar when opened using the GoToMeeting URL in a published instance
of Microsoft Internet Explorer in seamless mode.
[#LC4810]
When switching among FastConnect API users, the following error message appears:
"Your apps are not available at this time. Please try again in a few minutes."

© 1999-2017 Citrix Systems, Inc. All rights reserved. p.20https://docs.citrix.com
Additionally, when you log on using the FastConnect API, previous user application shortcuts are not removed from the
desktop.
[#LC5602]
Web Int erf aceWeb Int erf ace
The Citrix Receiver for Windows installation page does not appear in the web interface if an earlier version of Citrix
Receiver is installed on the user device.
[#LC4242]
MiscellaneousMiscellaneous
The wfica32.exe process can consume up to 100% of the CPU.
[#LC4520]
When you create a store by using the command, "SelfService.exe command, -init –createprovider," for example,
"C:\Program Files (x86)\Citrix\ICA Client\SelfServicePlugin\SelfService.exe -init -createprovider store
https://<StoreFrontURL>/Citrix/store/discovery," the related registry keys are created correctly. However, if you click the
Receiver icon in the notification area to access the SelfService user interface, the store is deleted from the registry and
the "Add Account" dialog might appear.
[#LC5096]
The wfica32.exe process can consume up to 100% of the CPU.
[#LC5189]
The Client Selective Trust (CST) settings might not be retained and the "HDX File Access" prompt appears for the first
and subsequent launches even after selecting the "Do not ask me again for this virtual desktop" option. The issue occurs
whenever new registries are created for the same VDA under the registry key "HKEY_Current_User\Software\Citrix\Ica
Client\Client Selective Trust" even after selecting the option.
[#LC5598]
Configuring NetScaler to TLSv1.2 can prevent external Windows 7 user devices from adding a StoreFront account. The
following error message might appear:
"The Authentication Service could not be contacted."
[#LC5737]
Receiver for Windows 4.4 CU1 (4.4.1000)
Compared to: Citrix Receiver for Windows 4.4
Receiver for Windows 4.4 CU1 (4.4.1000) contains all fixes that were included in Receiver for Windows 4.0, 4.0.1, 4.1, 4.1.2,
4.1.100, 4.1.200, 4.2, 4.2.100, 4.3, 4.3.100, and 4.4 plus the following, new fixes:
Client Device IssuesClient Device Issues

© 1999-2017 Citrix Systems, Inc. All rights reserved. p.21https://docs.citrix.com
When using Citrix Receiver for Windows 4.3, devices connected through USB 3.0 - including keyboards and mouse devices
- might stop working and show the error DRIVER_POWER_STATE_FAILURE (0x9f).
[#LC4542]
Surface Pro Type/Touch cover devices are available for USB redirection. After USB redirection, the mouse
cursor/keyboard may no longer work outside the session. Currently, a deny rule has been added at installation to prevent
Surface Pro Type/Touch covers devices from redirection. Refer to CTX137939 for more details on how these rules work.
Note: The current fix is limited only for fresh installations of Receiver. For an upgrade, the following deny rule needs to be
added manually to the below registry.
For 32-bit OS:
HKEY_LOCAL_MACHINE\SOFTWARE\Citrix\ICA Client\GenericUSB
For 64-bit OS:
HKEY_LOCAL_MACHINE\SOFTWARE\Wow6432Node\Citrix\ICA Client\GenericUSB
Edit the DeviceRules value and add specific Deny rules for the USB device.
DENY:vid=045e pid=079A # Microsoft Surface Pro TouchCover
DENY:vid=045e pid=079c # Microsoft Surface Pro Type Cover
DENY:vid=045e pid=07dc # Microsoft Surface Pro 3 Type Cover
DENY:vid=045e pid=07e4 # Microsoft Surface Pro 4 Type Cover with fingerprint reader
DENY:vid=03eb pid=8209 # Surface Pro Atmel maXTouch Digitizer
Follow the same procedure by adding VID and PID for those devices which warrant prevention of redirection.
DENY: vid=xxxx pid=xxxx rule for specific devices has to be on top of the list in devicerules.
[#LC4992]
HDX MediaSt reamHDX MediaSt ream
When opening Internet Explorer inside a Local App Access session and browsing to a web page with Flash content, and
an application is opened and maximized, the contents of the browser’s Flash container remain onscreen.
[#LC4527]
Inst alling, Uninst alling, UpgradingInst alling, Uninst alling, Upgrading
Attempts to suppress the "Add Account" window might fail when following the instructions in Knowledge Center article
CTX135438. With this fix, occasionally the "Add Account" window may pop up again even after closing it after resetting
or restarting Citrix Receiver.
[#LC4593]
KeyboardKeyboard
If a published application uses a hotkey combination of Ctrl+Alt+[Key], and if Alt+[Key] or Ctrl+[Key] is a Citrix hotkey,
the combination is not sent to the server.
[#LC3592]
When using a seamless session or applications, mouse clicks occasionally do not function as expected.

© 1999-2017 Citrix Systems, Inc. All rights reserved. p.22https://docs.citrix.com
[#LC4779]
Local App AccessLocal App Access
After installing the URL redirection plugin for the Mozilla Firefox portable browser, a large white box might appear in the
lower portion of the browser.
[#LC4351]
When you run redirector.exe to register/unregister browsers in a session, a pop-up window appears with information
that most users find not to be of value. With this enhancement, the pop-up window no longer appears unless you run
the redirector.exe command with the /verbose option.
[#LC4480]
When a published desktop with Local App Access enabled connects, the session window might not respond or can
disappear.
[#LC4689]
The CDViewer.exe process might not respond when both Local App Access and USB redirection are enabled in Citrix
Receiver.
[#LC5018]
Print ingPrint ing
On occasion, font embedding fails when fonts with symbols embedded are used with EMF printer drivers.
[#LC3334]
Seamless WindowsSeamless Windows
When you start and then minimize a seamless application, you cannot restore or maximize it from the taskbar.
[#LC3990]
Session/Connect ionSession/Connect ion
The session does not reconnect properly over proxy using WPAD. When reconnecting to the disconnected session, the
following message appears: "The network connection to your application was interrupted. Try to access your application
later or contact your help desk."
[#LC3077]
Adding a Storefront URL to a region different from the trusted sites' specific configuration for that region does not
work.
[#LC3281]
To use local file type associations, use the following registry key. The following registry key is set to true by default.
When the key is set to true, the local file icon changes to the Citrix Receiver icon if there are no other programs
associated with that file on the client machine.
HKEY_CURRENT_USER\Software\Citrix\Dazzle\EnabledDefaultFTAs=false (REG_SZ)

© 1999-2017 Citrix Systems, Inc. All rights reserved. p.23https://docs.citrix.com
[#LC4096]
After Session Reliability and Automatic Client Reconnection timeout disconnect, session launch is delayed and session
sharing does not work.
[#LC4143]
The size of a mapped client drive might display incorrectly and files cannot be copied to the drive if it exceeds 1TB. With
this fix, the drive will display as 0.99TB if it exceeds 1TB. The size of a mapped client drive only get displayed when the
Legacy Client Drive Mapping option is enabled.
[#LC4214]
With Local App Access (LAA) and Desktop Lock enabled, reconnecting to a full screen published server desktop session
can cause the session to lose focus and become unresponsive.
[#LC4253]
Using the "Switch user" Windows logon option changes the session resolution for the virtual desktop.
[#LC4452]
When using Citrix Receiver, application launch may not work with the ICO SDK.
[From RcvrForWin4.4_14.4.1000][#LC4550]
When a user logs on to StoreFront via Self Service Plug-in, the SelfService.exe process may intermittently take focus
from the other active windows every hour.
[#LC4628]
Epic applications will occasionally lose focus when transitioning networks.
[#LC4731]
The wfica32.exe process might exit unexpectedly when you attempt to launch an application, and the following error
message appears "The connection to <application_name> failed with status (Unknown client error 0)".
[#LC4768]
The NotificationDelay registry setting controls the delay in the appearance of the connection progress bar for seamless
connections. Setting this registry occasionally does not work when using the SelfService Plugin to launch the application.
This fix addresses that issue.
On 32-bit Windows:
HKEY_LOCAL_MACHINE\SOFTWARE\Citrix\ICA Client
Name: NotificationDelay
Type: REG_DWORD
Data: <Delay, in milliseconds>
On 64-bit Windows:
HKEY_LOCAL_MACHINE\SOFTWARE\Wow6432node\Citrix\ICA Client
Name: NotificationDelay

© 1999-2017 Citrix Systems, Inc. All rights reserved. p.24https://docs.citrix.com
Type: REG_DWORD
Data: <Delay, in milliseconds>
[#LC4969]
Syst em ExceptionsSyst em Exceptions
When updating XenApp services URLs through GPO and applying a new GPO or updating the same GPO with new store
values (such as store1 and store2), Citrix Receiver for Windows might exit unexpectedly.
[#LC4145]
The wfica32.exe process might experience an access violation and exit unexpectedly.
[#LC4482]
The SelfService.exe process can consume up to 100% of the CPU.
[#LC4494]
Sessions with GPU switching enabled on the endpoint can become unresponsive.
[#LC4562]
User ExperienceUser Experience
This fix provides improved support for sounds that play for a short period of time when using real-time mode for client
audio. This fix only applies to low quality audio.
[#LC2783]
Windows system sounds are occasionally inaudible in XenApp 7.5.
[#LC3926]
In an unstable network environment, popup messages such as "Your apps are not available at this time. Please try again
in a few minutes or contact your help desk with this information: Cannot contact [ServerName]." and "The network
connection to your application was interrupted. Try to access your application later or contact your help desk." appear.
This fix adds support for the following registry key that lets you disable the pop up messages.
On 32-bit Windows:
HKEY_LOCAL_MACHINE\SOFTWARE\Citrix\Dazzle
Name: SuppressDisconnectMessage
Type: REG_DWORD
Data: 24(0x18)
On 64-bit Windows:
HKEY_LOCAL_MACHINE\SOFTWARE\Wow6432Node\Citrix\Dazzle
Name: SuppressDisconnectMessage
Type: REG_DWORD
Data: 24(0x18)
[#LC4378]

© 1999-2017 Citrix Systems, Inc. All rights reserved. p.25https://docs.citrix.com
User Int erf aceUser Int erf ace
Shortcuts occasionally do not reappear if you manually delete them and then refresh the applications.
[#LC4020]
Receiver for Windows 4.4
Compared to: Citrix Receiver for Windows 4.3.100
Receiver for Windows 4.4 contains all fixes that were included in Receiver for Windows 4.0, 4.0.1, 4.1, 4.1.2, 4.1.100, 4.1.200,
4.2, 4.2.100, 4.3, and 4.3.100, plus the following, new fixes:
Inst alling, Uninst alling, UpgradingInst alling, Uninst alling, Upgrading
After uninstalling Citrix Receiver, Citrix HDX WMI Provider might not work.
[#LC3943]
KeyboardKeyboard
With Session Reliability enabled, the Snap-to feature fails to work in reconnected sessions. The Snap-to feature is a
mouse/keyboard setting you configure in Cont rol PanelCont rol Panel > MouseMouse > Point er Opt ionsPointer Opt ions > Aut omat ically moveAut omat ically move
point er t o t he def ault but t on in t he dialogue boxpoint er t o t he def ault but t on in t he dialogue box .
[#LC1252]
Switching between windows by using the Alt+Tab key activates application menus in a published desktop session.
[#LC2947]
Citrix Receiver and Remote Desktop Protocol (RDP) sessions share the same keyboard shortcut; pressing "Ctrl+Alt+End"
to invoke the "Ctrl+Alt+Delete" function inside a terminal session. As a result, the keyboard shortcut for RDP sessions
does not take effect inside a Citrix Receiver session.
With this fix, the keyboard shortcut for "Ctrl+Alt+End" is not a default for Citrix Receiver sessions and can be enabled by
setting the following registry key:
On 32-bit Windows
:
HKEY_LOCAL_MACHINE\SOFTWARE\Citrix\ICA Client\Engine\Lockdown Profiles\All Regions\Lockdown\Client
Engine\Hot Keys
Name: EnableCtrlAltEnd
Type: DWORD
Value: 1
On 64-bit Windows
:
HKEY_LOCAL_MACHINE\SOFTWARE\Wow6432Node\Citrix\ICA Client\Engine\Lockdown Profiles\All
Regions\Lockdown\Client Engine\Hot Keys

© 1999-2017 Citrix Systems, Inc. All rights reserved. p.26https://docs.citrix.com
Name: EnableCtrlAltEnd
Type: DWORD
Value: 1 (If the value is 0, the Ctrl+Alt+End is used inside the RDP session.)
[#LC3131]
After upgrading to Version 4.2 of Citrix Receiver, mouse clicks in double hop scenarios can be erratic.
[#LC3770]
Local App AccessLocal App Access
With Local App Access enabled, clicking the mouse to resize a session on a virtual machine can render the virtual machine
unresponsive.
[#LC1853]
Logon/Aut hent icat ionLogon/Aut hent icat ion
Single sign-on might not work when you attempt to log on using a cached fully qualified domain name (FQDN) for
credentials.
[#LC3305]
When Receiver is configured to use pass-through authentication for a Web Interface or StoreFront server in a published
desktop session, Receiver might not pass the credentials and instead prompt for credentials.
[#LC3388]
Session/Connect ionSession/Connect ion
With session pre-launch configured, if you attempt to reconnect to a session in which a published application is running,
an additional instance of that published application is added to the same session.
[#LC1701]
A windows session running in the foreground might unexpectedly lose focus.
[#LC2198]
Set the Policy as ProxyEnabled = f alseProxyEnabled = f alse under registry hive HKEY_LOCAL_MACHINE\SOF T WARE\ HKEY_LOCAL_MACHINE\SOFT WARE\
<Wow64 32Node>\Cit rix\Aut hManager<Wow64 32Node>\Cit rix\Aut hManager which will bypass the Proxy server configured on IE. Wow64 32NodeWow64 32Node hive is
not applicable if 32 bit OS architecture is used.
[#LC3129]
In a multi-port or multi-stream configuration where audio and video data is configured on separate ports, the audio can
be out of sync with the video.
[#LC3181]
Users authenticated to Receiver 4.2 for Windows with a smart card might see a PIN authentication prompt when
starting XenApp published apps.

© 1999-2017 Citrix Systems, Inc. All rights reserved. p.27https://docs.citrix.com
[#LC3187]
The configuration "KEYWORDS:prefer" for a published application might not take effect. This can happen when the user
logs off Receiver and the SelfService.exe process closes unexpectedly.
[#LC3190]
After logging on to Citrix Receiver, the application shortcuts might take a long time to appear on the Start menu and
Desktop of the user device.
[#LC3323]
Attempts to open a Windows media (.wmv) video from an email message in a published instance of Microsoft Outlook
might fail.
[#LC3453]
When the Desktop Viewer switches from full-screen mode to window mode, a floating toolbar might appear in the
XenDesktop session while using Receiver.
[#LC3526]
Desktop sessions might disconnect instead of remaining active when the system that is installed with Desktop Lock with
Receiver 4.3 is locked.
To enable the fix, set the following registry key:
On 32-bit Windows
:
HKEY_LOCAL_MACHINE\SOFTWARE\Citrix\Dazzle
Name: LiveInDesktopDisconnectonLock
Type: REG_SZ
Value: False
On 64-bit Windows
:
HKEY_LOCAL_MACHINE\SOFTWARE\Wow6432Node\Citrix\Dazzle
Name: LiveInDesktopDisconnectonLock
Type: REG_SZ
Value: False
[#LC3579]
If you are subscribed to a streamed-to-client application for Citrix Receiver that does not have the Citrix Offline Plug-in
installed, the following error message might appear while refreshing applications within Citrix Receiver:
"Your apps are not available at this time"
[#LC3609]
When you log on with Citrix Receiver for Windows, multiple pre-launch sessions on different worker servers might appear
in the same Delivery Group for the same user.

© 1999-2017 Citrix Systems, Inc. All rights reserved. p.28https://docs.citrix.com
[#LC3676]
After undocking the Thomson Reuters Eikon toolbar in a multiple monitor session, the space occupied by the toolbar is
not reclaimed by the session.
[#LC3773]
If a device has a version of Receiver for Windows earlier than 4.3 installed and the user upgrades the operating system
to Windows 10 from Windows 7, Windows 8, or Windows 8.1, uninstalling the Receiver through Add or Remove Programs
might fail. Attempts to upgrade to Receiver for Windows 4.3 also fail.
[#LC3789]
The wfica32.exe process might close unexpectedly while attempting to start a new session.
[#LC3795]
When you open applications from a published desktop through Citrix Receiver and change the "%appdata%" folder to
another file server, the following error message might appear:
"Error 1046: Virtual Driver is not loaded"
[#LC3981]
The alarm window of a locally installed instance of Lotus Notes can take keyboard focus from published applications.
[#LC3889]
Icons can appear in category folders in both the Start menu and on the desktop. There should not be a category folder
for the desktop. The issue occurs when using the registry key "UseCategoryAsStartMenuPath" to control icons in
category folders for both the Start menu and the desktop.
To enable the fix, you must set the following registry keys:
When the registry key "UseDifferentPathsforStartmenuAndDesktop" is set to "false," the key
"UseCategoryAsStartMenuPath" controls the creation of category folders for both the Start menu and the desktop.
When the registry key "UseDifferentPathsforStartmenuAndDesktop" is set to "true," the key
"UseCategoryAsStartMenuPath" controls the creation of an icon category folder in the Start menu. The key
"UseCategoryAsDesktopPath" controls the creation of an icon category folder on the desktop.
[#LC4052]
Attempts to change a password in Citrix Receiver might fail with the following error message:
"The old password you have entered is incorrect."
[#LC4081]
Syst em ExceptionsSyst em Exceptions
While using Microsoft AX Dynamics 2009 or Excel 2007, Citrix Receiver 4.x can exit unexpectedly with the following error
message:

© 1999-2017 Citrix Systems, Inc. All rights reserved. p.29https://docs.citrix.com
"Citrix HDX Engine has stopped working."
[#LC3776]
User ExperienceUser Experience
When attempting to add icon shortcuts to the desktop in a Citrix Receiver session, certain icons might not display the
application-specific icon. Instead, the generic white page icon appears.
[#LC4097]
Even with the "EnableFT U" set to "false," the CItrix Receiver connection wizard cannot be disabled.
To prevent the connection wizard from appearing, disable the EnableFTU policy setting using
Receiver.adm/Receiver.admx:
Comput erConfigurat ion > Administ rat ive Templat e > Cit rix Component > Cit rixReceiver > Self Service >Comput erConfigurat ion > Administ rat ive Templat e > Cit rix Component > Cit rixReceiver > Self Service >
EnableFT UEnableFT U
[#LC4133]
User Int erf aceUser Int erf ace
After installing the URL redirection plugin for Mozilla Firefox browser, a large white box might appear in the lower portion
of the browser.
[#LC3409]
When the seamless registry flag "ENABLE COLOR SYNC" is set, a seamless session might fail to inherit some of the colors
from the user device and display black instead.
To enable the fix, set the following registry key:
HKEY_LOCAL_MACHINE/System/CurrentControlSet/Control/Citrix/wfshell/TWI
Name: SeamlessFlags
Type: REG_DWORD
Value: 0x10
[#LC3768]
When changing the StoreFront URL, if the Citrix Receiver Self-service Plug-in user interface is opened and closed, the
applications that were set as disabled might appear as ghost icons instead of appearing as dimmed.
[#LC3863]
Certain applications can intermittently fail to enumerate; a blank icon can appear instead of the icon associated with
those applications.
[#LC4065]
If you change the icon of a published application in Citrix Studio, the desktop shortcut of the application does not
update.
[#LC4124]

© 1999-2017 Citrix Systems, Inc. All rights reserved. p.30https://docs.citrix.com
MiscellaneousMiscellaneous
When you add an account to Citrix Receiver on a computer that is located behind a proxy, Citrix Receiver does not use
the proxy settings when contacting beacons - the location is set to none instead of outside or inside.
[#LC2100]
Removing the registry value "ConnectionCenter" from the following key, can cause a forced repair for Citrix Receiver:
HKEY_LOCAL_MACHINE\SOFTWARE\Microsoft\Windows\CurrentVersion\Run
[#LC3751]
Not eNot e: This version of Citrix Receiver also includes all fixes included in Versions 4.3, 4.2, 4.1, and 4.0.

© 1999-2017 Citrix Systems, Inc. All rights reserved. p.31https://docs.citrix.com
Known Issues
Jun 21, 20 17
No new issues have been found in CU5 to date.
No new issues have been found in CU4 to date.
The following known issue has been observed in this release, along with the known issues in Citrix Receiver for Windows 4.4,
4.4 CU1 (4.4.1000), and 4.4 CU2 (4.4.2000):
Attempts to exit Citrix Receiver after an ACR/SR timeout might not work. As a workaround, log off and log back on to
Citrix Receiver or terminate the wfcrun32 process.
[#336, #4115]
The following known issue has been observed in this release, along with the known issues in Citrix Receiver for Windows 4.4
and 4.4 CU1 (4.4.1000):
"When launching a published desktop within a Remote Desktop session without a Desktop Viewer toolbar, the "Tip:
Exiting Full Screen Mode" dialog window might not appear. The keyboard shortcut “Shift+F2” controls the appearance
of the title bar of the session window. As a workaround, press Shift+F2 to view your desktop and then minimize the
session window."
[#LC4445, #639585]
The following known issues have been observed in this release, along with the known issues in Citrix Receiver for Windows
4.4:
After uninstalling Citrix Receiver for Windows, the registry value "Installer" under the registry key
HKEY_LOCAL_MACHINE\SOFTWARE\Citrix\ (on 32-bit systems) and
HKEY_LOCAL_MACHINE\SOFTWARE\Wow6432Node\Citrix\ (on 64-bit systems) might not be removed.
[#635242]
The following known issues have been observed in this release:
When changing the orientation of a hosted application on Windows 10 Surface Pro devices a tool tip screen appears
stating 'Exiting full screen mode'. To resolve this issue, disable tip dialog messages by setting the following registry key:

© 1999-2017 Citrix Systems, Inc. All rights reserved. p.32https://docs.citrix.com
HKEY_CURRENT_USER\Software\Citrix\ica client\keyboard mappings\tips
Use a value of 1 to disable tips, and use a value of 0 to enable tips; setting this registry key value to 1 disables all tips.
[#608346]
Warning
Editing the registry incorrectly can cause serious problems that may require you to reinstall your operating system. Citrix cannot
guarantee that problems resulting from the incorrect use of Registry Editor can be solved. Use Registry Editor at your own risk. Be
sure to back up the registry before you edit it.
VDA sessions on Windows 7 clients may experience display problems where a white shaded background appears behind
screen text. This issue occurs when the client does not have the latest GFX drivers installed. To resolve this issue where
the client has older NVIDIA drivers.
To resolve this issue where the client has older NVIDIA drivers:
1. Access the NVIDIA control panel.
2. Access the Video settings.
3. In the "How do you make color adjustments?" section, select "With NVIDIA Settings."
4. In NVIDIA settings, select the Advanced tab.
5. In the Advanced tab, set the Dynamic Range to "Full (0-255)".
You can alternatley skip the propased workaround by updating the client machine with the latest GFX drivers.
[#610197]
Note
For more information about NVIDIA driver usage, refer to the Dynamic RGB Range Capability page on the NVIDIA support site.
Performance degrades when connected to a Windows 2008 R2 VDA in H.264 Graphics mode when hardware decoding is
enabled on the client. Citrix recommends using legacy graphics mode on the VDA to avoid this issue.
[#609292, 611580]
ACR fails to reconnect to a session after multiple disconnect/reconnect cycles on the client, forcing users to log into
StoreFront again.
[#567938]
The NetScaler Gateway End Point Analysis Plugin (EPA) does not provide support for native Windows Reciever.

© 1999-2017 Citrix Systems, Inc. All rights reserved. p.33https://docs.citrix.com
[#534790]
In some localization instances (for example, running Citrix Receiver in Chinese), a virtual desktop and application may fail
to launch when localized login credentials contain surrogate pairs in a username.
[#556174]
If you install Receiver as a domain administrator, and select the ‘Enable CEIP ‘option during installation, the CEIP Window
is greyed out in the About menu.
[#556179]
Volume Controls might not work for RealTimes for Real Player inside the session due to compatibility issues with RAVE.
[#573549]
When using offline mode, Receiver encounters the following issues:
Loss of network connectivity does not result in an error message informing the user of the condition. Refreshing apps,
or subscribing/unsubscribing to an app, is not possible when using Receiver in offline mode. [#559792, #560091,
#560360]
Changes to apps or desktops made while Receiver is offline are not synchronized when network connectivity is re-
established. [#560362]
When logging out of Receiver, and then logging back in, the user name is not displayed in the top right corner of the
interface.
[#562107]
Smart card authorization does not function with XenApp Services sites, however, this functionality works with
StoreFront sites. To resolve this issue, point smart card authorization to a StoreFront site.
References to SSL may still be visible on field labels in the user interface, for example T LS and Compliance ModeT LS and Compliance Mode
Conf igurat ionConf igurat ion. These will be updated in a future release.
The language bar does not appear on the logon screen of the desktop lock client. The workaround is to use the floating
language bar.
[#502678]
The Shortcut options present in the Citrix Desktop Viewer are not working when the session is opened in windowed
mode.
[#510529]
The desktop viewer alert message during disconnect is not applicable for anonymous user sessions. This is by design.
[#481561]

© 1999-2017 Citrix Systems, Inc. All rights reserved. p.34https://docs.citrix.com
Receiver for Windows does not install on a Windows 2012 R2 machine with a User (non-admin) account.
To resolve this issue:
1. Click St artSt art , type regeditregedit and press Ent erEnt er.
2. Locate the following setting:
HKEY_LOCAL_MACHINE\Software\Policies\Microsoft\Windows\Installer
Create: DisableMSI Type: REG_DWORD value = 0 (0 should allow you to install)
[#492508]
System tray notifications can sometimes be seen in desktop lock mode.
[#488620]
The virtual keyboard does not appear automatically for the T erminal server VDA. The workaround is to open the virtual
keyboard using the icon on the Desktop Viewer toolbar or for apps, from the virtual keyboard icon on the task bar.
[#502774]
The audio quality is lower than expected when remoting a USB headset (Logitech USB H340) over generic USB. This is by
design. Audio optimization is not performed in USB redirection. This will be considered as an enhancement for a future
release.
[#469670]
Pinch and zoom gestures are not working on applications remoted through pre-7.0 versions of XenApp and XenDesktop,
or on XenApp and XenDesktop version 7.0 or later on Window 2008 R2.
[#517877]

© 1999-2017 Citrix Systems, Inc. All rights reserved. p.35https://docs.citrix.com
System requirements and compatibility
Apr 13, 20 17
Operating system
Cit rix Receiver f or WindowsCit rix Receiver f or Windows Support ed OSSupport ed OS
4.4
Windows 10
Windows 8.1, 32-bit and 64-bit editions (including Embedded edition)
Windows 8, 32-bit and 64-bit editions (including Embedded edition)
Windows 7, 32-bit and 64-bit editions (including Embedded edition)
Windows Vista, 32-bit and 64-bit editions
Windows Thin PC
Windows Server 2012 R2, Standard and Datacenter editions
Windows Server 2012, Standard and Datacenter editions
Windows Server 2008 R2, 64-bit edition
Windows Server 2008, 32-bit and 64-bit editions
Hardware
VGA or SVGA video adapter with color monitor
Windows-compatible sound card for sound support (optional)
For network connections to the server farm, a network interface card (NIC) and the appropriate network transport
software
Client machines should have the latest GFX drivers in order to experience better graphics performance.
Citrix Receiver for Windows 4.4 can be used on Windows 7 and 8.1 touch-enabled laptops, tablets, and monitors with
XenApp and XenDesktop 7 or later, and with Windows 7, 8 and 2012 Virtual Desktop Agents.

© 1999-2017 Citrix Systems, Inc. All rights reserved. p.36https://docs.citrix.com
XenApp (any of the following products):
Citrix XenApp 7.6
Citrix XenApp 7.5
Citrix XenApp 6.5, Feature Pack 2, for Windows Server 2008 R2
Citrix XenApp 6.5, Feature Pack 1, for Windows Server 2008 R2
Citrix XenApp 6.5 for Windows Server 2008 R2
Citrix XenApp 4, feature pack 2, for Unix operating systems
XenDesktop (any of the following products):
XenDesktop 7.6
XenDesktop 7.5
XenDesktop 7.1
XenDesktop 7.0
Citrix VDI-in-a-Box
VDI-in-a-Box 5.3
VDI-in-a-Box 5.2
You can use Citrix Receiver for Windows 4.4 browser-based access in conjunction with StoreFront Receiver for Web and
Web Interface, with - or without - the NetScaler Gateway plug-in.
StoreFront:
StoreFront 3.0.x, 2.6, 2.5 and 2.1
Provides direct access to StoreFront stores.
StoreFront configured with a Receiver for Web site
Provides access to StoreFront stores from a web browser. For the limitations of this deployment, refer to "Important
considerations" in Receiver for Web sites.
Web Interface in conjunction with the NetScaler VPN client:
Web Interface 5.4 for Windows web sites.
Provides access to virtual desktops and apps from a Web browser.
Web Interface 5.4 for Windows with XenApp Services or XenDesktop Services sites
Ways to deploy Citrix Receiver to users:
Enable users to download from receiver.citrix.com, then configure using an email or services address in conjunction
with StoreFront.
Offer to install from Citrix Receiver for Web site (configured with StoreFront).
Offer to install Receiver from Citrix Web Interface 5.4.
Deploy using Active Directory (AD) Group Policy Objects (GPOs).
Deploy using Microsoft System Center 2012 Configuration Manager.
Internet Explorer
Connections to Citrix Receiver for Web or to Web Interface support the 32-bit mode of Internet Explorer. For the
Internet Explorer versions supported, see StoreFront system requirements and Web Interface system requirements.
Mozilla Firefox 18.x (minimum supported version)
Google Chrome 21 or 20 (requires StoreFront).
Note
For information on changes to Google Chrome NPAPI support, see the Citrix blog article, Preparing for NPAPI being disabled by
Google Chrome.

© 1999-2017 Citrix Systems, Inc. All rights reserved. p.37https://docs.citrix.com
Citrix Receiver for Windows supports HTTPS and ICA-over-TLS connections through any one of the following
configurations:
For LAN connections:
StoreFront using StoreFront services or Citrix Receiver for Web sites
Web Interface 5.4 for Windows, using Web Interface or XenApp Services sites
For information about domain-joined and non-domain-joined devices, refer to the XenDesktop 7 documentation.
For secure remote or local connections:
Citrix NetScaler Gateway 11.x
Citrix NetScaler Gateway 10.5
Windows domain-joined, managed devices (local and remote, with or without VPN) and non-domain joined devices (with
or without VPN) are supported.
For information about the NetScaler Gateway and Access Gateway versions supported by StoreFront, see StoreFront
system requirements.
Note
References to NetScaler Gateway in this topic also apply to Access Gateway, unless otherwise indicated.
About secure connections and certificates
Note
For additional information about security certificates, refer to topics under Secure connections and Secure communications.
If a private certificate is installed on the remote gateway, the root certificate for the organization's certificate authority
must be installed on the user device to successfully access Citrix resources using Receiver.
Note
If the remote gateway's certificate cannot be verified upon connection (because the root certificate is not included in the local
keystore), an untrusted certificate warning appears. If a user chooses to continue through the warning, a list of apps is displayed but
the apps will not start.

© 1999-2017 Citrix Systems, Inc. All rights reserved. p.38https://docs.citrix.com
For information about installing root certificates on user devices as well as configuring Web Interface for certificate use,
see Secure Receiver communication.
Wildcard certificates are used in place of individual server certificates for any server within the same domain. Citrix Receiver
for Windows supports wildcard certificates, however they should only be used in accordance with your organization's
security policy. In practice, alternatives to wildcard certificates, such as a certificate containing the list of server names
within the Subject Alternative Name (SAN) extension, could be considered. Such certificates can be issued by both private
and public certificate authorities.
If your certificate chain includes an intermediate certificate, the intermediate certificate must be appended to the
NetScaler Gateway server certificate. For information, see Configuring Intermediate Certificates.
For connections to StoreFront, Citrix Receiver supports the following authentication methods:
Receiver f orReceiver f or
Web usingWeb using
browsersbrowsers
St oreFrontSt oreFront
Services sit eServices sit e
(nat ive)(nat ive)
St oreFrontSt oreFront
XenApp ServicesXenApp Services
sit e (nat ive)sit e (nat ive)
Net Scaler t oNet Scaler t o
Receiver f orReceiver f or
Web (browser)Web (browser)
Net Scaler t oNet Scaler t o
St oreFrontSt oreFront
Services sit eServices sit e
(nat ive)(nat ive)
Anonymous Yes Yes
Domain Yes Yes Yes Yes* Yes*
Domain pass-
through
Yes Yes Yes
Security token Yes* Yes*
Two-factor
(domain with
security token)
Yes* Yes*
SMS Yes* Yes*
Smart card Yes Yes No
User certificate Yes (NetScaler
plug-in)
Yes (NetScaler plug-
in)
* With or without the NetScaler plugin installed on the device.
Note

© 1999-2017 Citrix Systems, Inc. All rights reserved. p.39https://docs.citrix.com
Citrix Receiver for Windows 4.4 supports 2FA (domain plus security token) through NetScaler Gateway to StoreFront native service.
For connections to Web Interface 5.4, Citrix Receiver supports the following authentication methods (Web Interface uses
the term "Explicit" for domain and security token authentication):
WebWeb
Int erf aceInt erf ace
(browsers)(browsers)
Web Int erf aceWeb Int erf ace
XenApp ServicesXenApp Services
sit esit e
Net Scaler t o WebNet Scaler t o Web
Int erf ace (browser)Int erf ace (browser)
Net Scaler t o WebNet Scaler t o Web
Int erf ace XenAppInt erf ace XenApp
Services sit eServices sit e
Anonymous Yes
Domain Yes Yes Yes*
Domain pass-
through
Yes Yes
Security token Yes*
Two-factor (domain
with security token)
Yes*
SMS Yes*
Smart card Yes No
User certificate Yes (NetScaler plug-in)
* Available only in deployments that include NetScaler Gateway, with or without the associated plug-in installed on the
device.
For information about authentication, see Configuring Authentication and Authorization in the NetScaler Gateway
documentation andManage topics in the StoreFront documentation. For information about authentication methods
supported by Web Interface, seeConfiguring Authentication for the Web Interface.
Citrix Receiver for Windows 4.x can be used to upgrade Receiver for Windows 3.x as well as Citrix online plug-in 12.x. For
information more information on upgrading, see Considerations when upgrading.
Note
If you are upgrading from Citrix Receiver 3.4 to version 4.2.100, follow the instructions provided in the Upgrading from Receiver 3.4
to Receiver 4.2.100 Guide. Version 4.2.100 does not support in-place upgrades by the end user. The IT administrator must prepare
the environment, so all users on the network can complete the upgrade successfully. The information provided in the upgrade

© 1999-2017 Citrix Systems, Inc. All rights reserved. p.40https://docs.citrix.com
guide provides step by step instructions.
.NET Framework requirement s.NET Framework requirement s
.NET 3.5 Service Pack 1 is required by the Self-Service Plug-in, which allows users to subscribe to and launch desktops
and applications from the Receiver window or from a command line. For more information, see Configure and install
Receiver for Windows using command-line parameters.
The .NET 2.0 Service Pack 1 and Microsoft Visual C++ 2005 Service Pack 1 Redistributable Package are required to
ensure that the Receiver icon displays correctly. The Microsoft Visual C++ 2005 Service Pack 1 package is included
with .NET 2.0 Service Pack 1, .NET 3.5, and .NET 3.5 Service Pack 1; it is also available separately.
For XenDesktop connections: To use the Desktop Viewer, .NET 2.0 Service Pack 1 or later is required. This version is
required because, if Internet access is not available, certificate revocation checks slow down connection startup
times. The checks can be turned off and startup times improved with this version of the Framework but not with .NET
2.0.
For information about using Receiver with Microsoft Lync Server 2013 and the Microsoft Lync 2013 VDI Plug-in for
Windows, see XenDesktop, XenApp and Citrix Receiver Support for Microsoft Lync 2013 VDI Plug-in.
Support ed connect ion met hods and net work t ransport s:Support ed connect ion met hods and net work t ransport s:
TCP/IP+HTTP
See CTX 134341 for additional values, which may be required.
TLS+HTTPS
Important
If stores are configured in StoreFront with a Transport type of HTTP, you must add the following key value to the registry key
HKLM\Software\[Wow6432Node\]Citrix\AuthManager:ConnectionSecurityMode=Any.
Warning
Using Registry Editor incorrectly can cause serious problems that can require you to reinstall the operating system. Citrix cannot
guarantee that problems resulting from incorrect use of Registry Editor can be solved. Use Registry Editor at your own risk. Make
sure you back up the registry before you edit it.

© 1999-2017 Citrix Systems, Inc. All rights reserved. p.41https://docs.citrix.com
Install
Aug 11, 20 16
The CitrixReceiver.exe installation package can be installed:
By a user from Citrix.com or your own download site
A first-time Receiver user who obtains Receiver from Citrix.com or your own download site can set up an account by
entering an email address instead of a server URL. Receiver determines the NetScaler Gateway (or Access Gateway) or
StoreFront Server associated with the email address and then prompts the user to log on and continue the
installation. This feature is referred to as "email-based account discovery."
Note: A first-time user is one who does not have Receiver installed on the device.
Email-based account discovery for a first-time user does not apply if Receiver is downloaded from a location other
than Citrix.com (such as a Receiver for Web site).
If your site requires configuration of Receiver, use an alternate deployment method.
Automatically from Receiver for Web or from a Web Interface logon screen.
A first-time Receiver user can set up an account by entering a server URL or downloading a provisioning (CR) file.
Using an Electronic Software Distribution (ESD) tool
A first-time Receiver user must enter a server URL or open a provisioning file to set up an account.
Receiver does not require administrator rights to install unless it will use pass-through authentication.
A single installer now combines the latest Citrix Receiver for Windows with the HDX RT ME installer. When installing this
version of Citrix Receiver, the HDX RTME is included in the executable file (.exe).
Note
Installing the latest version of Citrix Receiver with integrated RTME support requires administrative privileges on the host machine.
Consider the following HDX RT ME issues when installing or upgrading Citrix Receiver:
The latest version of Citrix ReceiverPlusRTME contains the latest version of the HDX RTME (ver 1.0.0.1); no further
installation is required if you want to install RTME.
Upgrading from a previous Receiver version to the latest bundled version (Citrix Receiver with RTME) is supported.
Previously installed versions of RTME will be overwritten with the latest version; upgrading from the same Receiver
version to the latest bundled version (for example, Receiver 4.4 to the bundled Receiver 4.4 plus RTME) is not supported.
If you have an earlier version of RTME, installing the latest Receiver version automatically updates the RTME on the
client device.
If a more recent version of RT ME is present, the installer retains the latest version.
Important
The HDX RealTime Connector on your XenApp/XenDesktop servers must be at least version 2.0.0.417 (GA release) for
compatability with the new RT ME package; that is, RTME 2.0 cannot be used with the 1.8 RT ME Connector.

© 1999-2017 Citrix Systems, Inc. All rights reserved. p.42https://docs.citrix.com
For deployments with StoreFront:
Best practice for BYOD (Bring Your Own Device) users is to configure the latest versions of NetScaler Gateway and
StoreFront as described in the documentation for those products on the Product Documentation site. Attach the
provisioning file created by StoreFront to an email and inform users how to upgrade and to open the provisioning file
after installing Receiver.
As an alternative to providing a provisioning file, inform users to enter the URL of NetScaler Gateway (or Access Gateway
Enterprise Edition). Or, if you configured email-based account discovery as described in the StoreFront documentation,
inform users to enter their email address.
Another method is to configure a Receiver for Web site as described in the StoreFront documentation and complete the
configuration described in Deploy Receiver for Windows from Receiver for Web. Inform users how to upgrade Receiver,
access the Receiver for Web site, and download the provisioning file from Receiver for Web (click the user name and
click Activate).
For deployments with Web Interface
Upgrade your Web Interface site with Receiver for Windows and complete the configuration described inDeploy
Receiver for Windows from a Web Interface logon screen. Let your users know how to upgrade Receiver. You can, for
example, create a download site where users can obtain the renamed Receiver installer.
Considerations when upgrading
Tip
The process for configuring pass-through authentication (single sign-on) changed for Receiver for Windows 4.x. For information,
refer to the /includeSSON description in Configure and install Receiver for Windows using command-line parameters.
Citrix Receiver for Windows 4.x can be used to upgrade Receiver for Windows 3.x as well as Citrix online plug-in 12.x.
If Receiver for Windows 3.x was installed per machine, a per-user upgrade (by a user without administrative privileges) is not
supported.
If Receiver for Windows 3.x was installed per user, a per-machine upgrade is not supported.

© 1999-2017 Citrix Systems, Inc. All rights reserved. p.43https://docs.citrix.com
Install and uninstall Receiver for Windows manually
Jan 08 , 20 16
You can install Receiver from the installation media, a network share, Windows Explorer, or a command line by manually
running the CitrixReceiver.exe installer package. For command line installation parameters and space requirements, see
Configure and install Receiver for Windows using command-line parameters.
Important
The process for configuring pass-through authentication (single sign-on) changed for Receiver for Windows 4.x. For information,
refer to the /includeSSON description in Configure and install Receiver for Windows using command-line parameters.
If company policies prohibit you from using an .exe file, refer to How to Manually Extract, Install, and Remove Individual .msi
Files.
Manually inst alling and configuring Receiver f or pass-t hrough aut hent icat ionManually inst alling and configuring Receiver f or pass-t hrough aut hent icat ion
Receiver can be used in pass-through authentication scenarios with XenApp and XenDesktop. This section also describes
how to install and configure CitrixReciver.exe to use pass-through authentication for a Web Interface or StoreFront server
connection.
When successfully installed and configured, users can access their XenApp/XenDesktop resources without entering their
credentials again. The credentials from the client machine are passed through automatically to the endpoint.
Consider the following requirements for pass-through authentication:
Citrix Receiver for Windows installation package is CitrixReceiver.exe.
Load group policy files accordingly:
receiver.adm (located in the %SystemDrive%\Program Files (x86)\Citrix\ICA Client\Configuration folder on a Windows
machine where Citrix Receiver is installed); the receiver.adm file must be present in Windows XP, Windows 2003 and
thin client.
receiver.admx, receiver.adml (located in the %SystemDrive%\Program Files (x86)\Citrix\ICA Client\Configuration folder
on a Windows machine where Citrix Receiver is installed); to load the ADMX file to a GPO, refer to the "About ADMX
Template" Usage section in Configure Receiver with the Group Policy Object template.
Local administrator privileges are required for the client device to allow software installation and configuration.
Not eNot e: .adm files are only used if running XPe OS for thin client.
There are two different deployment scenarios to achieve pass-through authentication for XenApp/XenDesktop when
enterprise software deployment tools such as Citrix Merchandising Server or Microsoft System Center Configuration
Manager are not used:
1. Install Citrix Receiver manually and then configure using Local Group Policy (importing receiver.adm, receiver.admx,
receiver.adml) on various machines individually.
Not e: Not e: This is recommended for very small environments.
2. Install Citrix Receiver using Active Directory Group Policy (for example,
usingCheckAndDeployCit rixReceiverEnt erpriseSt art upScript.batCheckAndDeployCit rixReceiverEnt erpriseSt art upScript .bat , which is included with XenApp). Configuration

© 1999-2017 Citrix Systems, Inc. All rights reserved. p.44https://docs.citrix.com
using receiver.adm, receiver.admx, receiver.adml receiver.adm, receiver.admx, receiver.adml can then be applied using Active Directory Group Policy
Management to a large number of machines and centrally managed.
This option is not covered in this article because of a higher level of complexity. Refer to CT X134280 - How to Deploy Citrix
Receiver Enterprise for Pass-Through Authentication Using Active Directory Group Policy for more information.
Not eNot e: Citrix strongly recommends that any steps outlined in this article are thoroughly tested and validated in non-
production environments prior to use.
To manually inst all and configure Receiver f or pass-t hrough aut hent icat ionTo manually inst all and configure Receiver f or pass-t hrough aut hent icat ion:
1. Run the following command using PowerShell on the Controller: Set -BrokerSit e -Set -BrokerSit e -
T rustedRequest sSent T oT heXmlServicePort $T rueT rustedRequest sSent T oT heXmlServicePort $T rue
2. Log on to the client machine as the user with administrative rights.
3. Uninstall any existing installations of Online Plugin or Citrix Receiver for Windows from the client machine before starting
the installation process
4. Download Citrix Receiver for Windows Installation Package (CitrixReceiver.exe) from Citrix Downloads.
Use the appropriate installation deployment, either using the command line, or using the GUI.
To use t he command line:To use t he command line:
1. Open Windows Command PromptWindows Command Prompt and change directory where CitrixReceiver.exe is located.
2. On the Command PromptCommand Prompt , run the following command to install Citrix Receiver with the SSON feature enabled:
Cit rixReceiver.exe /includeSSONCit rixReceiver.exe /includeSSON. Note the information contained in the article Configuring and Installing Receiver
for Windows Using Command-Line Parameters; the parameter /includeSSON enables Single Sign-On for Receiver
standard (CitrixReceiver.exe). This option is not supported for Receiver enterprise (CitrixReceiverEnterprise.exe), which
installs Single Sign-On by default
3. After installation is completed, a pop up message is displayed: “Installation successful.”

© 1999-2017 Citrix Systems, Inc. All rights reserved. p.45https://docs.citrix.com
To use t he GUITo use t he GUI :
1. Double click CitrixReceiver.exe.
2. In the Enable Single Sign-on installation Wizard, select the Enable single sign-on checkbox to install Citrix Receiver with
the SSON feature enabled. This is equivalent to installing Receiver using the command line with the /includeSSON flag.
Not eNot e: The Enable Single Sign-on installation Wizard is only available for fresh (new) installations on a domain joined machine
when installed by a local administrator.
Configuring SSON via Local Group Policy Edit or (GPO)Configuring SSON via Local Group Policy Edit or (GPO)
By default, the group policy for SSON is to Enable pass-t hrough aut hent icat ionEnable pass-t hrough aut hent icat ion; this is sufficient for SSON to work
when Desktop Viewer and Receiver for Web is not used. When using Desktop Viewer, enable the GPO to Allow pass-Allow pass-
t hrough aut hent icat ion f or all ICA connect ionst hrough aut hent icat ion f or all ICA connect ions.
To use t he ADM file t o configure user aut hent icat ionTo use t he ADM file t o configure user aut hent icat ion
1. Open Local Group Policy Editor by running the command gpedit .mscgpedit .msc or by searching for “Edit group policy” on Start.
2. Add the receiver.adm template to the Local Group Policy Editor by selecting Computer Configuration; right-
click Administrative Templates, and choose Add/Remove Templates > Click AddAdd.
3. After the receiver.adm template has been successfully added,
expand Computer Configuration > Administrative Templates > Classic Administrative Templates (ADM) >
Citrix Components > Citrix Receiver > User authentication.
Not eNot e: Depending on the StoreFront\Receiver for Web configuration and security settings, the Allow pass-t hroughAllow pass-t hrough
aut hent icat ion f or all ICA connect ionsaut hent icat ion f or all ICA connect ions might have to be selected for pass-through authentication to work.

© 1999-2017 Citrix Systems, Inc. All rights reserved. p.46https://docs.citrix.com
Using a ADMX file f or pass-t hrough aut hent icat ionUsing a ADMX file f or pass-t hrough aut hent icat ion
1. Add the receiver.admx and receiver.adml template to the Local Group Policy Editor. Refer to the "About ADMX Template
Usage" section in Configure Receiver with the Group Policy Object template.
.
2. After successfully adding the eceiver.admx and receiver.adml template, expand Computer Configuration > Administrative
Templates > Citrix Components > Citrix Receiver > User Authentication.
3. Select the Local user name password Local user name password setting.
4. Select Enable pass-through authentication and Allow pass-through authentication for all ICA connections options when
enabling the preceding policy.

© 1999-2017 Citrix Systems, Inc. All rights reserved. p.47https://docs.citrix.com
Add the Fully Qualified Domain Name (FQDN) t o t he Trust ed Sit es listAdd the Fully Qualified Domain Name (FQDN) t o t he Trust ed Sit es list
1. On the client device, launch Internet Explorer.
2. In Internet Explorer, click Tools > Internet Options > Trusted sites.
3. Click AddAdd to add a FQDN to the trusted site list (for example, https://sf1.blricat.com). Once added, the site appears in
the Websites list:

© 1999-2017 Citrix Systems, Inc. All rights reserved. p.48https://docs.citrix.com
After adding a website to trusted site list, select an appropriate user authentication method:
1. In the Internet Options Security tab, select Trust Sites.
2. Choose Cust om level, securit y zone.Cust om level, securit y zone.
3. Scroll to the bottom of the list and select Aut omat ic logon wit h current user name and passwordAut omat ic logon wit h current user name and password.
4. Restart the client device to apply the changes.
Not eNot e: The Automatic logon with current user name and password is a per-user setting; if these settings are not configured
by the local administrator, each user must configure this option; to apply this setting globally, configure a GPO by adding
this value under the Custom level in both Internet and T rusted Sites.
Import ant Upgrade Considerat ions wit h using Single Sign-on (SSON)Import ant Upgrade Considerat ions wit h using Single Sign-on (SSON)
The table below contains information about upgrading Receiver using the command line with SSON:
SSON inst alled prior t o upgradeSSON inst alled prior t o upgrade SSON option during inst allat ionSSON option during inst allat ion
of new receiverof new receiver
(CMD Line - /includeSSON or UI(CMD Line - /includeSSON or UI
BehaviorBehavior

© 1999-2017 Citrix Systems, Inc. All rights reserved. p.49https://docs.citrix.com
Opt ion checked)Opt ion checked)
Yes Yes SSON Components Upgraded
Registry Key created
SSON functionality works – No
Action required to enable
Yes No SSON Components Upgraded
Registry Key created
SSON functionality works - No Action
required to enable
No Yes SSON Components Upgraded
Registry Key created
SSON functionality disabled – User
needs to uninstall receiver and install
it back with SSON selected via
cmdline option /includeSSON or by
GUI option
No No SSON component not installed
Not eNot e: The Enable Single Sign-on installation Wizard is not available when upgrading an existing version of Citrix Receiver.
You can uninstall Receiver with the Windows Programs and Features utility (Add/Remove Programs).
To remove Receiver using t he command lineTo remove Receiver using t he command line
You can also uninstall Receiver from a command line by typing the following command:
CitrixReceiver.exe /uninstall
After uninstalling Receiver from a user device, the custom Receiver registry keys created by Receiver.adm/Receiver.adml or
Receiver.admx remain in the Software\Policies\Citrix\ICA Client directory under HKEY_LOCAL_MACHINE and
HKEY_LOCAL_USER. If you reinstall Receiver, these policies might be enforced, possibly causing unexpected behavior. To
remove the customizations, delete them manually.
Warning
Using Registry Editor incorrectly can cause serious problems that can require you to reinstall the operating system. Citrix cannot
guarantee that problems resulting from incorrect use of Registry Editor can be solved. Use Registry Editor at your own risk. Make

© 1999-2017 Citrix Systems, Inc. All rights reserved. p.50https://docs.citrix.com
sure you back up the registry before you edit it.

© 1999-2017 Citrix Systems, Inc. All rights reserved. p.51https://docs.citrix.com
Configure and install Receiver for Windows using
command-line parameters
Aug 19, 20 16
Customize the Citrix Receiver installer by specifying command line options. The installer package self-extracts to the user's
temp directory before launching the setup program and requires approximately 57.8 MB of free space in the %temp%
directory. The space requirement includes program files, user data, and temp directories after launching several applications.
Warning
Using Registry Editor incorrectly can cause serious problems that can require you to reinstall the operating system. Citrix cannot
guarantee that problems resulting from incorrect use of Registry Editor can be solved. Use Registry Editor at your own risk. Make
sure you back up the registry before you edit it.
To install Citrix Receiver for Windows from a command prompt, use the syntax:
Cit rixReceiver.exe [Opt ions]Cit rixReceiver.exe [Opt ions]
Opt ionOpt ion /? or /help
Descript ionDescript ion This switch displays usage information
Sample usageSample usage
CitrixReceiver.exe /?
CitrixReceiver.exe /help
Opt ionOpt ion /noreboot
Descript ionDescript ion
Suppresses reboot during UI installations. T his option is not necessary for silent installs. If you suppress
reboot prompts, any USB devices which are in a suspended state when Receiver installs will not be
recognized by Receiver until after the user device is restarted.
SampleSample
usageusage
CitrixReceiver.exe /noreboot
Opt ionOpt ion /silent

© 1999-2017 Citrix Systems, Inc. All rights reserved. p.52https://docs.citrix.com
Descript ionDescript ion Disables the error and progress dialogs to run a completely silent installation.
Sample usageSample usage CitrixReceiver.exe /silent
Opt ionOpt ion /includeSSON
Descript ionDescript ion
Installs single sign-on (pass-through) authentication. This option is required for smart card single sign on.
The related option, ENABLE_SSON, is enabled when /includeSSON is on the command line. If you use
ADDLOCAL= to specify features and you want to install single sign on, you must also specify the value
ENABLE_SSON.
To enable pass-through authentication for a user device, you must install Receiver with local
administrator rights from a command line that has the option /includeSSON. On the user device, you
must also enable these policies located in Administrative Templates > Classic Administrative Templates
(ADM) > Citrix Components > Citrix Receiver > User authentication:
Local user name and password
Enable pass-through authentication
Allow pass-through authentication for all ICA (might be needed, depending on the Web Interface
configuration and security settings)
After the changes are completed, restart the user device. For more information, refer to How to
Manually Install and Configure Citrix Receiver for Pass-Through Authentication.
Note: Smart card, Kerberos and Local user name and password policies are inter-dependent.The order of
configuration is important. We recommend to first disable unwanted policies, and then enable the
policies you require. Carefully validate the result.
SampleSample
usageusage
CitrixReceiver.exe /includeSSON
Opt ionOpt ion ENABLE_SSON={Yes | No}
Descript ionDescript ion
Enable single sign on when /includeSSON is specified. The default value is Yes. Enables single sign on
when /includeSSON is also specified. This property is required for smart card single sign on. Note that
users must log off and log back on to their devices after an installation with single sign-on
authentication enabled. Requires administrator rights.
SampleSample
usageusage
CitrixReceiver.exe /ENABLE_SSON=Yes

© 1999-2017 Citrix Systems, Inc. All rights reserved. p.53https://docs.citrix.com
Opt ionOpt ion /EnableTracing={true | false}
Descript ionDescript ion
This feature is enabled by default. Use this property to explicitly enable or disable the always-on
tracing feature. Always-on tracing helps collect critical logs around connection time. These logs can
prove userful when troubleshooting intermittent connetivity issues. The Always-on tracing policy
overrides this setting.
By default, Always-on Tracing logs files are present in
C:\Users\
<username>\AppData\Local\Temp\CTXReceiverLogs\<sessionID>\xxx.etl
directory.
SampleSample
usageusage
CitrixReceiver.exe /EnableTracing=true
Opt ionOpt ion /EnableCEIP={true | false}
Descript ionDescript ion
When you enable participation in the Citrix Customer Experience Improvement Program (CEIP),
anonymous statistics and usage information are sent to Citrix to help Citrix improve the quality and
performance of its products.
SampleSample
usageusage
CitrixReceiver.exe /EnableCEIP=true
Opt ionOpt ion INSTALLDIR=<Installation Directory>
Descript ionDescript ion
Specifies the installation path, where Installation Directory is the location where most of the Citrix
Receiver software will be installed. The default value is C:\Program Files\Citrix\Receiver. The following
Receiver components are installed in the C:\Program Files\Citrix path: Authentication Manager, Citrix
Receiver, and the Self-Service plug-in.
If you use this option and specify an Installation directory, you must install RIInstaller.msi in the
installation directory\Receiver directory and the other .msi files in the installation directory.
SampleSample
usageusage
CitrixReceiver.exe INSTALLDIR=c:\Citrix\Test
Opt ionOpt ion CLIENT_NAME=<
ClientName
>

© 1999-2017 Citrix Systems, Inc. All rights reserved. p.54https://docs.citrix.com
Descript ionDescript ion
Specifies the client name, where ClientName is the name used to identify the user device to the server
farm. The default value is %COMPUTERNAME%
SampleSample
usageusage
CitrixReceiver.exe CLIENT_NAME=%COMPUTERNAME%.
Opt ionOpt ion ENABLE_CLIENT_NAME=Yes | No
Descript ionDescript ion
The dynamic client name feature allows the client name to be the same as the computer name. When
users change their computer name, the client name changes to match. Defaults to Yes. To disable
dynamic client name support, set this property to No and specify a value for the CLIENT_NAME
property.
SampleSample
usageusage
CitrixReceiver.exe DYNAMIC_NAME=Yes
Opt ionOpt ion ADDLOCAL=<feature... ,>
Descript ionDescript ion
Installs one or more of the specified components. When specifying multiple parameters, separate each
parameter with a comma and without spaces. The names are case sensitive. If you do not specify this
parameter, all components are installed by default.
Note: ReceiverInside and ICA_Client are prerequisites for all other components and must be installed.
Note:When ADDLOCAL is not specified, except SSON all the other default components gets installed.
Components include:
ReceiverInside – Installs the Citrix Receiver experience (required component for Receiver operation).
ICA_Client – Installs the standard Citrix Receiver (required component for Receiver operation).
WebHelper – Installs the WebHelper component. This component retrieves the ICA file from
Storefront and passes it to the HDX Engine. In addition, if verifies environment parameters and
shares them with Storefront (similar to ICO client detection).
SSON – Installs single sign on. Requires administrator rights.
AM – Installs the Authentication Manager.
SELFSERVICE – Installs the Self-Service Plug-in. The AM value must be specified on the command line
and .NET 3.5 Service Pack 1 must be installed on the user device. The Self-Service Plug-in is not
available for Windows Thin PC devices, which do not support .NET 3.5.
For information on scripting the Self-Service Plug-in (SSP), and a list of parameters available in
Receiver for Windows 4.2 and later, see http://support.citrix.com/article/CTX200337.
The Self-Service Plug-in allows users to access virtual desktops and applications from the Receiver
window or from a command line, as described in later in this section in To launch a virtual desktop or
application from a command line.

© 1999-2017 Citrix Systems, Inc. All rights reserved. p.55https://docs.citrix.com
USB – Installs USB support. Requires administrator rights.
DesktopViewer – Installs the Desktop Viewer.
Flash – Installs HDX media stream for Flash.
Vd3d – Enables the Windows Aero experience (for operating systems that support it).
SampleSample
usageusage
CitrixReceiver.exe ADDLOCAL=ReceiverInside, ICA_Client, SSON
Opt ionOpt ion ALLOWADDSTORE={N | S | A}
Descript ionDescript ion
Specifies whether users can add and remove stores not configured through Merchandising Server
deliveries; users can enable or disable stores configured through Merchandising Server deliveries, but they
cannot remove these stores or change the names or the URLs.) Defaults to S. Options include:
N – Never allow users to add or remove their own store.
S – Allow users to add or remove secure stores only (configured with HTTPS).
A – Allow users to add or remove both secure stores (HTTPS) and non-secure stores (HTTP). Not
applicable if Citrix Receiver is installed per user.
You can also control this feature by updating the registry key HKLM\Software\
[Wow6432Node\]Citrix\Dazzle\AllowAddStore.
Note: Only secure (HTTPS) stores are allowed by default and are recommended for production
environments. For test environments, you can use HTTP store connections through the following
configuration:
1. Set HKLM\Software\[Wow6432Node\]Citrix\Dazzle\AllowAddStore to A to allow users to add non-
secure stores.
2. Set HKLM\Software\[Wow6432Node\]Citrix\Dazzle\AllowSavePwd to A to allow users to save their
passwords for non-secure stores.
3. To enable the addition of a store that is configured in StoreFront with a TransportType of HTTP,
add to HKLM\Software\[Wow6432Node\]Citrix\AuthManager the
value ConnectionSecurityMode (REG_SZ type) and set it to Any.
4. Exit and restart Citrix Receiver.
SampleSample
usageusage
CitrixReceiver.exe ALLOWADDSTORE=N
Opt ionOpt ion ALLOWSAVEPWD={N | S | A}
Specifies whether users can add and remove stores not configured through Merchandising Server
deliveries; users can enable or disable stores configured through Merchandising Server deliveries, but they

© 1999-2017 Citrix Systems, Inc. All rights reserved. p.56https://docs.citrix.com
Descript ionDescript ion
cannot remove these stores or change the names or the URLs.) Defaults to S. Options include:
N – Never allow users to save their passwords.
S – Allow users to save passwords for secure stores only (configured with HTTPS).
A – Allow users to save passwords for both secure stores (HTTPS) and non-secure stores (HTTPS)
and non-secure stores (HTTP).
You can also control this feature by updating the registry key HKLM\Software\
[Wow6432Node]\Citrix\Dazzle\AllowSavePwd.
Note: The following registry key must be added manually if AllowSavePwd does not work:
Key for 32bit OS cilent: HKLM\Software\Citrix\AuthManager
Key for 64bit OS client: HKLM\Software\wow6432node\Citrix\AuthManager
Type: REG_SZ
Value: never - never allow users to save their passwords. secureonly - allow users to save passwords
for secure stores only (configured with HT TPS). always - allow users to save passwords for both
secure stores (HTTPS) and non-secure stores (HTTP).
SampleSample
usageusage
CitrixReceiver.exe ALLOWSAVEPWD=N
Opt ionOpt ion AM_CERTIFICATESELECT IONMODE={Prompt | SmartCardDefault | LatestExpiry}
Descript ionDescript ion
Use this option to select a certificate.The default value is Prompt, which prompts the user to choose a
certificate from a list. Change this property to choose the default certificate (per the smart card
provider) or the certificate with the latest expiry date. If there are no valid logon certificates, the user is
notified, and given the option to use an alternate logon method if available.
You can also control this feature by updating the registry key HKCU or HKLM\Software\
[Wow6432Node\]Citrix\AuthManager:CertificateSelectionMode={ Prompt | SmartCardDefault |
LatestExpiry }. Values defined in HKCU take precedence over values in HKLM to best assist the user in
selecting a certificate.
SampleSample
usageusage
CitrixReceiver.exe AM_CERTIFICAT ESELECT IONMODE=Prompt
Opt ionOpt ion AM_SMARTCARDPINENTRY=CSP
Descript ionDescript ion
Use CSP components to manage Smart Card PIN entry. By default, the PIN prompts presented to users
are provided by Citrix Receiver rather than the smart card Cryptographic Service Provider (CSP). Receiver
prompts users to enter a PIN when required and then passes the PIN to the smart card CSP. Specify this

© 1999-2017 Citrix Systems, Inc. All rights reserved. p.57https://docs.citrix.com
property to use the CSP components to manage the PIN entry, including the prompt for a PIN.
SampleSample
usageusage
CitrixReceiver.exe AM_SMARTCARDPINENTRY=CSP
Opt ionOpt ion ENABLE_KERBEROS={Yes | No}
Descript ionDescript ion
The default value is No. Specifies whether the HDX engine should use Kerberos authentication and
applies only when single sign-on (pass-through) authentication is enabled. For more information,
see Configure domain pass-through authentication with Kerberos.
SampleSample
usageusage
CitrixReceiver.exe ENABLE_KERBEROS=No
Opt ionOpt ion LEGACYFTAICONS={False | True}
Descript ionDescript ion
Use this option to display Legacy FTA icons. The default value is False. Specifies whether or not
application icons are displayed for documents that have file type associations with subscribed
applications. When the argument is set to false, Windows generates icons for documents that do not
have a specific icon assigned to them. The icons generated by Windows consist of a generic document
icon overlaid with a smaller version of the application icon. Citrix recommends enabling this option if you
plan to deliver Microsoft Office applications to users running Windows 7.
SampleSample
usageusage
CitrixReceiver.exe LEGACYFTAICONS=False
Opt ionOpt ion ENABLEPRELAUNCH={False | True}
Descript ionDescript ion
The default value is False. For information about session pre-launch, refer to Reduce application
launch time.
SampleSample
usageusage
CitrixReceiver.exe ENABLEPRELAUNCH=False
Opt ionOpt ion STARTMENUDIR={Directory Name}

© 1999-2017 Citrix Systems, Inc. All rights reserved. p.58https://docs.citrix.com
Descript ionDescript ion
By default, applications appear under Start > All Programs. You can specify the relative path under the
programs folder to contain the shortcuts to subscribed applications. For example, to place shortcuts
under Start > All Programs > Receiver, specify STARTMENUDIR=\Receiver\. Users can change the folder
name or move the folder at any time.
You can also control this feature through a registry key: Create the entry REG_SZ for StartMenuDir and
give it the value "\RelativePath". Location:
HKLM\Software\[Wow6432Node\]Citrix\Dazzle
HKCU\Software\Citrix\Dazzle
For applications published through XenApp with a Client applications folder (also referred to as a
Program Neighborhood folder) specified, you can specify that the client applications folder is to be
appended to the shortcuts path as follows: Create the
entry REG_SZ for UseCategoryAsStartMenuPath and give it the value "true". Use the same registry
locations as noted above.
Note: Windows 8/8.1 does not allow the creation of nested folders within the Start Menu. Applications
will be displayed individually or under the root folder but not within Category sub folders defined with
XenApp.
Examples
If client application folder is \office, UseCategoryAsStartMenuPath is true, and no StartMenuDiris
specified, shortcuts are placed under Start > All Programs > Office.
If Client applications folder is \Office, UseCategoryAsStartMenuPath is true,
and StartMenuDir is \Receiver, shortcuts are placed under Start > All Programs > Receiver > Office.
Changes made to these settings have no impact on shortcuts that are already created. To move
shortcuts, you must uninstall and re-install the applications.
SampleSample
usageusage
CitrixReceiver.exe STARTMENUDIR=\Office
Opt ionOpt ion
STOREx="storename;http[s]://servername.domain/IISLocation/discovery;[On | Off] ; [storedescription]"
[ STOREy="..."]
Descript ionDescript ion
Use this option to specify the Store name. Specifies up to 10 stores to use with Citrix Receiver. Values:
x and y – Integers 0 through 9.
storename – Defaults to store. This must match the name configured on the StoreFront Server.
servername.domain – The fully qualified domain name of the server hosting the store.
IISLocation – the path to the store within IIS. The store URL must match the URL in StoreFront
provisioning files. The store URLs are of the form “/Citrix/store/discovery”. To obtain the URL, export
a provisioning file from StoreFront, open it in notepad and copy the URL from the <Address> element.
On | Off – The optional Off configuration setting enables you to deliver disabled stores, giving users

© 1999-2017 Citrix Systems, Inc. All rights reserved. p.59https://docs.citrix.com
the choice of whether or not they access them. When the store status is not specified, the default
setting is On.
storedescription – An optional description of the store, such as HR App Store.
Note: In this release, it is important to include "/discovery" in the store URL for successful pass-through
authentication.
SampleSample
usageusage
CitrixReceiver.exe STORE0="Store;https://test.xx.com/Citrix/Store/Discovery"
Opt ionOpt ion ALLOW_CLIENTHOSTEDAPPSURL=1
Descript ionDescript ion
Enables the URL redirection feature on user devices. Requires administrator rights. Requires that Citrix
Receiver is installed for All Users. For information about URL redirection, refer to Local App Access and its
sub-topics in the XenDesktop 7 documentation.
SampleSample
usageusage
CitrixReceiver.exe ALLOW_CLIENTHOSTEDAPPSURL=1
Opt ionOpt ion SELFSERVICEMODE={False | True}
Descript ionDescript ion
The default value is True. When the administrator sets the SelfServiceMode flag to false, the user no
longer has access to the self service Citrix Receiver user interface. Instead, they can access subscribed
apps from the Start menu and via desktop shortcuts - known as "shortcut-only mode".
SampleSample
usageusage
CitrixReceiver.exe SELFSERVICEMODE=False
Opt ionOpt ion DESKT OPDIR=<Directory Name>
Descript ionDescript ion
Brings all shortcuts into a single folder. CategoryPath is supported for desktop shortcuts.
Note: When using the DESKTOPDIR option, set the PutShortcutsOnDesktop key to True.
Sample usageSample usage CitrixReceiver.exe DESKTOPDIR=\Office

© 1999-2017 Citrix Systems, Inc. All rights reserved. p.60https://docs.citrix.com
Opt ionOpt ion /rcu
Descript ionDescript ion
Allows you to upgrade from an unsupported version to the latest version of Citrix Receiver.
Sample usageSample usage CitrixReceiver.exe /rcu
When installation finishes, a dialog appears indicating a successful installation, followed by the Add AccountAdd Account screen. For a
first time user, the Add Account dialog requires you to enter an email or server address to setup an account.
Note
If a common store has not been defined by the STOREx argument above, or by a Group Policy Object, then users who have not
previously logged on to a computer where Citrix Receiver is installed, may see the Add Account dialog. To suppress this dialog,
create a REG_DWORD value EnableX1FTU in the key HKLM\Software\Citrix\Receiver and set the value to 0.
If there is a problem with the installation, search in the user's %TEMP%/CTXReceiverInstallLogs directory for the logs with
the prefix CtxInstall- or TrolleyExpress- . For example:
CtxInstall-ICAWebWrapper-20141114-134516.log
TrolleyExpress-20090807-123456.log
Examples of a command-line inst allat ionExamples of a command-line inst allat ion
To install all components silently and specify two application stores:
CitrixReceiver.exe /silent STORE0="AppStore;https://testserver.net/Citrix/MyStore/discovery;on;HR App Store"
STORE1="BackUpAppStore;https://testserver.net/Citrix/MyBackupStore/discovery;on;Backup HR App Store"
To specify single sign-on (pass-through authentication) and add a store that points to a XenApp Services URL:
CitrixReceiver.exe /INCLUDESSON /STORE0="PNAgent;https://testserver.net/Citrix/PNAgent/config.xml;on;My PNAgent
Site"
Citrix Receiver creates a stub application for each subscribed desktop or application. You can use a stub application to
launch a virtual desktop or application from the command line. Stub applications are located in
%appdata%\Citrix\SelfService. The file name for a stub application is the Display Name of the application, with the spaces
removed. For example, the stub application file name for Internet Explorer is InternetExplorer.exe.

© 1999-2017 Citrix Systems, Inc. All rights reserved. p.61https://docs.citrix.com
Deploy Receiver for Windows using Active Directory
and sample startup scripts
May 0 8, 20 15
You can use Active Directory Group Policy scripts to pre-deploy Receiver on systems based on your Active Directory
organizational structure. Citrix recommends using the scripts rather than extracting the .msi files because the scripts allow
for a single point for installation, upgrade, and uninstall, they consolidate the Citrix entries in Programs and Features, and
make it easier to detect the version of Receiver that is deployed. Use the Scripts setting in the Group Policy Management
Console (GPMC) under Computer Configuration or User Configuration. For general information about startup scripts, refer
to Microsoft documentation.
Citrix includes sample per-computer startup scripts to install and uninstall CitrixReceiver.exe. The scripts are located on
recent XenApp and XenDesktop media in the Citrix Receiver and Plug-ins\Windows\Receiver\Startup_Logon_Scripts folder.
CheckAndDeployReceiverPerMachineStartupScript.bat
CheckAndRemoveReceiverPerMachineStartupScript.bat
When the scripts are executed during Startup or Shutdown of an Active Directory Group Policy, custom configuration files
might be created in the Default User profile of a system. If not removed, these configuration files can prevent some users
from accessing the Receiver logs directory. The Citrix sample scripts include functionality to properly remove these
configuration files.
To use t he st art up scripts t o To use t he st art up scripts t o deploy Receiver wit h Act ive Direct orydeploy Receiver wit h Act ive Direct ory
1. Create the Organizational Unit (OU) for each script.
2. Create a Group Policy Object (GPO) for the newly created OU.
Modify the scripts by editing these parameters in the header section of each file:
Current Version of Current Version of packagepackage . The specified version number is validated and if it is not present, the deployment
proceeds. For example, set DesiredVersion= 3.3.0.XXXX to exactly match the version specified. If you specify a partial
version, for example 3.3.0, it matches any version with that prefix (3.3.0.1111, 3.3.0.7777, and so forth).
Package Locat ion/Deployment Package Locat ion/Deployment direct orydirect ory . This specifies the network share containing the packages and is not
authenticated by the script. The shared folder must have Read permission for EVERYONE.
Script Logging Direct oryScript Logging Direct ory . This specifies the network share where the install logs are copied and is not authenticated
by the script. The shared folder must have Read and Write permissions for EVERYONE.
Package Inst aller Command Package Inst aller Command Line Opt ionsLine Options. These command line options are passed to the installer. For the
command line syntax, see Configure and install Receiver for Windows using command-line parameters.
1. Open the Group Policy Management Console.
2. Select Computer Configuration > Policies > Windows Settings > Scripts (Startup/Shutdown).
3. In the right-hand pane of the Group Policy Management Console, select Startup.
4. In the Properties menu, click Show Files, copy the appropriate script to the folder displayed, and then close the window.
5. In the Properties menu, click Add and use Browse to find and add the newly created script.

© 1999-2017 Citrix Systems, Inc. All rights reserved. p.62https://docs.citrix.com
1. Move the user devices designated to receive this deployment to the OU you created.
2. Reboot the user device and log on as any user.
3. Verify that Program and Features (Add or Remove Programs in previous OS versions) contains the newly installed
package.
1. Move the user devices designated for the removal to the OU you created.
2. Reboot the user device and log on as any user.
3. Verify that Program and Features (Add or Remove Programs in previous OS versions) removed the previously installed
package.
Citrix recommends using per-computer startup scripts. However, for situations where you require Receiver per-user
deployments, two Receiver per-user scripts are included on the XenDesktop and XenApp media in the Citrix Receiver and
Plug-ins\Windows\Receiver\Startup_Logon_Scripts folder.
CheckAndDeployReceiverPerUserLogonScript.bat
CheckAndRemoveReceiverPerUserLogonScript.bat
To set up the per-user startup scripts
1. Open the Group Policy Management Console.
2. Select User Configuration > Policies > Windows Settings > Scripts.
3. In the right-hand pane of the Group Policy Management Console, select Logon
4. In the Logon Properties menu, click Show Files, copy the appropriate script to the folder displayed, and then close the
window.
5. In the Logon Properties menu, click Add and use Browse to find and add the newly created script.
To deploy Receiver per-user
1. Move the users designated to receive this deployment to the OU you created.
2. Reboot the user device and log on as the specified user.
3. Verify that Program and Features (Add or Remove Programs in previous OS versions) contains the newly installed
package.
To remove Receiver per-user
1. Move the users designated for the removal to the OU you created.
2. Reboot the user device and log on as the specified user.
3. Verify that Program and Features (Add or Remove Programs in previous OS versions) removed the previously installed
package.

© 1999-2017 Citrix Systems, Inc. All rights reserved. p.63https://docs.citrix.com
Deploy Receiver for Windows from Receiver for Web
May 0 8, 20 15
You can deploy Receiver from Receiver for Web to ensure that users have it installed before they try to connect to an
application from a browser. Receiver for Web sites enable users to access StoreFront stores through a web page. If the
Receiver for Web site detects that a user does not have a compatible version of Receiver, the user is prompted to
download and install Receiver. For more information, refer to Receiver for Web sites in the StoreFront documentation.
Email-based account discovery does not apply when Receiver is deployed from Receiver for Web. If email-based account
discovery is configured and a first-time user installs Receiver from Citrix.com, Receiver prompts the user for an email or server
address. Entering an email address results in the error message "Your email cannot be used to add an account." Use the
following configuration to prompt for the server address only.
1. Download CitrixReceiver.exe to your local computer.
2. Rename CitrixReceiver.exe to CitrixReceiverWeb.exe.
Important: The name CitrixReceiverWeb.exe is case sensitive.
3. Deploy the renamed executable using your regular deployment method. If you use StoreFront, refer to Configure
Receiver for Web sites using the configuration files in the StoreFront documentation.

© 1999-2017 Citrix Systems, Inc. All rights reserved. p.64https://docs.citrix.com
Deploy Receiver for Windows from a Web Interface
logon screen
May 0 8, 20 15
This feature is available only for XenDesktop and XenApp releases that support Web Interface.
You can deploy Receiver from a web page to ensure that users have it installed before they try to use the Web Interface.
The Web Interface provides a client detection and deployment process that detects which Citrix clients can be deployed
within the user's environment and then guides them through the deployment procedure.
You can configure the client detection and deployment process to run automatically when users access a XenApp website.
If the Web Interface detects that a user does not have compatible version of Receiver, the user is prompted to download
and install Receiver.
For more information, refer to Configuring Client Deployment in the Web Interface documentation.
Email-based account discovery does not apply when Receiver is deployed from Web Interface. If email-based account
discovery is configured and a first-time user installs Receiver from Citrix.com, Receiver prompts the user for an email or server
address. Entering an email address results in the error message "Your email cannot be used to add an account." Use the
following configuration to prompt for the server address only.
1. Download CitrixReceiver.exe to your local computer.
2. Rename CitrixReceiver.exe to CitrixReceiverWeb.exe.
Important: The name CitrixReceiverWeb.exe is case sensitive.
3. Specify the changed filename in the ClientIcaWin32 parameter in the configuration files for your XenApp websites.
To use the client detection and deployment process, the Receiver installation files must be available on the Web
Interface server. By default, the Web Interface assumes that the file names of the Receiver installation files are the
same as the files supplied on the XenApp or XenDesktop installation media.
4. Add the sites from which the CitrixReceiverWeb.exe file is downloaded to the Trusted Sites zone.
5. Deploy the renamed executable using your regular deployment method.

© 1999-2017 Citrix Systems, Inc. All rights reserved. p.65https://docs.citrix.com
Configure Citrix Receiver for Windows
Jul 27, 20 16
When using Receiver for Windows software, the following configuration steps allow users to access their hosted
applications and desktops:
Configure your application delivery and Configure your XenDesktop environment. Ensure your XenApp environment is
configured correctly. Understand your options and provide meaningful application descriptions for your users.
Configure self-service mode by adding a StoreFront account to Receiver. This mode allows your users to subscribe to
applications from the Receiver user interface.
Configure shortcut only mode, which includes:
using a Group Policy Object template file to customize shortcuts.
using registry keys for shortcut customization.
configuring shortcuts based on StoreFront account settings
Provide users with account information. Provide users with the information they need to set up access to accounts
hosting their virtual desktops and applications. In some environments, users must manually set up access to those
accounts.
If you have users who connect from outside the internal network (for example, users who connect from the Internet or
from remote locations), configure authentication through NetScaler Gateway. For more information see NetScaler
Gateway.
Configure your applicat ion deliveryConfigure your applicat ion delivery
When delivering applications with XenDesktop or XenApp, consider the following options to enhance the experience for
your users when they access their applications:
Web access mode
Without any configuration, Citrix Receiver for Windows provides web access mode; browser-based access to applications
and desktops. Users simply open a browser to a Receiver for Web or Web Interface site and select and use the applications
that they want. In web access mode, no app shortcuts are placed in the App Folder on your user's device.
Self-service mode
By adding a StoreFront or a Web Interface Services Site account to Receiver for Windows, you can configure self-service
mode, which enables your users to subscribe to applications through Receiver. This enhanced user experience is similar to
that of a mobile app store. In self-service mode you can configure mandatory, auto-provisioned, and featured app keyword
settings as needed. When one of your users selects an application, a shortcut to that application is placed in the App Folder
on the user device.
When accessing a StoreFront 3.0 site, your users see the Receiver user experience. For more information about the Receiver
user experience, see Receiver and StoreFront 3.0 Technology Preview.
When publishing applications on your XenApp farms, to enhance the experience for users accessing those applications
through StoreFront stores, ensure that you include meaningful descriptions for published applications. T he descriptions are
visible to your users through Citrix Receiver.

© 1999-2017 Citrix Systems, Inc. All rights reserved. p.66https://docs.citrix.com
As mentioned previously, by adding a StoreFront account to Receiver or configuring Receiver to point to a Web Interface
XenApp Services site, you can configure self-service mode, which allows users to subscribe to applications from the Receiver
user interface. This enhanced user experience is similar to that of a mobile app store.
In self service mode you can configure mandatory, auto-provisioned and featured app keyword settings as needed:
To automatically subscribe all users of a store to an application, append the string KEYWORDS:Auto to the description
you provide when you publish the application in XenApp. When users log on to the store, the application is automatically
provisioned without the need for users to manually subscribe to the application.
To advertise applications to users or make commonly used applications easier to find by listing them in the Receiver
Featured list, append the string KEYWORDS:Featured to the application description.
For more information, see the StoreFront documentation.
If the Web Interface of your XenApp deployment does not have a XenApp Services site, create a site. The name of the site
and how you create the site depends on the version of the Web Interface you have installed. For more information, see the
Web Interface documentation.
Note
When launching a session using self service mode, connecting automatically is enabled by default.
With StoreFront, the stores you create consist of services that provide authentication and resource delivery infrastructure
for Citrix Receiver. Create stores that enumerate and aggregate desktops and applications from XenDesktop sites and
XenApp farms, making these resources available to users.
1. Install and configure StoreFront. For more information, see the StoreFront documentation.
Note: For administrators who need more control, Citrix provides a template you can use to create a download site for
Receiver.

© 1999-2017 Citrix Systems, Inc. All rights reserved. p.67https://docs.citrix.com
Configuring application delivery
Aug 19, 20 16
When delivering applications with XenDesktop or XenApp, consider the following options to enhance the experience for users when they
access their applications:
Web Access Mode - Without any configuration, Receiver for Windows 4.4 provides browser-based access to applications and desktops.
Users simply open a browser to a Receiver for Web or Web Interface site to select and use the applications that they want. In this mode,
no shortcuts are placed on the user's desktop.
Self Service Mode - By simply adding a StoreFront account to Receiver or configuring Receiver to point to a StoreFront site, you can
configure
self service mode
, which allows users to subscribe to applications from the Receiver user interface. This enhanced user
experience is similar to that of a mobile app store. In self service mode you can configure mandatory, auto-provisioned and featured app
keyword settings as needed.
Note: By default, Receiver for Windows 4.4 allows users to select the applications they want to display in their Start menu.
App shortcut-only mode - As a Receiver administrator, you can configure Receiver for Windows 4.4 to automatically place application and
desktop shortcuts directly in the Start menu or on the desktop in a similar way that Receiver for Windows 3.4 Enterprise places them. The
new
shortcut only
mode allows users to find all their published apps within the familiar Windows navigation schema where users would
expect to find them.
For information on delivering applications using XenApp and XenDesktop 7 refer to Create a Delivery Group application.
Note: Include meaningful descriptions for applications in a Delivery Group. Descriptions are visible to Receiver users when using Web access or
self service mode.
For more information on how to configure shortcuts in the Start menu or on the desktop, see Configure Shortcut Only Mode in Citrix
Product Documentation.
By simply adding a StoreFront account to Receiver or configuring Receiver to point to a StoreFront site, you can configure
self-service mode
,
which allows users to subscribe to applications from the Receiver user interface. This enhanced user experience is similar to that of a mobile
app store.
Note: By default, Receiver for Windows 4.4 allows users to select the applications they want to display in their Start menu.
In self service mode you can configure mandatory, auto-provisioned and featured app keyword settings as needed.
Append keywords to the descriptions you provide for delivery group applications:
To make an individual app mandatory, so that it cannot be removed from Receiver for Windows, append the string KEYWORDS:Mandatory
to the application description. There is no Remove option for users to unsubscribe to mandatory apps.
To automatically subscribe all users of a store to an application, append the string KEYWORDS:Auto to the description. When users log on
to the store, the application is automatically provisioned without users needing to manually subscribe to the application.
To advertise applications to users or to make commonly used applications easier to find by listing them in the Receiver Featured list,
append the string KEYWORDS:Featured to the application description.
Start menu integration and desktop shortcut only mode lets you bring published application short cut sshort cut s into the Windows Start menu and
onto the desktop. In this way, users do not have to subscribe to applications from the Receiver user interface. Start menu integration and
desktop shortcut management provides a seamless desktop experience for groups of users, who need access to a core set of applications in
a consistent way.
As a Receiver administrator, you use a command-line install flags, GPOs, account services, or registry settings to disable the usual "self service"
Receiver interface and replace it with a preconfigured Start menu. The flag is called SelfServiceMode and is set to true by default. When the
administrator sets the SelfServiceMode flag to false, the user no longer has access to the self service Receiver user interface. Instead, they
can access subscribed apps from the Start menu and via desktop shortcuts - referred to here as short cut -only short cut -only modemode .

© 1999-2017 Citrix Systems, Inc. All rights reserved. p.68https://docs.citrix.com
Users and administrators can use a number of registry settings to customize the way shortcuts are set up. See Using registry keys to
customize app shortcut locations.
Working wit h short cut sWorking wit h short cut s
Users cannot remove apps. All apps are mandatory when working with the SelfServiceMode flag set to false (shortcut-only mode). If the
user removes a shortcut icon from the desktop, the icon comes back when the user selects Refresh from the Receiver system tray icon.
Users can configure only one store. The Account and Preferences options are not available. This is to prevent the user from configuring
additional stores. The administrator can give a user special privileges to add more than one account using the Group Policy Object
template, or by manually adding a registry key (HideEditStoresDialog) on the client machine. When the administrator gives a user this
privilege, the user has a Preferences option in the system tray icon, where they can add and remove accounts.
Users cannot remove apps via the Windows Control Panel.
You can add desktop shortcuts via a customizable registry setting. Desktop shortcuts are not added by default. After you make any
changes to the registry settings, Receiver must be restarted.
Shortcuts are created in the Start menu with a category path as the default, UseCategoryAsStartMenuPath.
Note: Windows 8/8.1 does not allow the creation of nested folders within the Start Menu. Applications will be displayed individually or under
the root folder but not within Category sub folders defined with XenApp.
You can add a flag [/DESKTOPDIR="Dir_name"] during installation to bring all shortcuts into a single folder. CategoryPath is supported for
desktop shortcuts.
Auto Re-install Modified Apps is a feature which can be enabled via the registry key AutoReInstallModifiedApps. When
AutoReInstallModifiedApps is enabled, any changes to attributes of published apps and desktops on the server are reflected on the client
machine. When AutoReInstallModifiedApps is disabled, apps and desktop attributes are not updated and shortcuts are not re-stored on
refresh if deleted on the client. By default this AutoReInstallModifiedApps is enabled. See Using registry keys to customize app shortcut
locations.
Not e:Not e: You should make changes to group policy before configuring a store. If at any time you or a user wants to customize the group
policies, you or the user must reset Receiver, configure the group policy, and then reconfigure the store.
As an administrator, you can configure shortcuts using group policy.
1. Open the Local Group Policy Editor by running the command gpedit.msc locally from the Start menu when applying policies to a single
computer or by using the Group Policy Management Console when applying domain policies.
2. In the left pane of the Group Policy Editor, select the Administrative Templates folder.
3. From the Action menu, choose Add/Remove Templates.
4. Choose Add, browse to the Receiver Configuration folder and then select receiver.admx (or receiver.adml). For more information on ADMX
template, See About ADMX Template Usage
5. Select Open to add the template and then Close to the return to the Group Policy Editor.
6. In the Group Policy Editor, got to Administrative Templates > Classic Administrative Templates (ADM) > Citrix Components > Citrix Receiver
> Self Service.
7. Select Manage SelfServiceMode to enable or disable the self service Receiver user interface.
8. Choose Manage App Shortcut to enable or disable:
Shortcuts on Desktop
Shortcuts in Start menu
Desktop Directory
Start menu Directory
Category path for Shortcuts
Remove apps on logoff
Remove apps on exit
9. Choose Allow users to Add/Remove account to give users privileges to add or remove more than one account.
Note

© 1999-2017 Citrix Systems, Inc. All rights reserved. p.69https://docs.citrix.com
By default, registry keys use String format.
You can use registry key settings to customize shortcuts. You can set the registry keys at the following locations. Where they apply, they are
acted on in the order of preference listed.
Caution: Editing the Registry incorrectly can cause serious problems that may require you to reinstall your operating system. Citrix cannot
guarantee that problems resulting from the incorrect use of Registry Editor can be solved. Use Registry Editor at your own risk. Be sure to
back up the registry before you edit it.
Not e:Not e: You should make changes to registry keys before configuring a store. If at any time you or a user wants to customize the registry
keys, you or the user must reset Receiver, configure the registry keys, and then reconfigure the store.
Regist ry keys f or 32-bit machinesRegist ry keys f or 32-bit machines
Regist ry nameRegist ry name Def ault valueDef ault value Locat ions in order of pref erenceLocat ions in order of pref erence
RemoveAppsOnLogoff False HKLM\SOFT WARE\Policies\Citrix\Dazzle
HKLM\SOFT WARE\Citrix\Dazzle
HKCU\Software\Citrix\Dazzle
HKCU\Software\Citrix\Receiver\SR\Store\" + primaryStoreID +
\Properties
RemoveAppsOnExit False HKLM\SOFT WARE\Policies\Citrix\Dazzle
HKLM\SOFT WARE\Citrix\Dazzle
HKCU\Software\Citrix\Dazzle
HKCU\Software\Citrix\Receiver\SR\Store\" + primaryStoreID +
\Properties
PutShortcutsOnDesktop False HKCU\Software\Citrix\Receiver\SR\Store\+StoreID
+\Properties
HKCU\Software\Citrix\Receiver\SR\Store\" + primaryStoreID +
\Properties
HKCU\Software\Citrix\Dazzle
HKLM\SOFT WARE\Policies\Citrix\Dazzle
HKLM \SOFT WARE\Citrix\Dazzle
PutShortcutsInStartMenu True HKCU\Software\Citrix\Receiver\SR\Store\+StoreID+\Properties
HKCU\Software\Citrix\Receiver\SR\Store\" + primaryStoreID +
\Properties
HKCU\Software\Citrix\Dazzle
HKLM\SOFT WARE\Policies\Citrix\Dazzle
HKLM\SOFT WARE\Citrix\Dazzle
SelfServiceMode True HKLM\SOFT WARE\Policies\Citrix\Dazzle

© 1999-2017 Citrix Systems, Inc. All rights reserved. p.70https://docs.citrix.com
HKLM\SOFT WARE\Citrix\Dazzle
UseCategoryAsStartMenuPath True HKCU\Software\Citrix\Receiver\SR\Store\+StoreID
+\Properties
HKCU\Software\Citrix\Receiver\SR\Store\" + primaryStoreID +
\Properties
HKCU\Software\Citrix\Dazzle
HKLM\SOFT WARE\Policies\Citrix\Dazzle
HKLM \SOFT WARE\Citrix\Dazzle
StartMenuDir "" (empty) HKCU\Software\Citrix\Receiver\SR\Store\+StoreID
+\Properties
HKCU\Software\Citrix\Receiver\SR\Store\" + primaryStoreID +
\Properties
HKCU\Software\Citrix\Dazzle
HKLM\SOFT WARE\Policies\Citrix\Dazzle
HKLM \SOFT WARE\Citrix\Dazzle
DesktopDir "" (empty) HKCU\Software\Citrix\Receiver\SR\Store\+StoreID
+\Properties
HKCU\Software\Citrix\Receiver\SR\Store\" + primaryStoreID +
\Properties
HKCU\Software\Citrix\Dazzle
HKLM\SOFT WARE\Policies\Citrix\Dazzle
HKLM\SOFT WARE\Citrix\Dazzle
AutoReinstallModifiedApps True HKCU\Software\Citrix\Receiver\SR\Store\+StoreID
+\Properties
HKCU\Software\Citrix\Receiver\SR\Store\" + primaryStoreID +
\Properties
HKCU\Software\Citrix\Dazzle
HKLM\SOFT WARE\Policies\Citrix\Dazzle
HKLM\SOFT WARE\Citrix\Dazzle
HideEditStoresDialog True in SelfServiceMode, and False
in NonSelfServiceMode
HKLM\SOFT WARE\Policies\Citrix\Dazzle
HKLM\SOFT WARE\Citrix\Dazzle
HKCU\Software\Citrix\Dazzle
HKCU\Software\Citrix\Receiver\SR\Store\" + primaryStoreID +
Regist ry nameRegist ry name Def ault valueDef ault value Locat ions in order of pref erenceLocat ions in order of pref erence

© 1999-2017 Citrix Systems, Inc. All rights reserved. p.71https://docs.citrix.com
\Properties
WSCSupported True HKCU\Software\Citrix\Dazzle
HKCU\Software\Citrix\Receiver\SR\Store\" + primaryStoreID
+\Properties
HKLM\SOFT WARE\Policies\Citrix\Dazzle
HKLM\SOFT WARE\Citrix\Dazzle
WSCReconnectAll True HKCU\Software\Citrix\Dazzle
HKCU\Software\Citrix\Receiver\SR\Store\" + primaryStoreID +
\Properties
HKLM\SOFT WARE\Policies\Citrix\Dazzle
HKLM\SOFT WARE\Citrix\Dazzle
WSCReconnectMode 3 HKCU\Software\Citrix\Dazzle
HKCU\Software\Citrix\Receiver\SR\Store\" + primaryStoreID
+\Properties
HKLM\SOFT WARE\Policies\Citrix\Dazzle
HKLM\SOFT WARE\Citrix\Dazzle
WSCReconnectModeUser Registry is not created during
installation.
HKCU\Software\Citrix\Dazzle
HKCU\Software\Citrix\Receiver\SR\Store\" +
primaryStoreID+\Properties
HKLM\SOFT WARE\Policies\Citrix\Dazzle
HKLM\SOFT WARE \Citrix\Dazzle
Regist ry nameRegist ry name Def ault valueDef ault value Locat ions in order of pref erenceLocat ions in order of pref erence
Regist ry keys f or 64 -bit machinesRegist ry keys f or 64-bit machines
Regist ry nameRegist ry name Def ault valueDef ault value Locat ions in order of pref erenceLocat ions in order of pref erence
RemoveAppsOnLogoff False HKLM\SOFT WARE\Wow6432Node\Policies\Citrix\Dazzle
HKLM\SOFT WARE\Wow6432Node\Citrix\Dazzle
HKCU\Software\Citrix\Dazzle
HKCU\Software\Citrix\Receiver\SR\Store\" + primaryStoreID +
\Properties
RemoveAppsOnExit False HKLM\SOFT WARE\Wow6432Node\Policies\Citrix\Dazzle
HKLM\SOFT WARE\Wow6432Node\Citrix\Dazzle
HKCU\Software\Citrix\Dazzle

© 1999-2017 Citrix Systems, Inc. All rights reserved. p.72https://docs.citrix.com
HKCU\Software\Citrix\Receiver\SR\Store\" + primaryStoreID +
\Properties
PutShortcutsOnDesktop False HKCU\Software\Citrix\Receiver\SR\Store\+StoreID
+\Properties
HKCU\Software\Citrix\Receiver\SR\Store\" + primaryStoreID +
\Properties
HKCU\Software\Citrix\Dazzle
HKLM\SOFT WARE\Wow6432Node\Policies\Citrix\Dazzle
HKLM \SOFT WARE\Wow6432Node\Citrix\Dazzle
PutShortcutsInStartMenu True HKCU\Software\Citrix\Receiver\SR\Store\+StoreID+\Properties
HKCU\Software\Citrix\Receiver\SR\Store\" + primaryStoreID +
\Properties
HKCU\Software\Citrix\Dazzle
HKLM\SOFT WARE\Wow6432Node\Policies\Citrix\Dazzle
HKLM\SOFT WARE\Wow6432Node\Citrix\Dazzle
SelfServiceMode True HKLM\SOFT WARE\Wow6432Node\Policies\Citrix\Dazzle
HKLM\SOFT WARE\Wow6432Node\Citrix\Dazzle
UseCategoryAsStartMenuPath True HKCU\Software\Citrix\Receiver\SR\Store\+StoreID
+\Properties
HKCU\Software\Citrix\Receiver\SR\Store\" + primaryStoreID +
\Properties
HKCU\Software\Citrix\Dazzle
HKLM\SOFT WARE\Wow6432Node\Policies\Citrix\Dazzle
HKLM \SOFT WARE\Wow6432Node\Citrix\Dazzle
StartMenuDir "" (empty) HKCU\Software\Citrix\Receiver\SR\Store\+StoreID
+\Properties
HKCU\Software\Citrix\Receiver\SR\Store\" + primaryStoreID +
\Properties
HKCU\Software\Citrix\Dazzle
HKLM\SOFT WARE\Wow6432Node\Policies\Citrix\Dazzle
HKLM \SOFT WARE\Wow6432Node\Citrix\Dazzle
DesktopDir "" (empty) HKCU\Software\Citrix\Receiver\SR\Store\+StoreID
+\Properties
Regist ry nameRegist ry name Def ault valueDef ault value Locat ions in order of pref erenceLocat ions in order of pref erence

© 1999-2017 Citrix Systems, Inc. All rights reserved. p.73https://docs.citrix.com
HKCU\Software\Citrix\Receiver\SR\Store\" + primaryStoreID +
\Properties
HKCU\Software\Citrix\Dazzle
HKLM\SOFT WARE\Wow6432Node\Policies\Citrix\Dazzle
HKLM\SOFT WARE\Wow6432Node\Citrix\Dazzle
AutoReinstallModifiedApps True HKCU\Software\Citrix\Receiver\SR\Store\+StoreID
+\Properties
HKCU\Software\Citrix\Receiver\SR\Store\" + primaryStoreID +
\Properties
HKCU\Software\Citrix\Dazzle
HKLM\SOFT WARE\Wow6432Node\Policies\Citrix\Dazzle
HKLM\SOFT WARE\Wow6432Node\Citrix\Dazzle
HideEditStoresDialog True in SelfServiceMode, and False
in NonSelfServiceMode
HKLM\SOFT WARE\Wow6432Node\Policies\Citrix\Dazzle
HKLM\SOFT WARE\Wow6432Node\Citrix\Dazzle
HKCU\Software\Citrix\Dazzle
HKCU\Software\Citrix\Receiver\SR\Store\" + primaryStoreID +
\Properties
WSCSupported True HKCU\Software\Citrix\Dazzle
HKCU\Software\Citrix\Receiver\SR\Store\" + primaryStoreID
+\Properties
HKLM\SOFT WARE\Wow6432Node\Policies\Citrix\Dazzle
HKLM\SOFT WARE\Wow6432Node\Citrix\Dazzle
WSCReconnectAll True HKCU\Software\Citrix\Dazzle
HKCU\Software\Citrix\Receiver\SR\Store\" + primaryStoreID +
\Properties
HKLM\SOFT WARE\Wow6432Node\Policies\Citrix\Dazzle
HKLM\SOFT WARE\Wow6432Node\Citrix\Dazzle
WSCReconnectMode 3 HKCU\Software\Citrix\Dazzle
HKCU\Software\Citrix\Receiver\SR\Store\" + primaryStoreID
+\Properties
HKLM\SOFT WARE\Wow6432Node\Policies\Citrix\Dazzle
HKLM\SOFT WARE\Wow6432Node\Citrix\Dazzle
Regist ry nameRegist ry name Def ault valueDef ault value Locat ions in order of pref erenceLocat ions in order of pref erence

© 1999-2017 Citrix Systems, Inc. All rights reserved. p.74https://docs.citrix.com
WSCReconnectModeUser Registry is not created during
installation.
HKCU\Software\Citrix\Dazzle
HKCU\Software\Citrix\Receiver\SR\Store\" +
primaryStoreID+\Properties
HKLM\SOFT WARE\Wow6432Node\Policies\Citrix\Dazzle
HKLM\SOFT WARE\Wow6432Node\Citrix\Dazzle
Regist ry nameRegist ry name Def ault valueDef ault value Locat ions in order of pref erenceLocat ions in order of pref erence
You can set up shortcuts in the Start menu and on the desktop from the StoreFront site. The following settings can be added in the
web.config file in C:\inetpub\wwwroot\Citrix\Roaming in the <annotatedServices> section:
To put shortcuts on the desktop, use PutShortcutsOnDesktop. Settings: "true" or "false" (default is false).
To put shortcuts in the Start menu, use PutShortcutsInStartMenu. Settings: "true" or "false" (default is true).
To use the category path in the Start menu, use UseCategoryAsStartMenuPath. Settings: "true" or "false" (default is true).
Note: Windows 8/8.1 does not allow the creation of nested folders within the Start Menu. Applications will be displayed individually or under
the root folder but not within Category sub folders defined with XenApp.
To set a single directory for all shortcuts in the Start menu, use StartMenuDir. Setting: String value, being the name of the folder into
which shortcuts are written.
To reinstall modified apps, use AutoReinstallModifiedApps. Settings: "true" or "false" (default is true).
To show a single directory for all shortcuts on the desktop, use DesktopDir. Setting: String value, being the name of the folder into which
shortcuts are written.
To not create an entry on the clients 'add/remove programs', use DontCreateAddRemoveEntry. Settings: "true" or "false" (default is false).
To remove shortcuts and Receiver icon for an application that was previously available from the Store but now is not available, use
SilentlyUninstallRemovedResources. Settings: "true" or "false" (default is false).
In the web.config file, the changes should be added in the XML section for the account. Find this section by locating the opening tab:
<account id=... name="Store"
The section ends with the </account> tag.
Before the end of the account section, in the first properties section:
<properties> <clear /> </properties>
Properties can be added into this section after the <clear /> tag, one per line, giving the name and value. For example:
<property name="PutShortcutsOnDesktop" value="True" />
Note: Property elements added before the <clear /> tag may invalidate them. Removing the <clear /> tag when adding a property name and
value is optional.
An extended example for this section is:
<properties> <property name="PutShortcutsOnDesktop" value="True" /> <property name="DesktopDir" value="My Apps Folder" /> </properties>
Important: In multiple server deployments, use only one server at a time to make changes to the configuration of the server group. Ensure
that the Citrix StoreFront management console is not running on any of the other servers in the deployment. Once complete, propagate
your configuration changes to the server group, so that the other servers in the deployment are updated.
Receiver can be configured to automatically place application and desktop shortcuts directly in the Start Menu or on the desktop. This
functionality was similar to previously released versions of Receiver, however, release 4.4 introduced the ability to control app shortcut
placement using XenApp per app settings. This functionality is useful in environments with a handful of applications that need to be displayed
in consistent locations.
If you want to set the location of shortcuts so every user finds them in the same place use XenApp per App Settings:
If you want per-app settings to determine where applications are placed
independently of whether in self service mode or Start Menu mode..
configure Receiver with
Put Short cut sInSt art Menu=f alsePut Short cut sInSt art Menu=f alse and enable per

© 1999-2017 Citrix Systems, Inc. All rights reserved. p.75https://docs.citrix.com
app settings.
Note: This setting applies to the Web interface site
only.
Note: The PutShort cut sInSt art M enu= f alsePutShort cut sInSt art Menu= f alse setting applies to both XenApp 6.5 XenDesktop 7.x.
Configure per app set t ings in XenApp 6.5Configure per app set t ings in XenApp 6.5
To configure a per app publishing shortcut in XenApp 6.5:
1. In the XenApp Application Properties screen, expand Basic properties.
2. Select the Shortcut presentation option.
3. In the Application shortcut placement portion of the Shortcut presentation screen, select the Add to the client's Start menu checkbox.
After selecting the checkbox, enter the name of the folder where you want to place the shortcut. If you do not specify a folder name,
XenApp places the shortcut in the Start Menu without placing it in a folder.
4. Select the Add shortcut to the client's desktop to include the shortcut on a client machine's desktop.
5. Click Apply.
6. Click OK.
To configure a per app publishing shortcut in XenApp 7.6:
1. In Citrix Studio, locate the Application Settings screen.
2. In the Application Settings screen, select Delivery. Using this screen, you can specify how applications are delivered to users.
3. Select the appropriate icon for the application. Click Change to browse to the location of the desired icon.
4. In the Application category field, optionally specify the category in Receiver where the application appears. For example, if you are adding
shortcuts to Microsoft Office applications, enter Microsoft Office.
5. Select the Add shortcut to user's desktop checkbox.
6. Click OK.

© 1999-2017 Citrix Systems, Inc. All rights reserved. p.76https://docs.citrix.com
If users experience delays in app enumeration at each logon, or if there is a need to digitally sign application stubs, Receiver provides
functionality to copy the .EXE stubs from a network share.
This functionality involves a number of steps:
1. Create the application stubs on the client machine.
2. Copy the application stubs to a common location accessible from a network share.
3. If necessary, prepare a white list (or, sign the stubs with an Enterprise certificate.
4. Add a registry key to enable Receiver to create the stubs by copying them from the network share.
If RemoveappsOnLogoff and RemoveAppsonExit are enabled, and users are experiencing delays in app enumeration at every logon, use the
following workaround to reduce the delays:
1. Use regedit to add HKCU\Software\Citrix\Dazzle /v ReuseStubs /t REG_SZ /d "true".
2. Use regedit to add HKLM\Software\Citrix\Dazzle /v ReuseStubs /t REG_SZ /d "true". HKCU has preference over HKLM.
Caution: Editing the Registry incorrectly can cause serious problems that may require you to reinstall your operating system. Citrix cannot
guarantee that problems resulting from the incorrect use of Registry Editor can be solved. Use Registry Editor at your own risk. Be sure to
back up the registry before you edit it.
Enable a machine to use pre-created stub executables that are stored on a network share:
1. On a client machine, create stub executables for all of the apps. To accomplish this, add all the applications to the machine using Receiver;
Receiver generates the executables.
2. Harvest the stub executables from %APPDATA%\Citrix\SelfService. You only need the .exe files.
3. Copy the executables to a network share.
4. For each client machine that will be locked down, set the following registry keys:
1. Reg add HKLM\Software\Citrix\Dazzle /v CommonStubDirectory /t REG_SZ /d "\\ShareOne\ReceiverStubs"
2. Reg add HKLM\Software\Citrix\Dazzle /v
3. CopyStubsFromCommonStubDirectory /t REG_SZ /d "true". It's also possible to configure these settings on HKCU if you prefer. HKCU
has preference over HKLM.
4. Exit and restart Receiver to test the settings.
This topic provides use cases for app shortcuts.
Allowing users t o choose Allowing users t o choose what t hey want in t he St art Menu (Self Service)what t hey want in t he St art Menu (Self Service)
If you have dozens (or even hundreds) of apps, it's best to allow users to select which applications they want to favorite and add to the Start
Menu:
If you want the user to choose the applications they
want in their Start Menu..
configure Receiver in self service mode. In this mode you also configure
auto-provisioned
and
mandatory
app keyword settings as needed.
If you want the user to choose the applications they configure Receiver without any options and then use per app settings for

© 1999-2017 Citrix Systems, Inc. All rights reserved. p.77https://docs.citrix.com
want in their Start Menu but also want specific app
shortcuts on the desktop..
the few apps that you want on the desktop. Use
auto provisioned
and
mandatory
apps as needed.
No app short cut s in t he No app short cut s in t he St art MenuSt art Menu
If a user has a family computer, you might not need or want app shortcuts at all. In such scenarios, the simplest approach is browser access;
install Receiver without any configuration and browse to Receiver for Web and Web interface. You can also configure Receiver for self service
access without putting shortcuts anywhere.
If you want to prevent Receiver from putting
application shortcuts in the Start Menu
automatically..
configure Receiver with PutShortcutsInStartMenu=False. Receiver will not put apps in
the Start Menu even in self service mode unless you put them there using per app
settings.
All app short cuts in t he All app short cuts in t he St art Menu or on t he Deskt opSt art Menu or on t he Deskt op
If the user has only a few apps, you can put them all in the Start Menu or all on the desktop, or in a folder on the desktop.
If you want Receiver to put all application shortcuts in the
start menu automatically..
configure Receiver with SelfServiceMode =False. All available apps will
appear in the Start Menu.
If you want all application shortcuts to put on desktop.. configure Receiver with PutShortcutsOnDesktop = true. All available
apps will appear in the desktop.
If you want all shortcuts to be put on the desktop in a
folder...
configure Receiver with DesktopDir=Name of the desktop folder where
you want applications.
Per app set t ings in XenApp Per app set t ings in XenApp 6.5 or 7 .x6.5 or 7 .x
If you want to set the location of shortcuts so every user finds them in the same place use XenApp per App Settings:
If you want per-app settings to determine where applications are placed
independently of whether in self service mode or Start Menu mode..
configure Receiver with
Put Short cut sInSt art Menu=f alsePut Short cut sInSt art Menu=f alse and enable per
app settings.
Note: This setting applies to the Web interface site
only.
Apps in cat egory f olders or Apps in cat egory f olders or in specific f oldersin specific f olders
If you want applications displayed in specific folders use the following options:
If you want the application shortcuts Receiver
places in the start menu to be shown in their
associated category (folder)..
configure Receiver with UseCategoryAsStartMenuPath=T rue.
Note: Windows 8/8.1 does not allow the creation of nested folders within the Start
Menu. Applications will be displayed individually or under the root folder but not within
Category sub folders defined with XenApp.
If you want the applications that Receiver puts
in the Start menu to be in a specific folder..
configure Receiver with StartMenuDir=the name of the Start Menu folder name.
Remove apps on logof f or Remove apps on logof f or exitexit
If you don't want users to see apps if another user is going to share the end point, you can ensure that apps are removed when the user logs
off and exits:

© 1999-2017 Citrix Systems, Inc. All rights reserved. p.78https://docs.citrix.com
If you want Receiver to remove all apps on logoff.. configure Receiver with RemoveAppsOnLogoff=True.
If you want Receiver to remove apps on exit.. configure Receiver with RemoveAppsOnExit=True.
When configuring local app access applications:
To specify that a locally installed application should be used instead of an application available in Receiver, append the string
KEYWORDS:prefer="pattern". This feature is referred to as Local App Access.
Before installing an application on a user's computer, Receiver searches for the specified patterns to determine if the application is
installed locally. If it is, Receiver subscribes the application and does not create a shortcut. When the user starts the application from the
Receiver window, Receiver starts the locally installed (preferred) application.
If a user uninstalls a preferred application outside of Receiver, the application is unsubscribed during the next Receiver refresh. If a user
uninstalls a preferred application from the Receiver window, Receiver unsubscribes the application but does not uninstall it.
Note: The keyword prefer is applied when Receiver subscribes an application. Adding the keyword after the application is subscribed has no
effect.
You can specify the prefer keyword multiple times for an application. Only one match is needed to apply the keyword to an application.
The following patterns can be used in any combination:
prefer="ApplicationName"
The application name pattern matches any application with the specified application name in the shortcut file name. The
application name can be a word or a phrase. Quotation marks are required for phrases. Matching is not allowed on partial words or
file paths and is case-insensitive. The application name matching pattern is useful for overrides performed manually by an
administrator.
KEYWORDS:pref er=KEYWORDS:pref er= Short cut under ProgramsShort cut under Programs Mat ches?Mat ches?
Word \Microsoft Office\Microsoft WordWord 2010 Yes
"Microsoft Word" \Microsoft Office\Microsof t WordMicrosof t Word 2010 Yes
Console \McAfee\VirusScan ConsoleConsole Yes
Virus \McAfee\VirusScan Console No
McAfee \McAfee\VirusScan Console No

© 1999-2017 Citrix Systems, Inc. All rights reserved. p.79https://docs.citrix.com
KEYWORDS:pref er=KEYWORDS:pref er= Short cut under ProgramsShort cut under Programs Mat ches?Mat ches?
prefer="\\Folder1\Folder2\...\ApplicationName"
The absolute path pattern matches the entire shortcut file path plus the entire application name under the Start menu. The
Programs folder is a subfolder of the Start menu directory, so you must include it in the absolute path to target an application in
that folder. Quotation marks are required if the path contains spaces. The matching is case-sensitive. The absolute path matching
pattern is useful for overrides implemented programmatically in XenDesktop.
KEYWORDS:pref er=KEYWORDS:pref er= Short cut under ProgramsShort cut under Programs Mat ches?Mat ches?
"\\Programs\Microsoft Office\Microsoft Word
2010"
\Programs\Microsof t Of f ice\Microsof t Word\Programs\Microsof t Of f ice\Microsof t Word
20102010
Yes
"\\Microsoft Office\" \Programs\Microsoft Office\Microsoft Word 2010 No
"\\Microsoft Word 2010" \Programs\Microsoft Office\Microsoft Word 2010 No
"\\Programs\Microsoft Word 2010" \Programs\Microsof t Word 2010\Programs\Microsof t Word 2010 Yes
prefer=”\Folder1\Folder2\...\ApplicationName”
The relative path pattern matches the relative shortcut file path under the Start menu. The relative path provided must contain
the application name and can optionally include the folders where the shortcut resides. Matching is successful if the shortcut file
path ends with the relative path provided. Quotation marks are required if the path contains spaces. The matching is case-
sensitive. The relative path matching pattern is useful for overrides implemented programmatically.
KEYWORDS:pref er=KEYWORDS:pref er= Short cut under ProgramsShort cut under Programs Mat ches?Mat ches?
"\Microsoft Office\Microsoft Word 2010" \Microsof t Of f ice\Microsof t Word 2010\Microsof t Of f ice\Microsof t Word 2010 Yes
"\Microsoft Office\" \Microsoft Office\Microsoft Word 2010 No
"\Microsoft Word 2010" \Microsoft Office\Microsof t Word 2010\Microsof t Word 2010 Yes
"\Microsoft Word" \Microsoft Word 2010 No
For information about other keywords, refer to "Additional recommendations" in Optimize the user experience in the StoreFront
documentation.

© 1999-2017 Citrix Systems, Inc. All rights reserved. p.80https://docs.citrix.com
Configure your XenDesktop environment
Jun 13, 20 16
The topics in this article describe how to configure USB support, prevent the Desktop Viewer window from dimming, and
configure settings for multiple users and devices.
USB support enables users to interact with a wide range of USB devices when connected to a virtual desktop. Users can
plug USB devices into their computers and the devices are remoted to their virtual desktop. USB devices available for
remoting include flash drives, smartphones, PDAs, printers, scanners, MP3 players, security devices, and tablets. Desktop
Viewer users can control whether USB devices are available on the virtual desktop using a preference in the toolbar.
Isochronous features in USB devices, such as webcams, microphones, speakers, and headsets are supported in typical low
latency/high speed LAN environments. This allows these devices to interact with packages, such as Microsoft Office
Communicator and Skype.
The following types of device are supported directly in a XenDesktop and XenApp session, and so do not use USB support:
Keyboards
Mice
Smart cards
Note: Specialist USB devices (for example, Bloomberg keyboards and 3-D mice) can be configured to use USB support. For
information on configuring Bloomberg keyboards, see Configure Bloomberg keyboards. For information on configuring
policy rules for other specialist USB devices, see CT X 119722.
By default, certain types of USB devices are not supported for remoting through XenDesktop and XenApp. For example, a
user may have a network interface card attached to the system board by internal USB. Remoting this device would not be
appropriate. The following types of USB device are not supported by default for use in a XenDesktop session:
Bluetooth dongles
Integrated network interface cards
USB hubs
USB graphics adaptors
USB devices connected to a hub can be remoted, but the hub itself cannot be remoted.
The following types of USB device are not supported by default for use in a XenApp session:
Bluetooth dongles
Integrated network interface cards
USB hubs
USB graphics adaptors
Audio devices
Mass storage devices
For instructions on modifying the range of USB devices that are available to users, see Update the list of USB devices
available for remoting.
For instructions on automatically redirecting specific USB devices, see CTX123015.

© 1999-2017 Citrix Systems, Inc. All rights reserved. p.81https://docs.citrix.com
How USB support works
When a user plugs in a USB device, it is checked against the USB policy, and, if allowed, remoted to the virtual desktop. If
the device is denied by the default policy, it is available only to the local desktop.
When a user plugs in a USB device, a notification appears to inform the user about a new device. The user can decide which
USB devices are remoted to the virtual desktop by selecting devices from the list each time they connect. Alternatively, the
user can configure USB support so that all USB devices plugged in both before and/or during a session are automatically
remoted to the virtual desktop that is in focus.
For mass storage devices only, in addition to USB support, remote access is available through client drive mapping, which you
configure through the Citrix Receiver policy Remoting client devices > Client drive mapping. When this policy is applied, the
drives on the user device are automatically mapped to drive letters on the virtual desktop when users log on. The drives are
displayed as shared folders with mapped drive letters.
The main differences between the two types of remoting policy are:
Feat ureFeat ure Client driveClient drive
mappingmapping
USB supportUSB support
Enabled by default Yes No
Read-only access configurable Yes No
Safe to remove device during a
session
No Yes, if the user clicks Safely Remove Hardware in the
notification area
If both Generic USB and the Client drive mapping policies are enabled and a mass storage device is inserted before a session
starts, it will be redirected using client drive mapping first, before being considered for redirection through USB support. If it
is inserted after a session has started, it will be considered for redirection using USB support before client drive mapping.
Different classes of USB device are allowed by the default USB policy rules.
Although they are on this list, some classes are only available for remoting in XenDesktop and XenApp sessions after
additional configuration. These are noted below.
Audio (Class 01). Includes audio input devices (microphones), audio output devices, and MIDI controllers. Modern audio
devices generally use isochronous transfers, which is supported by XenDesktop 4 or later. Audio (Class01) is not applicable
to XenApp because these devices are not available for remoting in XenApp using USB support.
Note: Some specialty devices (for example, VOIP phones) require additional configuration. For instructions on this, see
CTX123015.
Physical Interface Devices(Class 05). These devices are similar to Human Interface Devices (HIDs), but generally provide
"real-time" input or feedback and include force feedback joysticks, motion platforms, and force feedback exoskeletons.
Still Imaging (Class 06). Includes digital cameras and scanners. Digital cameras often support the still imaging class which
uses the Picture Transfer Protocol (PT P) or Media T ransfer Protocol (MTP) to transfer images to a computer or other

© 1999-2017 Citrix Systems, Inc. All rights reserved. p.82https://docs.citrix.com
peripheral. Cameras may also appear as mass storage devices and it may be possible to configure a camera to use either
class, through setup menus provided by the camera itself.
Note that if a camera appears as a mass storage device, client drive mapping is used and USB support is not required.
Printers (Class 07). In general most printers are included in this class, although some use vendor-specific protocols (class
ff). Multi-function printers may have an internal hub or be composite devices. In both cases the printing element
generally uses the Printers class and the scanning or fax element uses another class; for example, Still Imaging.
Printers normally work appropriately without USB support.
Note: This class of device (in particular printers with scanning functions) requires additional configuration. For instructions
on this, see CTX123015.
Mass Storage (Class 08). The most common mass storage devices are USB flash drives; others include USB-attached hard
drives, CD/DVD drives, and SD/MMC card readers. There are a wide variety of devices with internal storage that also
present a mass storage interface; these include media players, digital cameras, and mobile phones. Mass Storage (Class
08) is not applicable to XenApp because these devices are not available for remoting in XenApp using USB support.
Known subclasses include:
01 Limited flash devices
02 T ypically CD/DVD devices (ATAPI/MMC-2)
03 T ypically tape devices (QIC-157)
04 Typically floppy disk drives (UFI)
05 T ypically floppy disk drives (SFF-8070i)
06 Most mass storage devices use this variant of SCSI
Mass storage devices can often be accessed through client drive mapping, and so USB support is not required.
Important: Some viruses are known to propagate actively using all types of mass storage. Carefully consider whether or
not there is a business need to permit the use of mass storage devices, either through client drive mapping or USB
support.
Content Security (Class 0d). Content security devices enforce content protection, typically for licensing or digital rights
management. This class includes dongles.
Video (Class 0e). The video class covers devices that are used to manipulate video or video-related material, such as
webcams, digital camcorders, analog video converters, some television tuners, and some digital cameras that support
video streaming.
Note: Most video streaming devices use isochronous transfers, which is supported by XenDesktop 4 or later. Some video
devices (for example webcams with motion detection) require additional configuration. For instructions on this, see
CTX123015.
Personal Healthcare (Class 0f). These devices include personal healthcare devices such as blood pressure sensors, heart
rate monitors, pedometers, pill monitors, and spirometers.
Application and Vendor Specific (Classes fe and ff). Many devices use vendor specific protocols or protocols not
standardized by the USB consortium, and these usually appear as vendor-specific (class ff).
The following different classes of USB device are denied by the default USB policy rules.
Communications and CDC Control (Classes 02 and 0a). The default USB policy does not allow these devices, because one
of the devices may be providing the connection to the virtual desktop itself.
Human Interface Devices (Class 03). Includes a wide variety of both input and output devices. Typical Human Interface
Devices (HIDs) are keyboards, mice, pointing devices, graphic tablets, sensors, game controllers, buttons, and control

© 1999-2017 Citrix Systems, Inc. All rights reserved. p.83https://docs.citrix.com
functions.
Subclass 01 is known as the "boot interface" class and is used for keyboards and mice.
The default USB policy does not allow USB keyboards (class 03, subclass 01, protocol 1), or USB mice (class 03, subclass 01,
protocol 2). This is because most keyboards and mice are handled appropriately without USB support and it is normally
necessary to use these devices locally as well remotely when connecting to a virtual desktop.
USB Hubs (Class 09). USB hubs allow extra devices to be connected to the local computer. It is not necessary to access
these devices remotely.
Smart Card (Class 0b). Smart card readers include contactless and contact smart card readers, and also USB tokens with
an embedded smart card-equivalent chip.
Smart card readers are accessed using smart card remoting and do not require USB support.
Wireless Controller (Class e0). Some of these devices may be providing critical network access, or connecting critical
peripherals, such as Bluetooth keyboards or mice.
The default USB policy does not allow these devices. However, there may be particular devices to which it is appropriate
to provide access using USB support.
Miscellaneous net work devices (Class ef , subclass 04 )Miscellaneous net work devices (Class ef , subclass 04 ). Some of these devices may be providing critical network
access. The default USB policy does not allow these devices. However, there may be particular devices to which it is
appropriate to provide access using USB support.
You can update the range of USB devices available for remoting to desktops by editing the file icaclient_usb.adm. This
allows you to make changes to the Receiver using Group Policy. The file is located in the following installed folder:
<root drive>:\Program Files\Citrix\ICA Client\Configuration\en
Alternatively, you can edit the registry on each user device, adding the following registry key:
HKLM\SOFTWARE\Policies\Citrix\ICA Client\GenericUSB Type=String Name="DeviceRules" Value=
Caution: Editing the Registry incorrectly can cause serious problems that may require you to reinstall your operating system.
Citrix cannot guarantee that problems resulting from the incorrect use of Registry Editor can be solved. Use Registry Editor
at your own risk. Be sure to back up the registry before you edit it.
The product default rules are stored in:
HKLM\SOFTWARE\Citrix\ICA Client\GenericUSB Type=MultiSz Name=“DeviceRules” Value=
Do not edit the product default rules.
For details of the rules and their syntax, see http://support.citrix.com/article/ctx119722/.
Bloomberg keyboards are supported by XenDesktop and XenApp sessions (but not other USB keyboards). The required
components are installed automatically when the plug-in is installed, but you must enable this feature either during the
installation or later by changing a registry key.
On any one user device, multiple sessions to Bloomberg keyboards are not recommended. T he keyboard only operates
correctly in single-session environments.

© 1999-2017 Citrix Systems, Inc. All rights reserved. p.84https://docs.citrix.com
To t urn Bloomberg keyboard support on or of fTo t urn Bloomberg keyboard support on or of f
Caution: Editing the registry incorrectly can cause serious problems that may require you to reinstall your operating system.
Citrix cannot guarantee that problems resulting from the incorrect use of Registry Editor can be solved. Use Registry Editor
at your own risk. Be sure to back up the registry before you edit it.
1. Locate the following key in the registry:
HKEY_LOCAL_MACHINE\SOFTWARE\Citrix\ICA Client\GenericUSB
2. Do one of the following:
To turn on this feature, for the entry with Type DWORD and Name EnableBloombergHID, set Value to 1.
To turn off this feature, set the Value to 0.
If users have multiple Desktop Viewer windows, by default the desktops that are not active are dimmed. If users need to
view multiple desktops simultaneously, this can make the information on them unreadable. You can disable the default
behavior and prevent the Desktop Viewer window from dimming by editing the Registry.
Caution: Editing the registry incorrectly can cause serious problems that may require you to reinstall your operating system.
Citrix cannot guarantee that problems resulting from the incorrect use of Registry Editor can be solved. Use Registry Editor
at your own risk. Be sure to back up the registry before you edit it.
1. On the user device, create a REG_DWORD entry called DisableDimming in one of the following keys, depending on
whether you want to prevent dimming for the current user of the device or the device itself. An entry already exists if
the Desktop Viewer has been used on the device:
HKCU\Software\Citrix\XenDesktop\DesktopViewer
HKLM\Software\Citrix\XenDesktop\DesktopViewer
Optionally, instead of controlling dimming with the above user or device settings, you can define a local policy by creating
the same REG_WORD entry in one of the following keys:
HKCU\Software\Policies\Citrix\XenDesktop\DesktopViewer
HKLM\Software\Policies\Citrix\XenDesktop\DesktopViewer
The use of these keys is optional because XenDesktop administrators, rather than plug-in administrators or users,
typically control policy settings using Group Policy. So, before using these keys, check whether your XenDesktop
administrator has set a policy for this feature.
2. Set the entry to any non-zero value such as 1 or true.
If no entries are specified or the entry is set to 0, the Desktop Viewer window is dimmed. If multiple entries are specified,
the following precedence is used. The first entry that is located in this list, and its value, determine whether the window
is dimmed:
1. HKCU\Software\Policies\Citrix\...
2. HKLM\Software\Policies\Citrix\...
3. HKCU\Software\Citrix\...
4. HKLM\Software\Citrix\...
In addition to the configuration options offered by the Receiver user interface, you can use the Group Policy Editor and the
icaclient.adm template file to configure settings. Using the Group Policy Editor, you can:

© 1999-2017 Citrix Systems, Inc. All rights reserved. p.85https://docs.citrix.com
Extend the icaclient template to cover any Receiver setting by editing the icaclient.adm file. See the Microsoft Group
Policy documentation for more information about editing .adm files and about applying settings to a particular
computer.
Make changes that apply only to either specific users or all users of a client device.
Configure settings for multiple user devices
Citrix recommends using Group Policy to configure user devices remotely; however you can use any method, including the
Registry Editor, which updates the relevant registry entries.
1. As an administrator, open the Group Policy Editor by either running gpedit.msc locally from the Start menu when applying
policies to a single computer or by using the Group Policy Management Console when applying domain policies.
Note: If you already imported the icaclient template into the Group Policy Editor, you can omit Steps 2 to 5.
2. In the left pane of the Group Policy Editor, select the Administrative Templates folder.
3. From the Action menu, choose Add/Remove Templates.
4. Choose Add and browse to the Configuration folder for Receiver (usually C:\Program Files\Citrix\ICA
Client\Configuration) and select icaclient.adm.
5. Select Open to add the template and then Close to return to the Group Policy Editor.
6. Under the User Configuration node or the Computer Configuration node, edit the relevant settings as required.

© 1999-2017 Citrix Systems, Inc. All rights reserved. p.86https://docs.citrix.com
Configure StoreFront
Jul 12, 20 16
Citrix StoreFront authenticates users to XenDesktop, XenApp, and VDI-in-a-Box, enumerating and aggregating available
desktops and applications into stores that users access through Receiver.
In addition to the configuration summarized in this section, you must also configure NetScaler Gateway or Access Gateway
to enable users to connect from outside the internal network (for example, users who connect from the Internet or from
remote locations).
Note
Citrix Receiver for Windows always shows the older StoreFront user interface (Green bubble theme) instead of the updated
StoreFront user interface after you select the option to show All Accounts.
1. Install and configure StoreFront as described in the StoreFront documentation. Receiver for Windows requires an
HTTPS connection. If the StoreFront server is configured for HTTP, a registry key must be set on the user device as
described in Configure and install Receiver for Windows using command-line parameters under the ALLOWADDSTORE
property description.
Note: For administrators who need more control, Citrix provides a template you can use to create a download site for
Receiver.
Workspace control lets applications follow users as they move between devices. This enables, for example, clinicians in hospitals to move from workstation to
workstation without having to restart their applications on each device. For Receiver for Windows, you manage workspace control on client devices by modifying the
registry. This can also be done for domain-joined client devices using Group Policy.
Caution: Editing the registry incorrectly can cause serious problems that may require you to reinstall your operating system. Citrix cannot guarantee that problems
resulting from the incorrect use of Registry Editor can be solved. Use the Registry Editor at your own risk. Be sure to back up the registry before you edit it.
Create WSCReconnectModeUser and modify the existing registry key WSCReconnectMode in the Master Desktop Image or in XenApp server hosting. The
published desktop can change the behavior of the Receiver.
WSCReconnectMode key settings for Windows Receiver:
0 = do not reconnect to any existing sessions
1 = reconnect on application launch
2 = reconnect on application refresh
3 = reconnect on application launch or refresh
4 = reconnect when Receiver interface opens
8 = reconnect on Windows log on
11 = combination of both 3 and 8
Disable workspace control for Windows Receiver
To disable workspace control for Windows Receiver, create the following key:
HKEY_CURRENT_USER\SOFTWARE\Wow6432Node\Citrix\Dazzle (64-bit)
HKEY_CURRENT_USER\SOFTWARE\Citrix\Dazzle for (32-bit)

© 1999-2017 Citrix Systems, Inc. All rights reserved. p.87https://docs.citrix.com
Name: WSCReconnectModeUser
Type: REG_SZ
Value data: 0
Modify the following key from the default value of 3 to zero
HKEY_CURRENT_USER\SOFTWARE\Wow6432Node\Citrix\Dazzle (64-bit)
HKEY_CURRENT_USER\SOFTWARE\Citrix\Dazzle (32-bit)
Name: WSCReconnectMode
Type: REG_SZ
Value data: 0
Note: Alternatively, you can set the REG_SZ value WSCReconnectAll to false if you do not want to create a new key.
Changing the status indicator timeout
You can change the amount of time the status indicator displays when a user is launching a session. To alter the time out
period, create a REG_DWORD value SI INACTIVE MS in HKLM\SOFT WARE\Citrix\ICA CLIENT\Engine\. The REG_DWORD
value can be set to 4 if you want the status indicator to disappear sooner.
Warning
Editing the registry incorrectly can cause serious problems that may require you to reinstall your operating system. Citrix cannot
guarantee that problems resulting from the incorrect use of Registry Editor can be solved. Use Registry Editor at your own risk. Be
sure to back up the registry before you edit it.

© 1999-2017 Citrix Systems, Inc. All rights reserved. p.88https://docs.citrix.com
Configure Receiver with the Group Policy Object
template
Dec 22, 20 16
Citrix recommends using the Group Policy Object and provides template file receiver.adm or receiver.admx\receiver.adml
(depending on OS) to configure settings related to Citrix Receiver for Windows.
Note
receiver.admx/receiver.adml is available on Windows Vista / Windows Server 2008 or later. ADM files are available only on
Windows XP Embedded platforms.
Note
If Citrix Receiver for Windows is configured via VDA installation, admx/adml files is found in the Citrix Receiver for Windows
installation directory. For example: <installation directory>\online plugin\Configuration.
See the table below for information on Citrix Receiver for Windows templates files and their respective location.
File Type File Location
receiver.adm <Installation Directory>\ICA Client\Configuration
receiver.admx <Installation Directory>\ICA Client\Configuration
receiver.adml <Installation Directory>\ICA Client\Configuration\[MUIculture]
Note
Citrix recommends you to use the template files provided with the latest Citrix Receiver for Windows. While importing the latest files,
the previous settings are retained.
To add adm template files to the local GPO
Note: You can use adm template files to configure Local GPO and/or Domain-Based GPO.
1. As an administrator, open the Group Policy Editor by either running gpedit.msc locally from the Start menu when applying

© 1999-2017 Citrix Systems, Inc. All rights reserved. p.89https://docs.citrix.com
policies to a single computer, or by using the Group Policy Management Console when applying domain policies.
Note: If you already imported the Citrix Receiver for Windows template into the Group Policy Editor, you can leave out
steps 2 to 5.
2.In the left pane of the Group Policy Editor, select the Administrative Templates folder.
3.From the Action menu, choose Add/Remove Templates.
4.Select Add and browse to the template file location <Installation Directory>\ICA Client\Configuration\receiver.adm
5.Select Open to add the template and then Close to return to the Group Policy Editor.
Citrix Receiver for window template file will be available on local GPO in path Administrative Templates > Classic
Administrative Templates (ADM) > Citrix Components > Citrix Receiver.
After the adm template files are added to the local GPO, the following message is displayed:
“The following entry in the [strings] section is too long and has been truncated:
Click OK to ignore the message.
To add admx/adml template files to the local GPO
NOTE: You can use admx/adml template files to configure Local GPO and/or Domain-Based GPO. Refer Microsoft MSDN
article on managing ADMX files here
1. After installing Citrix Receiver for Windows, copy the template files.
admx:
From : <Installation Directory>\ICA Client\Configuration\receiver.admx
To : %systemroot%\policyDefinitions
adml:
From: <Installation Directory>\ICA Client\Configuration\[MUIculture]receiver.adml
To: %systemroot%\policyDefinitions\[MUIculture]
Citrix Receiver for Window template file is available on local GPO in Administrative Templates > Citrix Components > Citrix
Receiver directory.
Citrix recommends using the Group Policy Object icaclient.adm template file to configure rules for network routing, proxy
servers, trusted server configuration, user routing, remote user devices, and the user experience.
You can use the icaclient.adm template file with domain policies and local computer policies. For domain policies, import the
template file using the Group Policy Management Console. This is especially useful for applying Citrix Receiver settings to a
number of different user devices throughout the enterprise. To affect a single user device, import the template file using
the local Group Policy Editor on the device.
Note
Citrix recommends that you use the GPO template files provided with latest Citrix Receiver. While importing the latest files, previous
settings are retained.

© 1999-2017 Citrix Systems, Inc. All rights reserved. p.90https://docs.citrix.com
Use this policy to configure the TLS options that ensure Citrix Receiver securely identifies the server that it is connecting to
and to encrypt all communication with the server. Citrix recommends that connections over untrusted networks use TLS.
Citrix supports T LS 1.0, TLS 1.1 and TLS 1.2 protocols between Receiver and XenApp or XenDesktop.
When this policy is enabled, you can force Receiver to use TLS for all connections to published applications and desktops by
checking the "Require SSL for all connections" checkbox.
Citrix Receiver identifies the server by the name on the security certificate that the server presents. This has the form of a
DNS name (for example, www.citrix.com). You can restrict Receiver to connect only to particular servers specified by a
comma separated list in the "Allowed SSL servers" setting. Wildcards and port numbers can be specified here; for example,
*.citrix.com:4433 allows connection to any server whose common name ends with .citrix.com on port 4433. The accuracy
of the information in a security certificate is asserted by the certificate's issuer. If Receiver does not recognize and trust a
certificate's issuer, the connection is rejected.
When connecting by TLS the server may be configured to require Receiver to provide a security certificate identifying itself.
Use the "Client Authentication" setting to configure whether or not identification is provided automatically or if the user is
notified. Options include:
never supply identification
only use the certificate configured here
to always prompt the user to select a certificate
to prompt the user only if there a choice of certificate to supply
Tip
Use the "Client Certificate" setting to specify the identifying certificate's thumbprint to avoid prompting the user unnecessarily.
When verifying the server's security certificate, you can configure the plug-in to contact the certificate's issuer to obtain a
Certificate Revocation List (CRL) to ensure that the server certificate has not been revoked. T his enables a certificate to be
invalidated by its issuer should a system be compromised. Use the “CRL verification setting” to configure the plug-in to:
not check CRLs at all
only check CRLs that have been previously obtained from the issuer
actively retrieve an up-to-date CRL
to refuse to connect unless it can obtain an up-to-date CRL
Organizations that configure TLS for a range of products can choose to identify servers intended for Citrix plug-ins by
specifying a Certificate Policy OID as part of the security certificate. If a Policy OID is configured here, Receiver accepts
only certificates that declare a compatible Policy.
Some security policies have requirements related to the cryptographic algorithms used for a connection. You can restrict
the plug-in to use only TLS v1.0, TLS 1.1 and TLS 1.2 with the "TLS version" setting. Similarly, you can restrict the plug-in to
use only certain cryptographic ciphersuites. These cipersuites include:
Government Ciphersuites:
TLS_RSA_WITH_AES_256_CBC_SHA
TLS_RSA_WITH_3DES_EDE_CBC_SHA

© 1999-2017 Citrix Systems, Inc. All rights reserved. p.91https://docs.citrix.com
TLS_RSA_WITH_AES_256_GCM_SHA384
Commercial Ciphersuites:
TLS_RSA_WITH_AES_128_CBC_SHA
TLS_RSA_WITH_RC4_128_SHA
TLS_RSA_WITH_RC4_128_MD5
TLS_RSA_WITH_AES_128_GCM_SHA256
Citrix Receiver for Windows 4.4 introduces T LS and compliance mode configuration options to confgure FIPS (Federal
Information Processing Standards). Use this feature to ensure that only FIPS (Publication 140-2) approved cryptography is
used for all ICA connections.
A new security compliance mode provides support for NIST SP 800-52. By default, this mode is disabled (set to NONE).
Note
For additional information about compliance required for NIST SP 800-52, see the NIST page describing guidelines for TLS
implementations.
This version of Citirx Receiver also allows you to define the TLS version, which determines the TLS protocol for ICA
connections. The highest and mutually available version between the client and server will be selected.
When using these features, in the TLS and Compliance Mode Configuration screen:
Use the Enable FIPS checkbox to use the approved cryptography for all ICA sessions.
Set the Security Compliance Mode to SP 800-52.
Select the TLS version.
The image below illustrates FIPS options.

© 1999-2017 Citrix Systems, Inc. All rights reserved. p.92https://docs.citrix.com
Note
By default, FIPS is disabled (unchecked).
Configuring FIPS
To configure FIPS cryptography between all ICA clients :
1. Select Computer Configuration > Administrative Templates > Citrix Components > Network Routing > T LS andT LS and
Compliance Mode Conf igurat ionCompliance Mode Conf igurat ion.
2. In the TLS and Compliance Mode Configuration screen, select Enable FIPSEnable FIPS .
3. In the Security Compliance Mode section, use the drop down menu to select SP 800-52SP 800-52. When configuring this option:
SP 800-52 compliance mode requires FIPS compliance; when SP 800-52 is enabled, FIPS mode is also enabled
regardless of the FIPS setting.
The Certificate Revocation Check Policy is either
Full access check and CRL required
, or
Full access check and CRL
required all
.
4. Select the appropriate TLS protocol version for ICA connections; the highest and mutually available T LS version between
the client and server will be selected, options include:
TLS 1.0 | TLS 1.1 | TLS 1.2 (the default)
TLS 1.1 | TLS 1.2
TLS 1.2
With the release of StoreFront 3.0 and Citrix Receiver 4.3, Citrix XenApp and XenDesktop support Microsoft’s new format
for displaying registry-based policy settings using a standards-based XML file format, known as ADMX files.

© 1999-2017 Citrix Systems, Inc. All rights reserved. p.93https://docs.citrix.com
On Windows Vista/ Windows Server 2008 and later, these new files replace ADM files, which used their own markup
language. ADM files are still available for Windows XP Embedded platforms. The administrative tools you use— the Group
Policy Object Editor and the Group Policy Management Console— remain largely unchanged. In the majority of situations,
you will not notice the presence of ADMX files during your day-to-day Group Policy administration tasks.
One of the main benefits of using the new ADMX files is the central store. This option is available to you when you are
administering domain-based GPOs, although the central store is not used by default. Unlike the case with ADM files earlier,
the Group Policy Object Editor will not copy ADMX files to each edited GPO, but will provide the ability to read from either a
single domain-level location on the domain controller sysvol (not user configurable) or from the local administrative
workstation when the central store is unavailable. You can share a custom ADMX file by copying the file to the central
store, which makes it available automatically to all Group Policy administrators in a domain. This capability simplifies policy
administration and improves storage optimization for GPO files.
ADMX files are divided into language-neutral (ADMX) and language-specific (ADML) resources, available to all Group Policy
administrators. These factors allow Group Policy tools to adjust their UI according to the administrator's configured
language.
Note
More details can be found at this Microsoft MSDN article on managing ADMX files.
ADMX and ADML file names and locations
The naming convention of the ADM files (provided in previous version of Receiver) has been improved. The table below
provides the mapping of ADM files to their new ADMX file names:
Citrix Receiver Version (prior to 4.3) Citrix Receiver version (4.3 and later)
Icaclient.adm receiver.admx \ receiver.adm
Icaclient_usb.adm receiver_usb.admx \ receiver_usb.adm
ica-file-signing.adm ica-file-signing.admx \ ica-file-signing.admx
HdxFlash-Client.adm HdxFlash-Client.admx \ HdxFlash-Client.admx
Note
Use .admx files on Windows Vista/Windows Server 2008 and later; use .adm files for other platforms.
You can copy custom ADMX and ADML files distributed with Citrix Receiver installer to the central store, which makes it

© 1999-2017 Citrix Systems, Inc. All rights reserved. p.94https://docs.citrix.com
available automatically to all Group Policy administrators in a domain. The table below provides the location where you
need to copy the ADMX and ADML files:
File type File location
receiver.admx <Installation Directory>\ICA Client\Configuration
ica-file-signing.admx <Installation Directory>\ICA Client\Configuration
receiver_usb.admx <Installation Directory>\ICA Client\Configuration\en
HdxFlash-Client.admx <Installation Directory>\ICA Client\Configuration
receiver.adml <Installation Directory>\ICA Client\Configuration
ica-file-signing.adml <Installation Directory>\ICA Client\Configuration
receiver_usb.adml <Installation Directory>\ICA Client\Configuration\en
HdxFlash-Client.adml <Installation Directory>\ICA Client\Configuration\[MUIculture]
Note
If Citrix Receiver is configured through VDA installation, ADMX/ADML files can be found in the installation directory. For example:
<installation directory>\online plugin\Configuration.
When configuring session reliability group policy, set the transparency level. Using this option, you can control the
transparency level applied to a published app (or desktop) during the session reliability reconnection period.
To configure the transparency level, select Comput er Configurat ion - > Administ rat e Templat es-> Cit rixComput er Configurat ion - > Administ rat e Templat es-> Cit rix
Component s - > Net work Rout ing -> Session reliabilit y and aut omat ic reconnect ion - > Transparency LevelComponent s - > Net work Rout ing -> Session reliabilit y and aut omat ic reconnect ion - > Transparency Level.
Note
By default, Transparency Level is set to 80.

© 1999-2017 Citrix Systems, Inc. All rights reserved. p.95https://docs.citrix.com

© 1999-2017 Citrix Systems, Inc. All rights reserved. p.96https://docs.citrix.com
Provide users with account information
Jan 15, 20 16
Provide users with the account information they need to access virtual desktops and applications. You can provide this
information by:
Configuring email-based account discovery
Providing users with a provisioning file
Providing users with account information to enter manually
Important
Advise first-time Citrix Receiver users to restart Receiver after installing it. Restarting Receiver ensures that users can add accounts
and that Receiver can discover USB devices that were in a suspended state when Receiver was installed.
When you configure Receiver for email-based account discovery, users enter their email address rather than a server URL
during initial Receiver installation and configuration. Receiver determines the NetScaler Gateway or Access Gateway, or
StoreFront Server associated with the email address based on Domain Name System (DNS) Service (SRV) records and then
prompts the user to log on to access virtual desktops and applications.
Note
Email-based account discovery is not supported for deployments with Web Interface.
To configure your DNS server to support email-based discovery, see Configure email-based account discovery in the
StoreFront documentation.
To configure NetScaler Gateway, see Connecting to StoreFront by using email-based discovery in the NetScaler Gateway
documentation.
StoreFront provides provisioning files that users can open to connect to stores.
You can use StoreFront to create provisioning files containing connection details for accounts. Make these files
available to your users to enable them to configure Receiver automatically. After installing Receiver, users simply open
the file to configure Receiver. If you configure Receiver for Web sites, users can also obtain Receiver provisioning files
from those sites.
For more information, refer to To export store provisioning files for users in the StoreFront documentation.
To enable users to set up accounts manually, be sure to distribute the information they need to connect to their virtual
desktops and applications.

© 1999-2017 Citrix Systems, Inc. All rights reserved. p.97https://docs.citrix.com
For connections to a StoreFront store, provide the URL for that server. For example: https://servername.company.com
For web interface deployments, provide the URL for the XenApp Services site.
For connections through NetScaler Gateway, first determine whether user should see all configured stores or just the
store that has remote access enabled for a particular NetScaler Gateway.
To present all configured stores: Provide users with the NetScaler Gateway fully-qualified domain name.
To limit access to a particular store: Provide users with the NetScaler Gateway fully-qualified domain name and the
store name in the form:
Net ScalerGat ewayFQDN?MySt oreNameNet ScalerGat ewayFQDN?MySt oreName
For example, if a store named "SalesApps" has remote access enabled for server1.com and a store named "HRApps"
has remote access enabled for server2.com, a user must enter server1.com?SalesApps to access SalesApps or
enter server2.com?HRApps to access HRApps. This feature requires that a first-time user create an account by
entering a URL and is not available for email-based discovery.
When a user enters the details for a new account, Receiver attempts to verify the connection. If successful, Receiver
prompts the user to log on to the account.
To manage accounts, a Receiver user opens the Receiver home page, clicks , and then clicks Account sAccount s.
If you have more than one store account, you can configure Citrix Receiver for Windows to automatically connect to all
accounts when establishing a session. To automatically view all accounts when opening Receiver:
For 32-bit syst ems, creat e t he key "Current Account ":For 32-bit syst ems, creat e t he key "CurrentAccount ":
Location: HKLM\Software\Citrix\Dazzle
KeyName: CurrentAccount
Value: AllAccount
Type: REG_SZ
For 64 -bit syst ems, creat e t he key "CurrentAccount ":For 64 -bit syst ems, creat e t he key "CurrentAccount ":
Location: HKLM\Software\Wow6432Node\Citrix\Dazzle
KeyName: CurrentAccount
Value: AllAccount
Type: REG_SZ
Warning
Using Registry Editor incorrectly can cause serious problems that can require you to reinstall the operating system. Citrix cannot
guarantee that problems resulting from incorrect use of Registry Editor can be solved. Use Registry Editor at your own risk. Make
sure you back up the registry before you edit it.

© 1999-2017 Citrix Systems, Inc. All rights reserved. p.98https://docs.citrix.com
Optimize the Citrix Receiver environment
Oct 05, 20 16
You can optimize the environment in which Receiver operates for your users.
Reduce application launch time
Mapping client devices
Support DNS name resolution
Use proxy servers with XenDesktop connections
Provide support for NDS users
Use Receiver with XenApp for UNIX
Enable access to anonymous applications
For information about other optimization options, refer to topics in the XenDesktop documentation related to maintaining
session activity and optimizing the user HDX experience.

© 1999-2017 Citrix Systems, Inc. All rights reserved. p.99https://docs.citrix.com
Reduce application launch time
Nov 21, 2014
Use the session pre-launch feature to reduce application launch time during normal or high traffic periods, thus providing
users with a better experience. The pre-launch feature allows a pre-launch session to be created when a user logs on to
Receiver, or at a scheduled time if the user is already logged on.
This pre-launch session reduces the launch time of the first application. When a user adds a new account connection to
Receiver, session pre-launch does not take effect until the next session. T he default application ctxprelaunch.exe is running
in the session, but it is not visible to the user.
Session pre-launch is supported for StoreFront deployments as of the StoreFront 2.0 release. For Web Interface
deployments, be sure to use the Web Interface Save Password option to avoid logon prompts. Session pre-launch is not
supported for XenDesktop 7 deployments.
Session pre-launch is disabled by default. To enable session pre-launch, specify the ENABLEPRELAUNCH=true parameter on
the Receiver command line or set the EnablePreLaunch registry key to true. The default setting, null, means that pre-launch
is disabled.
Note: If the client machine has been configured to support Domain Passthrough (SSON) authentication, then prelaunch is
automatically enabled. If you want to use Domain Passthrough (SSON) without prelaunch, then set the EnablePreLaunch
registry key value to false.
Caution: Editing the registry incorrectly can cause serious problems that may require you to reinstall your operating system.
Citrix cannot guarantee that problems resulting from the incorrect use of Registry Editor can be solved. Use Registry Editor
at your own risk. Be sure to back up the registry before you edit it.
The registry locations are:
HKLM\Software\[Wow6432Node\]Citrix\Dazzle
HKCU\Software\Citrix\Dazzle
There are two types of pre-launch:
Just -in-t ime Just -in-t ime pre-launchpre-launch. Pre-Launch starts immediately after the user's credentials are authenticated whether or not
it is a high-traffic period. Typically used for normal traffic periods. A user can trigger just-in-time pre-launch by restarting
Receiver.
Scheduled pre-launchScheduled pre-launch. Pre-launch starts at a scheduled time. Scheduled pre-launch starts only when the user device is
already running and authenticated. If those two conditions are not met when the scheduled pre-launch time arrives, a
session does not launch. To spread network and server load, the session launches within a window of when it is
scheduled. For example, if the scheduled pre-launch is scheduled for 1:45 p.m., the session actually launches between 1:15
p.m. and 1:45 p.m. Typically used for high-traffic periods.
Configuring pre-launch on a XenApp server consists of creating, modifying, or deleting pre-launch applications, as well as
updating user policy settings that control the pre-launch application. See "To pre-launch applications to user devices" in the
XenApp documentation for information about configuring session pre-launch on the XenApp server.
Customizing the pre-launch feature using the icaclient.adm file is not supported. However, you can change the pre-launch
configuration by modifying registry values during or after Receiver installation. There are three HKLM values and two HKCU
values:

© 1999-2017 Citrix Systems, Inc. All rights reserved. p.100https://docs.citrix.com
The HKLM values are written during client installation.
The HKCU values enable you to provide different users on the same machine with different settings. Users can change
the HKCU values without administrative permission. You can provide your users with scripts to accomplish this.
For Windows 7 and 8, 64-bit: HKEY_LOCAL_MACHINE\SOFTWARE\Wow6432Node\Citrix\ICA Client\Prelaunch
For all other supported 32-bit Windows operating systems: HKEY_LOCAL_MACHINE\SOFT WARE\Citrix\ICA
Client\Prelaunch
Name: UserOverride
Values:
0 - Use the HKEY_LOCAL_MACHINE values even if HKEY_CURRENT_USER values are also present.
1 - Use HKEY_CURRENT_USER values if they exist; otherwise, use the HKEY_LOCAL_MACHINE values.
Name: State
Values:
0 - Disable pre-launch.
1 - Enable just-in-time pre-launch. (Pre-Launch starts after the user's credentials are authenticated.)
2 - Enable scheduled pre-launch. (Pre-launch starts at the time configured for Schedule.)
Name: Schedule
Value:
The time (24 hour format) and days of week for scheduled pre-launch entered in the following format:
HH:MM|M:T:W:TH:F:S:SU where HH and MM are hours and minutes. M:T:W:TH:F:S:SU are the days of the week. For
example, to enable scheduled pre-launch on Monday, Wednesday, and Friday at 1:45 p.m., set Schedule as
Schedule=13:45|1:0:1:0:1:0:0 . The session actually launches between 1:15 p.m. and 1:45 p.m.
HKEY_CURRENT_USER\SOFTWARE\Citrix\ICA Client\Prelaunch
The State and Schedule keys have the same values as for HKLM.

© 1999-2017 Citrix Systems, Inc. All rights reserved. p.101https://docs.citrix.com
Mapping client devices
May 0 2, 20 13
Receiver supports device mapping on user devices so they are available from within a session. Users can:
Transparently access local drives, printers, and COM ports
Cut and paste between the session and the local Windows clipboard
Hear audio (system sounds and .wav files) played from the session
During logon, Receiver informs the server of the available client drives, COM ports, and LPT ports. By default, client drives are
mapped to server drive letters and server print queues are created for client printers so they appear to be directly
connected to the session. These mappings are available only for the current user during the current session. They are
deleted when the user logs off and recreated the next time the user logs on.
You can use the redirection policy settings to map user devices not automatically mapped at logon. For more information,
see the XenDesktop or XenApp documentation.
You can configure user device mapping including options for drives, printers, and ports, using the Windows Server Manager
tool. For more information about the available options, see your Remote Desktop Services documentation.
Client folder redirection changes the way client-side files are accessible on the host-side session. When you enable only
client drive mapping on the server, client-side full volumes are automatically mapped to the sessions as Universal Naming
Convention (UNC) links. When you enable client folder redirection on the server and the user configures it on the user device,
the portion of the local volume specified by the user is redirected.
Only the user-specified folders appear as UNC links inside sessions instead of the complete file system on the user device. If
you disable UNC links through the registry, client folders appear as mapped drives inside the session. For more information,
including how to configure client folder redirection for user devices, see the XenDesktop 7 documentation.
Client drive mapping allows drive letters on the host-side to be redirected to drives that exist on the user device. For
example, drive H in a Citrix user session can be mapped to drive C of the user device running Receiver.
Client drive mapping is built into the standard Citrix device redirection facilities transparently. To File Manager, Windows
Explorer, and your applications, these mappings appear like any other network mappings.
The server hosting virtual desktops and applications can be configured during installation to map client drives automatically
to a given set of drive letters. The default installation maps drive letters assigned to client drives starting with V and works
backward, assigning a drive letter to each fixed drive and CD-ROM drive. (Floppy drives are assigned their existing drive
letters.) This method yields the following drive mappings in a session:
Client drive let t erClient drive let t er Is accessed by t he server as:Is accessed by t he server as:
A A

© 1999-2017 Citrix Systems, Inc. All rights reserved. p.102https://docs.citrix.com
B B
C V
D U
Client drive let t erClient drive let t er Is accessed by t he server as:Is accessed by t he server as:
The server can be configured so that the server drive letters do not conflict with the client drive letters; in this case the
server drive letters are changed to higher drive letters. For example, changing server drives C to M and D to N allows client
devices to access their C and D drives directly. This method yields the following drive mappings in a session:
Client drive let t erClient drive let t er Is accessed by t he server as:Is accessed by t he server as:
A A
B B
C C
D D
The drive letter used to replace the server drive C is defined during Setup. All other fixed drive and CD-ROM drive letters are
replaced with sequential drive letters (for example; C > M, D > N, E > O). These drive letters must not conflict with any
existing network drive mappings. If a network drive is mapped to the same drive letter as a server drive letter, the network
drive mapping is not valid.
When a user device connects to a server, client mappings are reestablished unless automatic client device mapping is
disabled. Client drive mapping is enabled by default. To change the settings, use the Remote Desktop Services (Terminal
Services) Configuration tool. You can also use policies to give you more control over how client device mapping is applied.
For more information about policies, see the XenDesktop or XenApp documentation in eDocs.
Updated: 2015-01-27
HDX Plug and Play USB device redirection enables dynamic redirection of media devices, including cameras, scanners, media
players, and point of sale (POS) devices to the server. You or the user can restrict redirection of all or some of the devices.
Edit policies on the server or apply group policies on the user device to configure the redirection settings. For more
information, see USB and client drive considerations in the XenApp and XenDesktop documentation.
Important: If you prohibit Plug and Play USB device redirection in a server policy, the user cannot override that policy setting.
A user can set permissions in Receiver to always allow or reject device redirection or to be prompted each time a device is
connected. The setting affects only devices plugged in after the user changes the setting.
Client COM port mapping allows devices attached to the COM ports of the user device to be used during sessions. These

© 1999-2017 Citrix Systems, Inc. All rights reserved. p.103https://docs.citrix.com
mappings can be used like any other network mappings.
You can map client COM ports at the command prompt. You can also control client COM port mapping from the Remote
Desktop (Terminal Services) Configuration tool or using policies. For information about policies, see the XenDesktop or
XenApp documentation.
Important: COM port mapping is not T API-compatible. TAPI devices cannot be mapped to client COM ports.
1. For XenDesktop 7 deployments, enable the Client COM port redirection policy setting.
2. Log on to Receiver.
3. At a command prompt, type:
net use comx: \\client\comz:
where x is the number of the COM port on the server (ports 1 through 9 are available for mapping) and z is the number of
the client COM port you want to map.
4. To confirm the operation, type:
net use
at a command prompt. The list that appears contains mapped drives, LPT ports, and mapped COM ports.
To use this COM port in a virtual desktop or application, install your user device to the mapped name. For example, if you
map COM1 on the client to COM5 on the server, install your COM port device on COM5 during the session. Use this
mapped COM port as you would a COM port on the user device.

© 1999-2017 Citrix Systems, Inc. All rights reserved. p.104https://docs.citrix.com
Support DNS name resolution
Jun 19, 20 13
You can configure Receivers that use the Citrix XML Service to request a Domain Name Service (DNS) name for a server
instead of an IP address.
Important: Unless your DNS environment is configured specifically to use this feature, Citrix recommends that you do not
enable DNS name resolution in the server farm.
Receivers connecting to published applications through the Web Interface also use the Citrix XML Service. For Receivers
connecting through the Web Interface, the Web server resolves the DNS name on behalf of the Receiver.
DNS name resolution is disabled by default in the server farm and enabled by default on the Receiver. When DNS name
resolution is disabled in the farm, any Receiver request for a DNS name returns an IP address. There is no need to disable
DNS name resolution on Receiver.
To disable DNS name resolution for specific user devices
If your server deployment uses DNS name resolution and you experience issues with specific user devices, you can disable
DNS name resolution for those devices.
Caution: Using Registry Editor incorrectly can cause serious problems that can require you to reinstall the operating system.
Citrix cannot guarantee that problems resulting from incorrect use of Registry Editor can be solved. Use Registry Editor at
your own risk. Make sure you back up the registry before you edit it.
1. Add a string registry key xmlAddressResolutionType to HKEY_LOCAL_MACHINE\Software\Wow6432Node\Citrix\ICA
Client\Engine\Lockdown Profiles\All Regions\Lockdown\Application Browsing.
2. Set the value to IPv4-Port.
3. Repeat for each user of the user devices.

© 1999-2017 Citrix Systems, Inc. All rights reserved. p.105https://docs.citrix.com
Use proxy servers with XenDesktop connections
Apr 13, 20 15
If you do not use proxy servers in your environment, correct the Internet Explorer proxy settings on any user devices running
Internet Explorer 7.0 on Windows XP. By default, this configuration automatically detects proxy settings. If proxy servers
are not used, users will experience unnecessary delays during the detection process. For instructions on changing the proxy
settings, consult your Internet Explorer documentation. Alternatively, you can change proxy settings using the Web
Interface. For more information, consult the Web Interface documentation.

© 1999-2017 Citrix Systems, Inc. All rights reserved. p.106https://docs.citrix.com
Improve the user experience
Jan 06, 20 16
You can improve your users' experience with the following features:
Hardware decoding
When using Citrix Receiver for Windows version 4.4 (with HDX engine 14.4), the GPU can be used for H.264 decoding
wherever it is available at the client. The API layer used for GPU decoding is DXVA (DirectX Video Acceleration).
For more information, refer to the Improved User Experience: Hardware Decoding for Citrix Windows Receiver blog.
Note
By default, the hardware decoding feature is OFF; it can be enabled via client-side policies.
To enable hardware decoding:
1. Copy “receiver.adml” from “root\Citrix\ICA Client\Configuration\en” to “C:\Windows\PolicyDefinitions\en-US”.
2. Copy “receiver.admx” from “root\Citrix\ICA Client\Configuration” to “C:\Windows\PolicyDefinitions\”.
3. Navigate to Local Group policy editor.
4. Under Computer Configuration-> Administrative Templates -> Citrix Receiver -> User Experience, open Hardware
Acceleration f or graphics.
5. Select Enabled and click OK.

© 1999-2017 Citrix Systems, Inc. All rights reserved. p.107https://docs.citrix.com
To validate if the policy was applied and hardware acceleration is being used for an active ICA session, look for the
following registry entries:
Registry Path: HKCU\Software\Citrix\ICA Client\CEIP\Data\GfxRender\<session ID>
Tip
The value for Graphics_Gf xRender_Decoder and Graphics_GfxRender_Renderer should be 2. If the value is 1, that means CPU
based decoding is being used.
When using the hardware decoding feature, consider the following limitations:
If the client has two GPU’s and if one of the monitors is active on the 2nd GPU, CPU decoding will be used.
When connecting to a XenApp 7.x server running on Windows Server 2008 R2, Citrix recommends that you do not to use
hardware decoding on the user’s Windows device. If enabled, issues like slow performance while highlighting text and
flickering issues will be seen.
Client-side microphone input

© 1999-2017 Citrix Systems, Inc. All rights reserved. p.108https://docs.citrix.com
Receiver supports multiple client-side microphone input. Locally installed microphones can be used for:
Real-time activities, such as softphone calls and Web conferences.
Hosted recording applications, such as dictation programs.
Video and audio recordings.
Receiver users can select whether to use microphones attached to their device by changing a Connection Center setting.
XenDesktop users can also use the XenDesktop Viewer Preferences to disable their microphones and webcams.
Multi-monitor support
Updated: 2014-11-28
You can use up to eight monitors with Receiver.
Each monitor in a multiple monitor configuration has its own resolution designed by its manufacturer. Monitors can have
different resolutions and orientations during sessions.
Sessions can span multiple monitors in two ways:
Full screen mode, with multiple monitors shown inside the session; applications snap to monitors as they would locally.
XenDesktop: To display the Desktop Viewer window across any rectangular subset of monitors, resize the window
across any part of those monitors and press the Maximize button.
Windowed mode, with one single monitor image for the session; applications do not snap to individual monitors.
XenDesktop: When any desktop in the same assignment (formerly "desktop group") is launched subsequently, the window
setting is preserved and the desktop is displayed across the same monitors. Multiple virtual desktops can be displayed on
one device provided the monitor arrangement is rectangular. If the primary monitor on the device is used by the
XenDesktop session, it becomes the primary monitor in the session. Otherwise, the numerically lowest monitor in the
session becomes the primary monitor.
To enable multi-monitor support, ensure the following:
The user device is configured to support multiple monitors.
The user device operating system must be able to detect each of the monitors. On Windows platforms, to verify that
this detection occurs, on the user device, view the Settings tab in the Display Settings dialog box and confirm that each
monitor appears separately.
After your monitors are detected:
XenDesktop: Configure the graphics memory limit using the Citrix Machine Policy setting Display memory limit.
XenApp: Depending on the version of the XenApp server you have installed:
Configure the graphics memory limit using the Citrix Computer Policy setting Display memory limit.
From the Citrix management console for the XenApp server, select the farm and in the task pane, select Modify
Server Properties > Modify all properties > Server Default > HDX Broadcast > Display (or Modify Server Properties >
Modify all properties > Server Default > ICA > Display) and set the Maximum memory to use for each session’s
graphics.
Ensure the setting is large enough (in kilobytes) to provide sufficient graphic memory. If this setting is not high enough, the
published resource is restricted to the subset of the monitors that fits within the size specified.
For information about calculating the session's graphic memory requirements for XenApp and XenDesktop, see ctx115637.
Printer setting overrides on devices

© 1999-2017 Citrix Systems, Inc. All rights reserved. p.109https://docs.citrix.com
If the Universal printing optimization defaults policy setting Allow non-administrators to modify these settings is enabled,
users can override the Image Compression and Image and Font Caching options specified in that policy setting.
To override the printer settings on the user device
1. From the Print menu available from an application on the user device, choose Properties.
2. On the Client Settings tab, click Advanced Optimizations and make changes to the Image Compression and Image and
Font Caching options.
On-screen keyboard control
To enable touch-enabled access to virtual applications and desktops from Windows tablets, Receiver automatically displays
the on-screen keyboard when you activate a text entry field, and when the device is in tent or tablet mode.
On some devices and in some circumstances, Receiver cannot accurately detect the mode of the device, and the on-screen
keyboard may appear when you do not want it to.
To suppress the on-screen keyboard from appearing when using a convertible device (tablet with detachable keyboard),
create a REG_DWORD value DisableKeyboardPopup in HKLM\SOFTWARE\Citrix\ICA
Client\Engine\Configuration\Advanced\Modules\MobileReceiver and set the value to 1.
Note: On a x64 machine, create the value in HKLM\SOFTWARE\Wow6432Node\ Citrix\ICA
Client\Engine\Configuration\Advanced\Modules\MobileReceiver
Keyboard shortcuts
You can configure combinations of keys that Receiver interprets as having special functionality. When the keyboard
shortcuts policy is enabled, you can specify Citrix Hotkey mappings, behavior of Windows hotkeys, and keyboard layout for
sessions.
1. As an administrator, open the Group Policy Editor by either running gpedit.msc locally from the Start menu when applying
policies to a single computer or by using the Group Policy Management Console when applying domain policies.
Note: If you already imported the icaclient template into the Group Policy Editor, you can omit Steps 2 to 5.
2. In the left pane of the Group Policy Editor, select the Administrative Templates folder.
3. From the Action menu, choose Add/Remove Templates.
4. Choose Add and browse to the Receiver Configuration folder (usually C:\Program Files\Citrix\ICA Client\Configuration)
and select icaclient.adm.
5. Select Open to add the template and then Close to return to the Group Policy Editor.
6. In the Group Policy Editor, go to Administrative Templates > Classic Administrative Templates (ADM) > Citrix Components
> Citrix Receiver > User Experience > Keyboard shortcuts.
7. From the Action menu, choose Properties, select Enabled, and choose the desired options.
Receiver support for 32-bit color icons
Receiver supports 32-bit high color icons and automatically selects the color depth for applications visible in the Citrix
Connection Center dialog box, the Start menu, and task bar to provide for seamless applications.
Caution: Editing the registry incorrectly can cause serious problems that may require you to reinstall your operating system.
Citrix cannot guarantee that problems resulting from the incorrect use of Registry Editor can be solved. Use Registry Editor
at your own risk. Be sure to back up the registry before you edit it.
To set a preferred depth, you can add a string registry key named TWIDesiredIconColor to
HKEY_LOCAL_MACHINE\SOFTWARE\Wow6432Node\Citrix\ICA Client\Engine\Lockdown Profiles\All Regions\Preferences

© 1999-2017 Citrix Systems, Inc. All rights reserved. p.110https://docs.citrix.com
and set it to the desired value. The possible color depths for icons are 4, 8, 16, 24, and 32 bits-per-pixel. The user can select
a lower color depth for icons if the network connection is slow.
Enabling Desktop Viewer
Different enterprises have different corporate needs. Your requirements for the way users access virtual desktops may vary
from user to user and may vary as your corporate needs evolve. The user experience of connecting to virtual desktops and
the extent of user involvement in configuring the connections depend on how you set up Receiver for Windows.
Use the Desktop Viewer when users need to interact with their virtual desktop. The user's virtual desktop can be a
published virtual desktop, or a shared or dedicated desktop. In this access scenario, the Desktop Viewer toolbar
functionality allows the user to open a virtual desktop in a window and pan and scale that desktop inside their local
desktop. Users can set preferences and work with more than one desktop using multiple XenDesktop connections on the
same user device.
Note: Your users must use Citrix Receiver to change the screen resolution on their virtual desktops. They cannot change
Screen Resolution using Windows Control Panel.
Keyboard input in Desktop Viewer sessions
In Desktop Viewer sessions, Windows logo key+L is directed to the local computer.
Ctrl+Alt+Delete is directed to the local computer.
Key presses that activate StickyKeys, FilterKeys, and ToggleKeys (Microsoft accessibility features) are normally directed to
the local computer.
As an accessibility feature of the Desktop Viewer, pressing Ctrl+Alt+Break displays the Desktop Viewer toolbar buttons in a
pop-up window.
Ctrl+Esc is sent to the remote, virtual desktop.
Note: By default, if the Desktop Viewer is maximized, Alt+Tab switches focus between windows inside the session. If the
Desktop Viewer is displayed in a window, Alt+T ab switches focus between windows outside the session.
Hotkey sequences are key combinations designed by Citrix. For example, the Ctrl+F1 sequence reproduces Ctrl+Alt+Delete,
and Shift+F2 switches applications between full-screen and windowed mode. You cannot use hotkey sequences with
virtual desktops displayed in the Desktop Viewer (that is, with XenDesktop sessions), but you can use them with published
applications (that is, with XenApp sessions).
Connect to virtual desktops
From within a desktop session, users cannot connect to the same virtual desktop. Attempting to do so will disconnect the
existing desktop session. Therefore, Citrix recommends:
Administrators should not configure the clients on a desktop to point to a site that publishes the same desktop
Users should not browse to a site that hosts the same desktop if the site is configured to automatically reconnect users
to existing sessions
Users should not browse to a site that hosts the same desktop and try to launch it
Be aware that a user who logs on locally to a computer that is acting as a virtual desktop blocks connections to that
desktop.
If your users connect to virtual applications (published with XenApp) from within a virtual desktop and your organization has

© 1999-2017 Citrix Systems, Inc. All rights reserved. p.111https://docs.citrix.com
a separate XenApp administrator, Citrix recommends working with them to define device mapping such that desktop
devices are mapped consistently within desktop and application sessions. Because local drives are displayed as network
drives in desktop sessions, the XenApp administrator needs to change the drive mapping policy to include network drives.
Changing the status indicator timeout
You can change the amount of time the status indicator displays when a user is launching a session. To alter the time out
period, create a REG_DWORD value SI INACTIVE MS in HKLM\SOFT WARE\Citrix\ICA CLIENT\Engine\. The REG_DWORD
value can be set to 4 if you want the status indicator to disappear sooner.
Caution: Editing the registry incorrectly can cause serious problems that may require you to reinstall your
operating system. Citrix cannot guarantee that problems resulting f rom the incorrect use of Registry Editor can
be solved. Use Registry Editor at your own risk. Be sure to back up the registry bef ore you edit it .

© 1999-2017 Citrix Systems, Inc. All rights reserved. p.112https://docs.citrix.com
Secure your connections
May 0 1, 20 13
To maximize the security of your environment, the connections between Citrix Receiver and the resources you publish must
be secured. You can configure various types of authentication for your Citrix Receiver software, including smart card
authentication, certificate revocation list checking, and Kerberos pass-through authentication.
Windows NT Challenge/Response (NTLM) authentication is supported by default on Windows computers.

© 1999-2017 Citrix Systems, Inc. All rights reserved. p.113https://docs.citrix.com
Configure domain pass-through authentication
Nov 03, 20 15
This topic shows you how to enable domain pass-through authentication for Citrix Receiver with XenDesktop or XenApp.
Note
In this example, the Citrix Receiver installation, application of computer policy, and the configuration of a trusted site on the client
operating system are done manually. Once a Group Policy Object (GPO) template is built, you can apply it to any domain client
machine where Citrix Receiver has been installed.
Citrix Receiver installation
There two ways to enable domain pass-through (SSON) when installing Citrix Receiver:
using the command line installation
using the graphical user interface
Enable domain pass-through using the command line interface
To enable domain-passthrough (SSON) using the command line interface:
1. Install Citrix Receiver 4.x with the /includeSSON switch.
Install one or more StoreFront stores (you can complete this step at a later stage); installing StoreFront stores is not
a prerequisite for setting up domin pass-through authentication.
Verify that pass-through authentication is enabled by starting Citrix Receiver, then confirm that the ssonsvr.exe
process is running in task manager after rebooting the end point where Citrix Receiver is installed.
Note
For information on the syntax for adding one or more StoreFront stores, see Configure and install Receiver for Windows using
command-line parameters.
Enable domain pass-through using the graphical user interface
To enable domain pass-through using the graphical user interface:
1. Locate the Citrix Receiver installation file (CitrixReceiver.exe).
2. Double click CitrixReceiver.exe to launch the installer.
3. In the Enable Single Sign-on installation wizard, select the Enable single sign-on checkbox to install Citrix Receiver with
the SSON feature enabled; this is equivalent to installing Citrix Receiver using the command line switch /includeSSON.
The image below illustrates how to enable single sign-on:

© 1999-2017 Citrix Systems, Inc. All rights reserved. p.114https://docs.citrix.com
Note
The Enable Single Sign-on installation wizard is only available for fresh Installation on a domain joined machine.
Verfy that pass-through authentication is enabled by starting Citrix Receiver, then confirm that the ssonsvr.exe process is
running in task manager after rebooting the endpoint on which Citrix Receiver is installed.
Group policy settings for SSON
Use the information in this section to configure group policy settings for SSON authentication.
Note
The default value of the GPO policy setting related to SSON is Enable pass-through authentication, and is sufficient for SSON to
work. Use the procedures below to modify this setting.
Using an ADMX file for SSON group policy
Use the following procedure to configure group policy settings using an ADMX file:
1. Load group policy files. For installations using Citrix Receiver 4.3 and later, use Receiver.ADMX or Receiver.ADML located
in the %SystemDrive%\Program Files (x86)\Citrix\ICA Client\Configuration folder.
2. Open gpedit.msc, right-click Computer Conf iguration > Administrative Templates - > Citrix Component-> Citrix
Receiver->User Authentication.
3. Enable the following local computer GPO settings (on the user's local machine and/or in the VDA desktop golden image):
Choose the local user name and password.
Select Enabled.
Select Enable pass-through authentication.
4. Reboot the end point (on which Citrix Receiver is installed) or the VDA desktop golden image.

© 1999-2017 Citrix Systems, Inc. All rights reserved. p.115https://docs.citrix.com
Using an ADM file for SSON group policy
Use the following procedure to configure group policy settings using an ADM file:
1. Open the local group policy editor by selecting Computer Conf iguration > Right-click Administrative Templates >
Choose Add/Remove Templates.
2. Click Add to add a ADM template.
3. After successfully adding the receiver.adm template, expand Computer Conf iguration > Administrative Templates
> Classic Administrative Templates (ADM) > Citrix Components > Citrix Receiver > User authentication.

© 1999-2017 Citrix Systems, Inc. All rights reserved. p.116https://docs.citrix.com
4. Open Internet Explorer on the local machine and/or in the VDA desktop golden image.
5. In Internet Settings > Security > Trusted Sites, add the StoreFront server(s) fully qualified domain name (FQDN),
without the store path, to the list. For example, https://storefront.example.com.
Note
You can also add the StoreFront server to the Trusted Sites using a Microsoft GPO. The GPO is called Site to Z one Assignment
List; you can find this list in Computer Configuration > Administrative Templates > Windows Components > Internet
Explorer > Internet Control Panel > Security Page.
6. Log off, and log back on to the Citrix Receiver endpoint.
When Citrix Receiver opens, if the current user is logged on to the domain, the user's credentials are passed through to
StoreFront, along with enumerated apps and desktops within Citrix Receiver, including the user's Start menu settings. When
the user clicks an icon, Citrix Receiver passes through the user's domain credentials to the Delivery Controller and the app
(or desktop) opens.
Changes on the Delivery Controller
Use the following procedure to configure SSON on StoreFront and Web Interface
1. Log onto the Delivery Controller(s) as an administrator.
2. Open Windows PowerShell (with administrative privileges). Using PowerShell, you'll issue commands to enable the Delivery
Controller to trust XML requests sent from StoreFront.

© 1999-2017 Citrix Systems, Inc. All rights reserved. p.117https://docs.citrix.com
3. If not already loaded, load the Citrix cmdlets by typing Add-PSSapin Citrix*, and press Enter.
4. Press Enter.
5. Type Add-PSSnapin citrix.broker.admin.v2, and press Enter.
6. Tpe Set-BrokerSite -TrustRequestsSentToTheXmlServicePort $True, and press Enter.
7. Closer PowerShell.
Configuring SSON on StoreFront and Web Ingterface
StoreFront configuration
To configure SSON on StoreFront and Web Interface, open Studio on the StoreFront Server and select Authentication-
>Add /Remove Methods. Select Domain pass-through.
Web Interface configuration
To configure SSON on Web Interface, select Citrix Web Interface Management-> XenApp Sevices Sites->
Authentication Methods and enable Pass-through.

© 1999-2017 Citrix Systems, Inc. All rights reserved. p.118https://docs.citrix.com
About FastConnect API and HTTP basic authentication
The FastConnect API uses the HTTP Basic Authentication method, which is freqently confused with authentication methods associated with domain passthrough,
Kerberos, and IWA. Citrix recommends that you disable IWA on StoreFront and in ICA group policy.

© 1999-2017 Citrix Systems, Inc. All rights reserved. p.119https://docs.citrix.com
Configure domain pass-through authentication with
Kerberos
Dec 0 1, 20 14
This topic applies only to connections between Citrix Receiver and StoreFront, XenDesktop, or XenApp.
Citrix Receiver for Windows supports Kerberos for domain pass-through authentication for deployments that use smart
cards. Kerberos is one of the authentication methods included in Integrated Windows Authentication (IWA).
When Kerberos authentication is enabled, Kerberos authenticates without passwords for Citrix Receiver, thus preventing
Trojan horse-style attacks on the user device to gain access to passwords. Users can log on to the user device with any
authentication method; for example, a biometric authenticator such as a fingerprint reader, and still access published
resources without further authentication.
Citrix Receiver handles pass-through authentication with Kerberos as follows when Citrix Receiver, StoreFront, XenDesktop
and XenApp are configured for smart card authentication and a user logs on with a smart card:
1. The Citrix Receiver single sign-on service captures the smart card PIN.
2. Citrix Receiver uses IWA (Kerberos) to authenticate the user to StoreFront. StoreFront then provides Receiver with
information about available virtual desktops and apps.
Note: You do not have to use Kerberos authentication for this step. Enabling Kerberos on Receiver is only needed to
avoid an extra PIN prompt. If you do not use Kerberos authentication, Receiver authenticates to StoreFront using the
smart card credentials.
3. The HDX engine (previously referred to as the ICA client) passes the smart card PIN to XenDesktop or XenApp to log the
user on to the Windows session. XenDesktop or XenApp then deliver the requested resources.
To use Kerberos authentication with Citrix Receiver, make sure your Kerberos configuration conforms to the following.
Kerberos works only between Receiver and servers that belong to the same or to trusted Windows Server domains.
Servers must also be trusted for delegation, an option you configure through the Active Directory Users and Computers
management tool.
Kerberos must be enabled on the domain and in XenDesktop and XenApp. For enhanced security and to ensure that
Kerberos is used, disable on the domain any non-Kerberos IWA options.
Kerberos logon is not available for Remote Desktop Services connections configured to use Basic authentication, to
always use specified logon information, or to always prompt for a password.
The remainder of this topic describes how to configure domain pass-through authentication for the most common
scenarios. If you are migrating to StoreFront from Web Interface and previously used a customized authentication solution,
contact your Citrix Support representative for more information.
Warning
Some of the configuration described in this topic include registry edits. Using Registry Editor incorrectly can cause serious problems
that can require you to reinstall the operating system. Citrix cannot guarantee that problems resulting from incorrect use of Registry
Editor can be solved. Use Registry Editor at your own risk. Make sure you back up the registry before you edit it.

© 1999-2017 Citrix Systems, Inc. All rights reserved. p.120https://docs.citrix.com
To configure domain pass-through authentication with Kerberos for use with smart cards
If you are not familiar with smart card deployments in a XenDesktop environment, we recommend that you review the
smart card information in the Secure your deployment section in the XenDesktop documentation before continuing.
When you install Citrix Receiver, include the following command-line option:
/includeSSON
This option installs the single sign-on component on the domain-joined computer, enabling Receiver to authenticate to
StoreFront using IWA (Kerberos). The single sign-on component stores the smart card PIN, which is then used by the
HDX engine when it remotes the smart card hardware and credentials to XenDesktop. XenDesktop automatically
selects a certificate from the smart card and obtains the PIN from the HDX engine.
A related option, ENABLE_SSON, is enabled by default and should remain enabled.
If a security policy prevents enabling single sign-on on a device, configure Receiver through the following policy:
Administrative Templates > Classic Administrative Templates (ADM) > Citrix Components > Citrix Receiver > User
authentication > Local user name and password
Note: In this scenario you want to allow the HDX engine to use smart card authentication and not Kerberos, so do not
use the option ENABLE_KERBEROS=Yes, which would force the HDX engine to use Kerberos.
To apply the settings, restart Receiver on the user device.
To configure StoreFront:
In the default.ica file located on the StoreFront server, set DisableCtrlAltDel to false.
Note: This step is not required if all client machines are running Receiver for Windows 4.2 or above.
When you configure the authentication service on the StoreFront server, select the Domain pass-through check box.
That setting enables Integrated Windows Authentication. You do not need to select the Smart card check box unless
you also have non domain joined clients connecting to Storefront with smart cards.
For more information about using smart cards with StoreFront, refer to Configure the authentication service in the
StoreFront documentation.
About FastConnect API and HTTP basic authentication
The FastConnect API uses the HTTP Basic Authentication method, which is freqently confused with authentication
methods associated with domain passthrough, Kerberos, and IWA. Citrix recommends that you disable IWA on StoreFront
and in ICA group policy.

© 1999-2017 Citrix Systems, Inc. All rights reserved. p.121https://docs.citrix.com
Configure smart card authentication
Nov 28, 20 14
Receiver for Windows supports the following smart card authentication features. For information about XenDesktop and
StoreFront configuration, refer to the documentation for those components. T his topic describes Receiver for Windows
configuration for smart cards.
Pass-through authentication (single sign-on) – Pass-through authentication captures smart card credentials when
users log on to Receiver. Receiver uses the captured credentials as follows:
Users of domain-joined devices who log on to Receiver with smart card credentials can start virtual desktops and
applications without needing to re-authenticate.
Users of non-domain-joined devices who log on to Receiver with smart card credentials must enter their credentials
again to start a virtual desktop or application.
Pass-through authentication requires StoreFront and Receiver configuration.
Bimodal authentication – Bimodal authentication offers users a choice between using a smart card and entering their
user name and password. This feature is useful if the smart card cannot be used (for example, the user has left it at
home or the logon certificate has expired). Dedicated stores must be set up per site to allow this, using the
DisableCtrlAltDel method set to False to allow smart cards. Bimodal authentication requires StoreFront configuration. If
NetScaler Gateway is present in the solution, is also requires configuration.
Bimodal authentication also now gives the StoreFront administrator the opportunity to offer the end user both user
name and password and smart card authentication to the same store by selecting them in the StoreFront Console. See
StoreFront documentation.
Multiple certificates – Multiple certificates can be available for a single smart card and if multiple smart cards are in use.
When a user inserts a smart card into a card reader, the certificates are available to all applications running on the user
device, including Receiver. To change how certificates are selected, configure Receiver.
Client certificate authentication – Client certificate authentication requires NetScaler Gateway/Access Gateway and
StoreFront configuration.
For access to StoreFront resources through NetScaler Gateway/Access Gateway, users might have to re-
authenticate after removing a smart card.
When the NetScaler Gateway/Access Gateway SSL configuration is set to mandatory client certificate
authentication, operation is more secure. However mandatory client certificate authentication is not compatible with
bimodal authentication.
Double hop sessions – If a double-hop is required, a further connection is established between Receiver and the user's
virtual desktop. Deployments supporting double hops are described in the XenDesktop documentation.
Smart card-enabled applications – Smart card-enabled applications, such as Microsoft Outlook and Microsoft Office,
allow users to digitally sign or encrypt documents available in virtual desktop or application sessions.
Prerequisites
This topic assumes familiarity with the smart card topics in the XenDesktop and StoreFront documentation.
Limitations
Certificates must be stored on a smart card, not the user device.
Receiver for Windows does not save the user certificate choice, but can store the PIN when configured. T he PIN is only
cached in non-paged memory for the duration of the user session and is not stored to disk at any point.

© 1999-2017 Citrix Systems, Inc. All rights reserved. p.122https://docs.citrix.com
Receiver for Windows does not reconnect sessions when a smart card is inserted.
When configured for smart card authentication, Receiver for Windows does not support virtual private network (VPN)
single-sign on or session pre-launch. To use VPN tunnels with smart card authentication, users must install the NetScaler
Gateway Plug-in and log on through a web page, using their smart cards and PINs to authenticate at each step. Pass-
through authentication to StoreFront with the NetScaler Gateway Plug-in is not available for smart card users.
Receiver for Windows Updater communications with citrix.com and the Merchandising Server is not compatible with
smart card authentication on NetScaler Gateway.
Warning
Some of the configuration described in this topic include registry edits. Using Registry Editor incorrectly can cause serious problems
that can require you to reinstall the operating system. Citrix cannot guarantee that problems resulting from incorrect use of Registry
Editor can be solved. Use Registry Editor at your own risk. Make sure you back up the registry before you edit it.
To enable single sign-on for smart card authentication
To configure Receiver, include the following command-line option when you install it:
ENABLE_SSON=Yes
Single sign-on is another term for pass-through authentication. Enabling this setting prevents Receiver from displaying a
second prompt for a PIN.
Alternatively, you can perform the configuration through these policy and registry changes:
Administrative Templates > Classic Administrative Templates (ADM) > Citrix Components > Citrix Receiver > User
authentication > Local user name and password
Set SSONCheckEnabled to false in either of the following registry keys if the single sign-on component is not installed.
The key prevents the Receiver authentication manager from checking for the single sign-on component, thus allowing
Receiver to authenticate to StoreFront.
HKEY_CURRENT_USER\Software\Citrix\AuthManager\protocols\integratedwindows\
HKEY_LOCAL_MACHINE\Software\Citrix\AuthManager\protocols\integratedwindows\
Alternatively, it is possible to enable smart card authentication to Storefront instead of Kerberos. To enable smart card
authentication to StoreFront instead of Kerberos, install Receiver with the command line options below. This requires
administrator privileges. The machine does not need to be joined to a domain.
/includeSSON installs single sign-on (pass-through) authentication. Enables credential caching and the use of pass-
through domain-based authentication.
If the user is logging on to the endpoint with a different method to smart card for Receiver authentication (for example,
user name and password), the command line is:
/includeSSON LOGON_CREDENTIAL_CAPTURE_ENABLE=No
This prevents the credentials being captured at log on time and allows Receiver to store the PIN when logging on to
Receiver.
Go to Policy > Administrative Templates > Classic Administrative Templates (ADM) > Citrix Components > Citrix Receiver >
User Authentication > Local user name and password.
Enable pass-through authentication. Depending on the configuration and security settings, you may need to select the

© 1999-2017 Citrix Systems, Inc. All rights reserved. p.123https://docs.citrix.com
Allow pass-through authentication for all ICA option for pass-through authentication to work.
To configure StoreFront:
When you configure the authentication service, select the Smart card check box.
For more information about using smart cards with StoreFront, refer to Configure the authentication service in the
StoreFront documentation.
To enable user devices for smart card use
1. Import the certificate authority root certificate into the device's keystore.
2. Install your vendor's cryptographic middleware.
3. Install and configure Receiver for Windows.
To change how certificates are selected
By default, if multiple certificates are valid, Receiver prompts the user to choose a certificate from the list. Alternatively, you
can configure Receiver to use the default certificate (per the smart card provider) or the certificate with the latest expiry
date. If there are no valid logon certificates, the user is notified, and given the option to use an alternate logon method if
available.
A valid certificate must have all of these characteristics:
The current time of the clock on the local computer is within the certificate validity period.
The Subject public key must use the RSA algorithm and have a key length of 1024, 2048, or 4096 bits.
Key Usage must contain Digital Signature.
Subject Alternative Name must contain the User Principal Name (UPN).
Enhanced Key Usage must contain Smart Card Logon and Client Authentication, or All Key Usages.
One of the Certificate Authorities on the certificate’s issuer chain must match one of the permitted Distinguished
Names (DN) sent by the server in the TLS handshake.
Change how certificates are selected by using either of the following methods:
On the Receiver command line, specify the option AM_CERTIFICATESELECT IONMODE={ Prompt | SmartCardDefault |
LatestExpiry }.
Prompt is the default. For SmartCardDefault or LatestExpiry, if multiple certificates meet the criteria, Receiver prompts
the user to choose a certificate.
Add the following key value to the registry key HKCU or HKLM\Software\[Wow6432Node\]Citrix\AuthManager:
CertificateSelectionMode={ Prompt | SmartCardDefault | LatestExpiry }.
Values defined in HKCU take precedence over values in HKLM to best assist the user in selecting a certificate.
To use CSP PIN prompts
By default, the PIN prompts presented to users are provided by Receiver rather than the smart card Cryptographic Service
Provider (CSP). Receiver prompts users to enter a PIN when required and then passes the PIN to the smart card CSP. If your
site or smart card has more stringent security requirements, such as to disallow caching the PIN per-process or per-session,
you can configure Receiver to instead use the CSP components to manage the PIN entry, including the prompt for a PIN.
Change how PIN entry is handled by using either of the following methods:

© 1999-2017 Citrix Systems, Inc. All rights reserved. p.124https://docs.citrix.com
On the Receiver command line, specify the option AM_SMARTCARDPINENTRY=CSP.
Add the following key value to the registry key HKLM\Software\[Wow6432Node\]Citrix\AuthManager:
SmartCardPINEntry=CSP.

© 1999-2017 Citrix Systems, Inc. All rights reserved. p.125https://docs.citrix.com
Enabling certificate revocation list checking
Nov 19, 2014
When certificate revocation list (CRL) checking is enabled, Receiver checks whether or not the server’s certificate is revoked.
By forcing Citrix Receiver to check this, you can improve the cryptographic authentication of the server and the overall
security of the TLS connection between a user device and a server.
You can enable several levels of CRL checking. For example, you can configure Citrix Receiver to check only its local
certificate list or to check the local and network certificate lists. In addition, you can configure certificate checking to allow
users to log on only if all CRLs are verified.
If you are making this change on a local computer, exit Receiver if it is running. Make sure all Citrix Receiver components,
including the Connection Center, are closed.
1. As an administrator, open the Group Policy Editor by either running gpedit.msc locally from the Start menu when applying
policies to a single computer or by using the Group Policy Management Console when applying domain policies.
Note: If you already imported the icaclient template into the Group Policy Editor, you can omit Steps 2 to 5.
2. In the left pane of the Group Policy Editor, select the Administrative Templates folder.
3. From the Action menu, choose Add/Remove Templates.
4. Choose Add and browse to the Configuration folder for the Receiver (usually C:\Program Files\Citrix\ICA
Client\Configuration) and select icaclient.adm.
5. Select Open to add the template and then Close to return to the Group Policy Editor.
6. In the Group Policy Editor, go to Administrative Templates > Classic Administrative Templates (ADM) > Citrix Components
> Citrix Receiver > Network routing > TLS/SSL data encryption and server identification.
7. From the Action menu, choose Properties and select Enabled.
8. From the CRL verification drop-down menu, select one of the options.
Disabled. No certificate revocation list checking is performed.
Only check locally stored CRLs. CRLs that were installed or downloaded previously are used in certificate validation.
Connection fails if the certificate is revoked.
Require CRLs for connection. CRLs locally and from relevant certificate issuers on the network are checked.
Connection fails if the certificate is revoked or not found.
Retrieve CRLs from network. CRLs from the relevant certificate issuers are checked. Connection fails if the certificate
is revoked.
If you do not set CRL verification, it defaults to Only check locally stored CRLs.

© 1999-2017 Citrix Systems, Inc. All rights reserved. p.126https://docs.citrix.com
Secure Receiver communication
Mar 0 3, 20 15
To secure the communication between XenDesktop sites or XenApp server farms and Citrix Receiver, you can integrate your
Citrix Receiver connections using security technologies such as the following:
Citrix NetScaler Gateway (Access Gateway). For information, refer to topics in this section as well as the NetScaler
Gateway, and StoreFront documentation.
Note: Citrix recommends using NetScaler Gateway to secure communications between StoreFront servers and user
devices.
A firewall. Network firewalls can allow or block packets based on the destination address and port. If you are using
Receiver through a network firewall that maps the server's internal network IP address to an external Internet address
(that is, network address translation, or NAT), configure the external address.
Trusted server configuration.
For XenApp or Web Interface deployments only; not applicable to XenDesktop 7: A SOCKS proxy server or secure proxy
server (also known as security proxy server, HTTPS proxy server). You can use proxy servers to limit access to and from
your network and to handle connections between Receiver and servers. Receiver supports SOCKS and secure proxy
protocols.
For XenApp or Web Interface deployments only; not applicable to XenDesktop 7, XenDesktop 7.1, XenDesktop 7.5, or
XenApp 7.5: SSL Relay solutions with Transport Layer Security (TLS) protocols.
For XenApp 7.6 and XenDesktop 7.6, you can enable an SSL connection directly between users and VDAs. (See SSL for
information about configuring SSL for XenApp 7.6 or XenDesktop 7.6.)
Citrix Receiver is compatible with and functions in environments where the Microsoft Specialized Security - Limited
Functionality (SSLF) desktop security templates are used. These templates are supported on various Windows platforms.
Refer to the Windows security guides available at http://technet.microsoft.com for more information about the templates
and related settings.

© 1999-2017 Citrix Systems, Inc. All rights reserved. p.127https://docs.citrix.com
Connect with NetScaler Gateway
Nov 10, 20 14
To enable remote users to connect through NetScaler Gateway, configure NetScaler Gateway to work with StoreFront.
For StoreFront deployments: Allow connections from internal or remote users to StoreFront through NetScaler
Gateway by integrating NetScaler Gateway and StoreFront. This deployment allows users to connect to StoreFront to
access virtual desktops and applications. Users connect through Receiver.
Note
The NetScaler Gateway End Point Analysis Plugin (EPA) does not support native Windows Receiver.
For information about configuring these connections, refer to Integrating NetScaler Gateway with XenMobile App
Edition and the other topics under that node in Citrix eDocs. Information about the settings required for Receiver for
Windows are in the following topics:
Configuring Session Policies and Profiles for XenMobile App Edition
Creating the Session Profile for Receiver for XenMobile App Edition
Configuring Custom Clientless Access Policies for Receiver
To enable remote users to connect through NetScaler Gateway to your Web Interface deployment, configure NetScaler
Gateway to work with Web Interface, as described in Providing Access to Published Applications and Virtual Desktops
Through the Web Interface and its sub-topics in Citrix eDocs.

© 1999-2017 Citrix Systems, Inc. All rights reserved. p.128https://docs.citrix.com
Connect with NetScaler Gateway Enterprise Edition
Aug 01, 20 16
To enable remote users to connect through NetScaler Gateway, configure NetScaler Gateway to work with StoreFront
and AppController (a component of CloudGateway).
For StoreFront deployments: Allow connections from internal or remote users to StoreFront through Access Gateway
by integrating Access Gateway and StoreFront. This deployment allows users to connect to StoreFront to access virtual
desktops and applications. Users connect through Receiver.
For AppController deployments: Allow connections from remote users to AppController by integrating Access Gateway
and AppController. This deployment allows users to connect to AppController to obtain their web and Software as a
Service (SaaS) apps and provides ShareFile Enterprise services to Receiver users. Users connect through either Receiver or
the NetScaler Gateway Plug-in.
For information about configuring these connections, refer to Integrating NetScaler Gateway with CloudGateway and the
other topics under that node on the Citrix Product Documentation site. Information about the settings required for
Receiver for Windows are in the following topics:
Configuring Session Policies and Profiles for CloudGateway
Creating the Session Profile for Receiver for CloudGateway Enterprise
Creating the Session Profile for Receiver for CloudGateway Express
Configuring Custom Clientless Access Policies for Receiver
To enable remote users to connect through Access Gateway to your Web Interface deployment, configure Access
Gateway to work with Web Interface, as described in Configuring Access Gateway Enterprise Edition to Communicate with
the Web Interface and its sub-topics in Citrix eDocs.

© 1999-2017 Citrix Systems, Inc. All rights reserved. p.129https://docs.citrix.com
Connect with Secure Gateway
Oct 12, 2012
This topic applies only to deployments using the Web Interface.
You can use the Secure Gateway in either Normal mode or Relay mode to provide a secure channel for communication
between Receiver and the server. No Receiver configuration is required if you are using the Secure Gateway in Normal mode
and users are connecting through the Web Interface.
Receiver uses settings that are configured remotely on the server running the Web Interface to connect to servers running
the Secure Gateway. See the topics for the Web Interface for information about configuring proxy server settings for
Receiver.
If the Secure Gateway Proxy is installed on a server in the secure network, you can use the Secure Gateway Proxy in Relay
mode. See the topics for the Secure Gateway for more information about Relay mode.
If you are using Relay mode, the Secure Gateway server functions as a proxy and you must configure Receiver to use:
The fully qualified domain name (FQDN) of the Secure Gateway server.
The port number of the Secure Gateway server. Note that Relay mode is not supported by Secure Gateway Version 2.0.
The FQDN must list, in sequence, the following three components:
Host name
Intermediate domain
Top-level domain
For example: my_computer.my_company.com is an FQDN, because it lists, in sequence, a host name (my_computer), an
intermediate domain (my_company), and a top-level domain (com). The combination of intermediate and top-level domain
(my_company.com) is generally referred to as the domain name.

© 1999-2017 Citrix Systems, Inc. All rights reserved. p.130https://docs.citrix.com
Connect through a firewall
Oct 12, 2012
Network firewalls can allow or block packets based on the destination address and port. If you are using a firewall in your
deployment, Receiver must be able to communicate through the firewall with both the Web server and Citrix server. The
firewall must permit HTTP traffic (often over the standard HTTP port 80 or 443 if a secure Web server is in use) for user
device to Web server communication. For Receiver to Citrix server communication, the firewall must permit inbound ICA
traffic on ports 1494 and 2598.
If the firewall is configured for Network Address Translation (NAT), you can use the Web Interface to define mappings from
internal addresses to external addresses and ports. For example, if your XenApp or XenDesktop server is not configured
with an alternate address, you can configure the Web Interface to provide an alternate address to Receiver. Receiver then
connects to the server using the external address and port number. For more information, see the Web Interface
documentation.

© 1999-2017 Citrix Systems, Inc. All rights reserved. p.131https://docs.citrix.com
Enforce trust relations
Nov 20, 20 14
Trusted server configuration is designed to identify and enforce trust relations involved in Receiver connections. This trust
relationship increases the confidence of Receiver administrators and users in the integrity of data on user devices and
prevents the malicious use of Receiver connections.
When this feature is enabled, Receivers can specify the requirements for trust and determine whether or not they trust a
connection to the server. For example, a Receiver connecting to a certain address (such as https://*.citrix.com) with a
specific connection type (such as TLS) is directed to a trusted zone on the server.
When trusted server configuration is enabled, connected servers must reside in a Windows Trusted Sites zone. (For step-by-
step instructions about adding servers to the Windows Trusted Sites zone, see the Internet Explorer online help.)
To enable trusted server configuration
If you are changing this on a local computer, close all Receiver components, including the Connection Center.
1. As an administrator, open the Group Policy Editor by either running gpedit.msc locally from the Start menu when applying
policies to a single computer or by using the Group Policy Management Console when applying domain policies.
Note: If you already imported the icaclient template into the Group Policy Editor, you can omit Steps 2 to 5.
2. In the left pane of the Group Policy Editor, select the Administrative Templates folder.
3. From the Action menu, choose Add/Remove Templates.
4. Choose Add and browse to the Receiver Configuration folder (usually C:\Program Files\Citrix\ICA Client\Configuration)
and select icaclient.adm.
5. Select Open to add the template and then Close to return to the Group Policy Editor.
6. Expand the Administrative Templates folder under the User Configuration node.
7. In the Group Policy Editor, go to Administrative Templates > Classic Administrative Templates (ADM) > Citrix Components
> Citrix Receiver > Network Routing > Configure trusted server configuration.
8. From the Action menu, choose Properties and select Enabled.

© 1999-2017 Citrix Systems, Inc. All rights reserved. p.132https://docs.citrix.com
Elevation level and wfcrun32.exe
May 0 1, 20 13
When User Access Control (UAC) is enabled on devices running Windows 8, Windows 7, or Windows Vista, only processes at
the same elevation/integrity level as wfcrun32.exe can launch virtual applications.
Example 1:
When wfcrun32.exe is running as a normal user (un-elevated), other processes such as Receiver must be running as a normal
user to launch applications through wfcrun32.
Example 2:
When wfcrun32.exe is running in elevated mode, other processes such as Receiver, Connection Center, and third party
applications using the ICA Client Object that are running in non-elevated mode cannot communicate with wfcrun32.exe.

© 1999-2017 Citrix Systems, Inc. All rights reserved. p.133https://docs.citrix.com
Connect Receiver through a proxy server
Jan 02, 20 13
This topic applies only to deployments using Web Interface.
Proxy servers are used to limit access to and from your network, and to handle connections between Receivers and servers.
Receiver supports SOCKS and secure proxy protocols.
When communicating with the server farm, Receiver uses proxy server settings that are configured remotely on the server
running Receiver for Web or the Web Interface. For information about proxy server configuration, refer to StoreFront or
Web Interface documentation.
In communicating with the Web server, Receiver uses the proxy server settings that are configured through the Internet
settings of the default Web browser on the user device. You must configure the Internet settings of the default Web
browser on the user device accordingly.

© 1999-2017 Citrix Systems, Inc. All rights reserved. p.134https://docs.citrix.com
Connect with Secure Sockets Layer (SSL) Relay
Oct 05, 20 16
This topic applies to XenDesktop 7.6 or later or XenApp 7.5 only.
You can integrate Receiver with the Secure Sockets Layer (SSL) Relay service. Receiver supports TLS protocols. Receiver for
Windows 4.2 supports TLS 1.0 only.
TLS (Transport Layer Security) is the latest, standardized version of the SSL protocol. T he Internet Engineering Taskforce
(IETF) renamed it TLS when it took over responsibility for the development of SSL as an open standard. TLS secures data
communications by providing server authentication, encryption of the data stream, and message integrity checks. Some
organizations, including U.S. government organizations, require the use of TLS to secure data communications. These
organizations may also require the use of validated cryptography, such as FIPS 140 (Federal Information Processing
Standard). FIPS 140 is a standard for cryptography.
Connecting with Citrix SSL Relay
This topic applies to XenDesktop 7.6 or later or XenApp 7.5 only.
By default, Citrix SSL Relay uses TCP port 443 on the XenApp server for TLS-secured communication. When the SSL Relay
receives an TLS connection, it decrypts the data before redirecting it to the server, or, if the user selects TLS+HTTPS
browsing, to the Citrix XML Service.
If you configure SSL Relay to listen on a port other than 443, you must specify the nonstandard listening port number to
the plug-in.
You can use Citrix SSL Relay to secure communications:
Between an TLS-enabled client and a server. Connections using TLS encryption are marked with a padlock icon in the
Citrix Connection Center.
With a server running the Web Interface, between the XenApp server and the Web server.
For information about configuring SSL Relay to secure your installation, refer to the XenApp documentation.
User device requirements
In addition to the System Requirements, you also must ensure that:
The user device supports 128-bit encryption
The user device has a root certificate installed that can verify the signature of the Certificate Authority on the server
certificate
Receiver is aware of the TCP listening port number used by the SSL Relay service in the server farm
Any service packs or upgrades that Microsoft recommends are applied
If you are using Internet Explorer and you are not certain about the encryption level of your system, visit the Microsoft
Web site at http://www.microsoft.com to install a service pack that provides 128-bit encryption.
Important: Receiver supports certificate key lengths of up to 4096 bits. Ensure that the bit lengths of your Certificate
Authority root and intermediate certificates, and those of your server certificates, do not exceed the bit length your
Receiver supports or connection might fail.

© 1999-2017 Citrix Systems, Inc. All rights reserved. p.135https://docs.citrix.com
To apply a different listening port number for all connections
1. As an administrator, open the Group Policy Editor by either running gpedit.msc locally from the Start menu when applying
policies to a single computer or by using the Group Policy Management Console when applying domain policies.
Note: If you already imported the icaclient template into the Group Policy Editor, you can omit Steps 2 to 5.
2. In the left pane of the Group Policy Editor, select the Administrative Templates folder.
3. From the Action menu, choose Add/Remove Templates.
4. Choose Add and browse to the plug-in Configuration folder (usually C:\Program Files\Citrix\ICA Client\Configuration) and
select icaclient.adm.
5. Select Open to add the template and then Close to return to the Group Policy Editor.
6. In the Group Policy Editor, go to Administrative Templates > Classic Administrative Templates (ADM) > Citrix Components
> Citrix Receiver > Network routing > TLS/SSL data encryption and server identification.
7. From the Action menu, choose Properties, select Enabled, and type a new port number in the Allowed SSL servers text
box in the following format: server:SSL relay port number where SSL relay port number is the number of the listening
port. You can use a wildcard to specify multiple servers. For example, *.Test.com:SSL relay port number matches all
connections to T est.com through the specified port.
To apply a different listening port number to particular connections only
If you are changing this on a local computer, close all Receiver components, including the Connection Center.
1. As an administrator, open the Group Policy Editor by either running gpedit.msc locally from the Start menu when applying
policies to a single computer or by using the Group Policy Management Console when applying domain policies.
Note: If you already added the icaclient template to the Group Policy Editor, you can omit Steps 2 to 5.
2. In the left pane of the Group Policy Editor, select the Administrative Templates folder.
3. From the Action menu, choose Add/Remove Templates.
4. Choose Add and browse to the Receiver Configuration folder (usually C:\Program Files\Citrix\ICA Client\Configuration)
and select icaclient.adm.
5. Select Open to add the template and then Close to return to the Group Policy Editor.
6. In the Group Policy Editor, go to Administrative Templates > Classic Administrative Templates (ADM) > Citrix Components
> Citrix Receiver > Network routing > TLS/SSL data encryption and server identification.
7. From the Action menu, choose Properties, select Enabled, and type a comma-separated list of trusted servers and the
new port number in the Allowed SSL servers text box in the following format: servername:SSL relay port
number,servername:SSL relay port number where SSL relay port number is the number of the listening port. You can
specify a comma-separated list of specific trusted SSL servers similar to this example:
csghq.Test.com:443,fred.Test.com:443,csghq.Test.com:444
which translates into the following in an example appsrv.ini file: [Word]
SSLProxyHost=csghq.Test.com:443
[Excel]
SSLProxyHost=csghq.Test.com:444
[Notepad]
SSLProxyHost=fred.Test.com:443

© 1999-2017 Citrix Systems, Inc. All rights reserved. p.136https://docs.citrix.com
Configuring and enabling Receivers for TLS
Oct 05, 20 16
This topic applies to XenDesktop 7.6 or later or XenApp 7.5 only.
To force Receiver to connect with TLS, you must specify TLS on the Secure Gateway server or SSL Relay service. See the
topics for the Secure Gateway or your SSL Relay service documentation for more information.
In addition, make sure the user device meets all system requirements.
To use TLS encryption for all Receiver communications, configure the user device, Receiver, and, if using Web Interface, the
server running the Web Interface. For information about securing StoreFront communications, refer to topics under
"Secure" in the StoreFront documentation in Citrix Product documentation.
Install root certificates on user devices
To use TLS to secure communications between a TLS-enabled Receiver and the server farm, you need a root certificate on
the user device that can verify the signature of the Certificate Authority on the server certificate.
Receiver supports the Certificate Authorities that are supported by the Windows operating system. The root certificates
for these Certificate Authorities are installed with Windows and managed using Windows utilities. They are the same root
certificates that are used by Microsoft Internet Explorer.
If you use your own Certificate Authority, you must obtain a root certificate from that Certificate Authority and install it on
each user device. This root certificate is then used and trusted by both Microsoft Internet Explorer and Receiver.
You might be able to install the root certificate using other administration or deployment methods, such as:
Using the Microsoft Internet Explorer Administration Kit (IEAK) Configuration Wizard and Profile Manager
Using third-party deployment tools
Make sure that the certificates installed by your Windows operating system meet the security requirements for your
organization or use the certificates issued by your organization’s Certificate Authority.
To configure Web Interface to use TLS for Receiver
1. To use TLS to encrypt application enumeration and launch data passed between Receiver and the server running the
Web Interface, configure the appropriate settings using the Web Interface. You must include the computer name of the
XenApp server that is hosting the SSL certificate.
2. To use secure HTTP (HTTPS) to encrypt the configuration information passed between Receiver and the server running
the Web Interface, enter the server URL in the format https://servername. In the Windows notification area, right-click
the Receiver icon and choose Preferences.
3. Right-click the Online Plug-in entry in the Plug-in Status and choose Change Server.
To configure TLS support
If you are changing this on a local computer, close all Receiver components, including the Connection Center.
1. As an administrator, open the Group Policy Editor by running gpedit.msc locally from the Start menu when applying this
to a single computer or by using the Group Policy Management Console when using Active Directory.
Note: If you already imported the icaclient template into the Group Policy Editor, you can omit Steps 2 to 5
2. In the left pane of the Group Policy Editor, select the Administrative Templates folder.

© 1999-2017 Citrix Systems, Inc. All rights reserved. p.137https://docs.citrix.com
3. From the Action menu, choose Add/Remove Templates.
4. Choose Add and browse to the Receiver Configuration folder (usually C:\Program Files\Citrix\ICA Client\Configuration)
and select icaclient.adm.
5. Select Open to add the template and then Close to return to the Group Policy Editor.
6. In the Group Policy Editor, go to Administrative Templates > Classic Administrative Templates (ADM) > Citrix Components
> Citrix Receiver > Network routing > TLS/SSL data encryption and server identification.
7. From the Action menu, choose Properties, select Enabled, and from the drop-down menus, select the TLS settings.
Set TLS Version to T LS or Detect all to enable TLS. If Detect all is selected, Receiver connects using TLS encryption.
Set SSL cipher suite to Detect version to have Receiver negotiate a suitable cipher suite from the Government and
Commercial cipher suits. You can restrict the cipher suites to either Government or Commercial.
Set CRL verification to Require CRLs for connection requiring Receiver to try to retrieve Certificate Revocation Lists
(CRLs) from the relevant certificate issuers.
To use the Group Policy template on Web Interface to meet FIPS 140 security requirements
If you are changing this on a local computer, close all Receiver components, including the Connection Center.
To meet FIPS 140 security requirements, use the Group Policy template to configure the parameters or include the
parameters in the Default.ica file on the server running the Web Interface. See the information about Web Interface for
additional information about the Default.ica file.
1. As an administrator, open the Group Policy Editor by either running gpedit.msc locally from the Start menu when applying
policies to a single computer or by using the Group Policy Management Console when applying domain policies.
Note: If you already imported the icaclient template into the Group Policy Editor, you can omit Steps 3 to 5.
2. In the left pane of the Group Policy Editor, select the Administrative Templates folder.
3. From the Action menu, choose Add/Remove Templates.
4. Choose Add and browse to the Receiver Configuration folder (usually C:\Program Files\Citrix\ICA Client\Configuration)
and select icaclient.adm.
5. Select Open to add the template and then Close to return to the Group Policy Editor.
6. In the Group Policy Editor, go to Administrative Templates > Classic Administrative Templates (ADM) > Citrix Components
> Citrix Receiver > Network routing > TLS/SSL data encryption and server identification.
7. From the Action menu, choose Properties, select Enabled, and from the drop-down menus, select the correct settings.
Set TLS Version to T LS or Detect all to enable TLS. If Detect all is selected, Receiver tries to connect using T LS
encryption.
Set SSL ciphersuite to Government.
Set CRL verification to Require CRLs for connection.
To configure the Web Interface to use TLS when communicating with Citrix Receiver
When using the Web Interface, specify the computer name of the server hosting the SSL certificate. See the information
about Web Interface for more details about using TLS to secure communications between Receiver and the Web server.
1. From the Configuration settings menu, select Server Settings.
2. Select Use SSL/TLS for communications between clients and the Web server.
3. Save your changes.
Selecting SSL/TLS changes all URLs to use HTTPS protocol.
To configure Citrix XenApp to use TLS when communicating with Citrix Receiver
You can configure the XenApp server to use TLS to secure the communications between Receiver and the server.

© 1999-2017 Citrix Systems, Inc. All rights reserved. p.138https://docs.citrix.com
1. From the Citrix management console for the XenApp server, open the Properties dialog box for the application you want
to secure.
2. Select Advanced > Client options and ensure that you select Enable SSL and TLS protocols.
3. Repeat these steps for each application you want to secure.
When using the Web Interface, specify the computer name of the server hosting the SSL certificate. See the information
about Web Interface for more details about using TLS to secure communications between Receiver and the Web server.
To configure Citrix Receiver to use TLS when communicating with the server running the Web Interface
You can configure Receiver to use TLS to secure the communications between Receiver and the server running the Web
Interface.
Ensure that a valid root certificate is installed on the user device. For more information, see Install root certificates on user
devices.
1. In the Windows notification area, right-click the Receiver icon and choose Preferences.
2. Right-click the Online Plug-in entry in the Plug-in Status and choose Change Server.
3. The Change Server screen displays the currently configured URL. Enter the server URL in the text box in the format
https://servername to encrypt the configuration data using TLS.
4. Click Update to apply the change.
5. Enable TLS in the user device browser. For more information, see the online Help for the browser.

© 1999-2017 Citrix Systems, Inc. All rights reserved. p.139https://docs.citrix.com
ICA File Signing to protect against application or
desktop launches from untrusted servers
Nov 19, 2014
This topic applies only to deployments with Web Interface using Administrative Templates.
The ICA File Signing feature helps protect users from unauthorized application or desktop launches. Citrix Receiver verifies
that a trusted source generated the application or desktop launch based on administrative policy and protects against
launches from untrusted servers. You can configure this Receiver security policy for application or desktop launch signature
verification using Group Policy Objects, StoreFront, or Citrix Merchandising Server. ICA file signing is not enabled by default.
For information about enabling ICA file signing for StoreFront, refer to the StoreFront documentation.
For Web Interface deployments, the Web Interface enables and configures application or desktop launches to include a
signature during the launch process using the Citrix ICA File Signing Service. The service can sign ICA files using a certificate
from the computer's personal certificate store.
The Citrix Merchandising Server with Receiver enables and configures launch signature verification using the Citrix
Merchandising Server Administrator Console > Deliveries wizard to add trusted certificate thumbprints.
To use Group Policy Objects to enable and configure application or desktop launch signature verification, follow this
procedure:
1. As an administrator, open the Group Policy Editor by either running gpedit.msc locally from the Start menu when applying
policies to a single computer or by using the Group Policy Management Console when applying domain policies.
Note: If you already imported the ica-file-signing.adm template into the Group Policy Editor, you can omit Steps 2 to 5.
2. In the left pane of the Group Policy Editor, select the Administrative Templates folder.
3. From the Action menu, choose Add/Remove Templates.
4. Choose Add and browse to the Receiver Configuration folder (usually C:\Program Files\Citrix\ICA Client\Configuration)
and select ica-file-signing.adm.
5. Select Open to add the template and then Close to return to the Group Policy Editor.
6. In the Group Policy Editor, go to Administrative Templates > Classic Administrative Templates (ADM) > Citrix Components
> Citrix Receiver and navigate to Enable ICA File Signing.
7. If you choose Enabled, you can add signing certificate thumbprints to the white list of trusted certificate thumbprints or
remove signing certificate thumbprints from the white list by clicking Show and using the Show Contents screen. You can
copy and paste the signing certificate thumbprints from the signing certificate properties. Use the Policy drop-down
menu to select Only allow signed launches (more secure) or Prompt user on unsigned launches (less secure).
Option Description
Only allow
signed launches
(more secure)
Allows only properly signed application or desktop launches from a trusted server. The user sees
a Security Warning message in Receiver if an application or desktop launch has an invalid
signature. T he user cannot continue and the unauthorized launch is blocked.
Prompt user on
unsigned
launches (less
secure)
Prompts the user every time an unsigned or invalidly signed application or desktop attempts to
launch. The user can either continue the application launch or abort the launch (default).

© 1999-2017 Citrix Systems, Inc. All rights reserved. p.140https://docs.citrix.com
Option Description
To select and distribute a digital signature certificate
When selecting a digital signature certificate, Citrix recommends you choose from this prioritized list:
1. Buy a code-signing certificate or SSL signing certificate from a public Certificate Authority (CA).
2. If your enterprise has a private CA, create a code-signing certificate or SSL signing certificate using the private CA.
3. Use an existing SSL certificate, such as the Web Interface server certificate.
4. Create a new root CA certificate and distribute it to user devices using GPO or manual installation.

© 1999-2017 Citrix Systems, Inc. All rights reserved. p.141https://docs.citrix.com
Configure a Web browser and ICA file to enable single
sign-on and manage secure connections to trusted
servers
Dec 0 2, 20 12
This topic applies only to deployments using Web Interface.
To use Single sign-on (SSO) and to manage secure connections to trusted servers, add the Citrix server's site address to the
Local intranet or Trusted sites zones in Internet Explorer under Tools > Internet Options > Security on the user device. The
address can include the wildcard (*) formats supported by the Internet Security Manager (ISM) or be as specific as
protocoll://URL[:port].
The same format must be used in both the ICA file and the sites entries. For example, if you use a fully qualified domain
name (FQDN) in the ICA file, you must use an FQDN in the sites zone entry. XenDesktop connections use only a desktop
group name format.
Supported formats (including wildcards)
http[s]://10.2.3.4
http[s]://10.2.3.*
http[s]://hostname
http[s]://fqdn.example.com
http[s]://*.example.com
http[s]://cname.*.example.com
http[s]://*.example.co.uk
desktop://group-20name
ica[s]://xaserver1
ica[s]://xaserver1.example.com
Launch SSO or use secure connections with a Web site
Add the exact address of the Web Interface site in the sites zone.
Example Web site addresses
https://my.company.com
http://10.20.30.40
http://server-hostname:8080
https://SSL-relay:444

© 1999-2017 Citrix Systems, Inc. All rights reserved. p.142https://docs.citrix.com
XenDesktop connections with Desktop Viewer
Add the address in the form desktop://Desktop Group Name. If the desktop group name contains spaces, replace each
space with -20.
Custom ICA entry formats
Use one of the following formats in the ICA file for the Citrix server site address. Use the same format to add it to the Local
intranet or Trusted sites zones in Internet Explorer under Tools > Internet Options > Security on the user device:
Example of ICA file HttpBrowserAddress entry
HttpBrowserAddress=XMLBroker.XenappServer.example.com:8080
Examples of ICA file XenApp server address entries
If the ICA file contains only the XenApp server Address field, use one of the following entry formats:
icas://10.20.30.40:1494
icas://my.xenapp-server.company.com
ica://10.20.30.40

© 1999-2017 Citrix Systems, Inc. All rights reserved. p.143https://docs.citrix.com
To set client resource permissions
Oct 30, 20 14
This topic applies only to deployments using Web Interface.
You can set client resource permissions using trusted and restricted site regions by:
Adding the Web Interface site to the Trusted Site list
Making changes to new registry settings
Note
Due to recent enhancements to Citrix Receiver, the .ini procedure available in earlier versions of the plug-in/Receiver is replaced with
these procedures.
Warning
Editing the registry incorrectly can cause serious problems that may require you to reinstall your operating system. Citrix cannot
guarantee that problems resulting from the incorrect use of Registry Editor can be solved. Use Registry Editor at your own risk. Be
sure to back up the registry before you edit it.
1. From the Internet Explorer Tools menu, choose Internet Options > Security.
2. Select the Trusted sites icon and click the Sites button.
3. In the Add this website to the zone text field, type the URL to your Web Interface site and click Add.
4. Download the registry settings from http://support.citrix.com/article/CTX133565 and make any registry changes. Use
SsonRegUpx86.reg for Win32 user devices and SsonRegUpx64.reg for Win64 user devices.
5. Log off and then log on to the user device.
1. Download the registry settings from http://support.citrix.com/article/CTX133565 and import the settings on each user
device. Use SsonRegUpx86.reg for Win32 user devices and SsonRegUpx64.reg for Win64 user devices.
2. In the registry editor, navigate to HKEY_LOCAL_MACHINE\SOFTWARE\Citrix\ICA Client\Client Selective Trust and in the
appropriate regions, change the default value to the required access values for any of the following resources:
Resource keyResource key Resource descript ionResource descript ion
FileSecurityPermission Client drives
MicrophoneAndWebcamSecurityPermission Microphones and webcams
ScannerAndDigitalCameraSecurityPermission USB and other devices

© 1999-2017 Citrix Systems, Inc. All rights reserved. p.144https://docs.citrix.com
Resource keyResource key Resource descript ionResource descript ion
ValueValue Descript ionDescript ion
0 No Access
1 Read-only access
2 Full access
3 Prompt user for access
When Citrix Receiver is enumerating applications and communicating with Storefront, Windows platform cryptography is
used.
For TCP connections between Citrix Receiver and XenApp/XenDesktop, Citrix Receiver supports TLS 1.0, 1.1 and 1.2 with the
following cipher suites:
TLS_RSA_WITH_AES_256_CBC_SHA
TLS_RSA_WITH_AES_128_CBC_SHA
TLS_RSA_WITH_RC4_128_SHA
TLS_RSA_WITH_RC4_128_MD5
TLS_RSA_WITH_3DES_EDE_CBC_SHA
TLS_RSA_WITH_AES_256_GCM_SHA384
TLS_RSA_WITH_AES_128_GCM_SHA256
For UDP based connections Citrix Receiver supports DTLS 1.0 with the following cipher suites:
TLS_RSA_WITH_AES_256_CBC_SHA
TLS_RSA_WITH_AES_128_CBC_SHA
TLS_RSA_WITH_3DES_EDE_CBC_SHA
Enable SP 800-52 compliance mode
[edit this section - use previously created FIPS info and leverage new UI image in DAM]
A new check box has been introduced under Computer Configuration - > Administrate Templates-> Citrix Components - >
Network Routing -> TLS and Compliance Mode Configuration, called Enable FIPS. This will ensure that only FIPS approved
cryptography is used for all ICA connections. By fault this option will be disabled or unchecked.
A new Security Compliance Mode is introduced called SP 800-52. By fault this option will be NONE and is not enabled.
Please follow the link that describes the compliance required for NIST SP 800-52:- http://www.nist.gov/manuscript-
publication-search.cfm?pub_id=915295.

© 1999-2017 Citrix Systems, Inc. All rights reserved. p.145https://docs.citrix.com
The SP800-52 compliance mode requires FIPS Compliance. When SP800-52 is enabled FIPS mode is also enabled regardless
of the FIPS setting. The allowed ‘Certificate Revocation Check policy’ values are either ‘Full access check and CRL required’
or ‘Full access check and CRL required All’.
Limiting TLS versions and cipher suites
You can configure Citrix Receiver to limit T LS versions and cipher suites. An option is provided to select the allowed TLS
protocol versions, which determines TLS protocol for ICA connections. Highest and mutually available TLS version between
Client and Server will be selected. Options include:
TLS 1.0 | TLS 1.1 | TLS 1.2 ( default).
TLS 1.1 | TLS 1.2
TLS 1.2
An option is available for TLS cipher suite selection. Citrix Receiver can choose between:
Any
Commercial
Government
Commercial Cipher suit esCommercial Cipher suit es
TLS_RSA_WITH_AES_128_GCM_SHA256
TLS_RSA_WITH_AES_128_CBC_SHA
TLS_RSA_WITH_RC4_128_SHA
TLS_RSA_WITH_RC4_128_MD5
Government Cipher suit esGovernment Cipher suit es
TLS_RSA_WITH_AES_256_GCM_SHA384
TLS_RSA_WITH_AES_128_GCM_SHA256
TLS_RSA_WITH_AES_256_CBC_SHA
TLS_RSA_WITH_3DES_EDE_CBC_SHA
Note
If Require T LS for all conne ctio nsRequire T LS for a ll connectio ns is enabled, connection requests to Storefront must also adhere to HTTPS; adding a store as
HT T P fails, and non-SSL VDA (XenDesktop and XenApp) cannot be launched.

© 1999-2017 Citrix Systems, Inc. All rights reserved. p.146https://docs.citrix.com
Receiver Desktop Lock
Aug 09, 20 16
You can use the Receiver Desktop Lock when users do not need to interact with the local desktop. Users can still use the
Desktop Viewer (if enabled), however it has only the required set of options on the toolbar: Ctrl+Alt+Del, Preferences,
Devices, and Disconnect.
Citrix Receiver Desktop Lock works on domain-joined machines, which are SSON-enabled (Single Sign-On) and store
configured; it can also be used on non-domain joined machines without SSON enabled. It does not support PNA sites.
Previous versions of Desktop Lock are not supported when you upgrade to Receiver for Windows 4.2.x.
You must install Citrix Receiver for Windows with the /includeSSON flag. You must configure the store and single sign-on,
either using the adm/admx file or cmdline option. For more information, refer to Install and configure Citrix Receiver using
the command line.
Then, install the Receiver Desktop Lock as an administrator using the CitrixReceiverDesktopLock.MSI available at
citrix.com/downloads.
Syst em requirement s f or Cit rix Receiver Deskt op LockSyst em requirement s f or Cit rix Receiver Deskt op Lock
Supported on Windows 7 (including Embedded Edition), Windows 7 Thin PC, Windows 8, and Windows 8.1.
User devices must be connected to a local area network (LAN) or wide area network (WAN).
Local App AccessLocal App Access
Important
Enabling Local App Access may permit local desktop access, unless a full lock down has been applied with the Group Policy Object
template, or a similar policy. See Configure Local App Access and URL redirection in XenApp and XenDesktop for more information.
Working wit h Receiver Deskt op LockWorking wit h Receiver Deskt op Lock
You can use Receiver Desktop Lock with the following Receiver for Windows features:
3Dpro, Flash, USB, HDX Insight, Microsoft Lync 2013 plug-in, and local app access
Domain, two-factor, or smart card authentication only
Disconnecting the Receiver Desktop Lock session logs out the end device.
Flash redirection is disabled on Windows 8 and later versions. Flash redirection is enabled on Windows 7.
The Desktop Viewer is optimized for Receiver Desktop Lock with no Home, Restore, Maximize, and Display properties.
Ctrl+Alt+Del is available on the Viewer toolbar.
Most windows shortcut keys are passed to the remote session, with the exception of Windows+L. For details, see
Passing Windows shortcut keys to the remote session.
Ctrl+F1 triggers Ctrl+Alt+Del when you disable the connection or Desktop Viewer for desktop connections.
This procedure installs Receiver for Windows so that virtual desktops appear using Receiver Desktop Lock. For deployments
that use smart cards, see T o configure smart cards for use with devices running Receiver Desktop Lock.

© 1999-2017 Citrix Systems, Inc. All rights reserved. p.147https://docs.citrix.com
1. Log on using a local administrator account.
2. At a command prompt, run the following command (located in the Citrix Receiver and Plug-ins > Windows > Receiver
folder on the installation media).
For example:
CitrixReceiver.exe
/includeSSON
STORE0="DesktopStore;https://my.storefront.server/Citrix/MyStore/discovery;on;Desktop Store"
For command details, see the Receiver for Windows install documentation at Configure and install Receiver for Windows
using command-line parameters.
3. In the same folder on the installation media, double-click CitrixReceiverDesktopLock.MSI . The Desktop Lock wizard
opens. Follow the prompts.
4. When the installation completes, restart the user device. If you have permission to access a desktop and you log on as a
domain user, the device appears using Receiver Desktop Lock.
To allow administration of the user device after installation, the account used to install CitrixReceiverDesktopLock.msi is
excluded from the replacement shell. If that account is later deleted, you will not be able to log on and administer the
device.
To run a silent installsilent inst all of Receiver Desktop Lock, use the following command line: msiexec /i CitrixReceiverDesktopLock.msi
/qn
Grant access to only one virtual desktop running Receiver Desktop Lock per user.
Using Active Directory policies, prevent users from hibernating virtual desktops.
Use the same administrator account to configure Receiver Desktop Lock as you did to install it.
Ensure that the Receiver.admx (or Receiver.adml) and Receiver_usb.admx (.adml) files are loaded into Group Policy (where
the policies appear in Computer Configuration or User Configuration > Administrative Templates > Classic Administrative
Templates (ADMX) > Citrix Components). The .admx files are located in %Program Files%\Citrix\ICA Client\Configuration\.
USB preferences - When a user plugs in a USB device, that device is automatically remoted to the virtual desktop; no user
interaction is required. T he virtual desktop is responsible for controlling the USB device and displaying it in the user
interface.
Enable the USB policy rule.
In Citrix Receiver > Remoting client devices > Generic USB Remoting, enable and configure the Existing USB Devices
and New USB Devices policies.
Drive mapping - In Citrix Receiver > Remoting client devices, enable and configure the Client drive mapping policy.
Microphone - In Citrix Receiver > Remoting client devices, enable and configure the Client microphone policy.
1. Configure StoreFront.
1. Configure the XML Service to use DNS Address Resolution for Kerberos support.
2. Configure StoreFront sites for HTTPS access, create a server certificate signed by your domain certificate authority,
and add HTTPS binding to the default website.
3. Ensure pass-through with smart card is enabled (enabled by default).
4. Enable Kerberos.
5. Enable Kerberos and Pass-through with smart card.

© 1999-2017 Citrix Systems, Inc. All rights reserved. p.148https://docs.citrix.com
6. Enable Anonymous access on the IIS Default Web Site and use Integrated Windows Authentication.
7. Ensure the IIS Default Web Site does not require SSL and ignores client certificates.
2. Use the Group Policy Management Console to configure Local Computer Policies on the user device.
1. Import the Receiver.admx template from %Program Files%\Citrix\ICA Client\Configuration\.
2. Expand Administrative Templates > Classic Administrative Templates (ADMX) > Citrix Components > Citrix Receiver >
User authentication.
3. Enable Smart card authentication.
4. Enable Local user name and password.
3. Configure the user device before installing Receiver Desktop Lock.
1. Add the URL for the Delivery Controller to the Windows Internet Explorer T rusted Sites list.
2. Add the URL for the first Delivery Group to the Internet Explorer Trusted Sites list in the form desktop://delivery-
group-name.
3. Enable Internet Explorer to use automatic logon for Trusted Sites.
When Receiver Desktop Lock is installed on the user device, a consistent smart card removal policy is enforced. For example,
if the Windows smart card removal policy is set to Force logoff for the desktop, the user must log off from the user device
as well, regardless of the Windows smart card removal policy set on it. This ensures that the user device is not left in an
inconsistent state. This applies only to user devices with the Receiver Desktop Lock.
Be sure to remove both of the components listed below.
1. Log on with the same local administrator account that was used to install and configure Receiver Desktop Lock.
2. From the Windows feature for removing or changing programs:
Remove Citrix Receiver Desktop Lock.
Remove Citrix Receiver.
Most windows shortcut keys are passed to the remote session. This section highlights some of the common ones.
WindowsWindows
Win+D - Minimize all windows on the desktop.
Alt+Tab - Change active window.
Ctrl+Alt+Delete - via Ctrl+F1 and the Desktop Viewer toolbar.
Alt+Shift+Tab
Windows+Tab
Windows+Shift+Tab
Windows+All Character keys
Windows 8Windows 8
Win+C - Open charms.
Win+Q - Search charm.
Win+H - Share charm.
Win+K - Devices charm.
Win+I - Settings charm.
Win+Q - Search apps.
Win+W - Search settings.
Win+F - Search files.

© 1999-2017 Citrix Systems, Inc. All rights reserved. p.149https://docs.citrix.com
Windows 8 appsWindows 8 apps
Win+Z - Get to app options.
Win+. - Snap app to the left.
Win+Shift+. - Snap app to the right.
Ctrl+Tab - Cycle through app history.
Alt+F4 - Close an app.
Deskt opDeskt op
Win+D - Open desktop.
Win+, - Peek at desktop.
Win+B - Back to desktop.
Ot herOt her
Win+U - Open Ease of Access Center.
Ctrl+Esc - Start screen.
Win+Enter - Open Windows Narrator.
Win+X - Open system utility settings menu.
Win+PrintScrn - Take a screen shot and save to pictures.
Win+Tab - Open switch list.
Win+T - Preview open windows in taskbar.

© 1999-2017 Citrix Systems, Inc. All rights reserved. p.150https://docs.citrix.com
SDK and API for Citrix Receiver for Windows
Apr 05, 20 17
Citrix Virtual Channel SDK
The Citrix Virtual Channel software development kit (SDK) supports writing server-side applications and client-side drivers for
additional virtual channels using the ICA protocol. The server-side virtual channel applications are on XenApp or XenDesktop
servers. This version of the SDK supports writing new virtual channels for Receiver for Windows. If you want to write virtual
drivers for other client platforms, contact Citrix Technical support.
The Virtual Channel SDK provides:
The Citrix Virtual Driver Application Programming Interface (VDAPI) is used with the virtual channel functions in the Citrix
Server API SDK (WFAPI SDK) to create new virtual channels. The virtual channel support provided by VDAPI makes it easy
to write your own virtual channels.
The Windows Monitoring API, which enhances the visual experience and support for third-party applications integrated
with ICA.
Working source code for virtual channel sample programs to demonstrate programming techniques.
The Virtual Channel SDK requires the WFAPI SDK to write the server side of the virtual channel.
For more information on SDK, see Citrix Virtual Channel SDK for Citrix Receiver for Windows.
Fast Connect 3 Credential Insertion API
The Fast Connect 3 Credential Insertion API provides an interface that supplies user credentials to the Single Sign-on
(SSON) feature.This feature is available from Citrix Receiver for Windows Version 4.2 and later. Using this API, Citrix partners
can provide authentication and SSO products that use StoreFront or the Web Interface to log users on to virtual
applications or desktops and then disconnect users from those sessions.
For more information on Fast Connect API, see Fast Connect 3 Credential Insertion API for Citrix Receiver for Windows.
