
OnBase Guide - Reporting Dashboards
Goal: To create dashboards and reports from OnBase
data
Complexity Level: Departmental Reporting Dashboard
Developers
5/12/2022

2
Table of Contents
Background & Terminology ....................................................................................... 3
Prerequisites .............................................................................................................. 3
Resources ................................................................................................................. 3
User Groups/Access .................................................................................................. 4
Configuring Data Providers ........................................................................................ 6
Editing Data Providers ........................................................................................... 7
Configuring Dashboards ............................................................................................ 8
Dashboard Items/Elements .................................................................................... 8
Filtering Dashboards ............................................................................................ 12
Exclude Values from Dashboard Items (Pre-configured) .................................. 12
Default Filtering Options (End User) ................................................................. 13
Filter Values using Filter Elements (End User) ................................................. 13
Drill Down (End User) ....................................................................................... 15
Filter Dashboard Items based on other Dashboard Items (End-User) .............. 16
Formatting ............................................................................................................ 17
Value Formatting .............................................................................................. 17
Names .............................................................................................................. 17
Rules ................................................................................................................ 17
Calculated Fields ................................................................................................. 18
Dashboard Designer Tips .................................................................................... 19
Configuring Reports ................................................................................................. 20
Configuring Categories ............................................................................................ 22
Display Actions ........................................................................................................ 22
Migration .................................................................................................................. 23
Scheduling ............................................................................................................... 23

3
Background & Terminology
The Reporting Dashboards module in OnBase provides a point-and-click
configurable designer to create highly visual, interactive dashboards and user-
customized reports. This guide is intended to supplement the resources listed below,
please refer to the MRG for full details on configuration.
Within the module, you can configure:
• Dashboards - these are pre-configured and can include visual elements such
as charts, graphs, etc.
o Dashboards can be made available via URL if they do not include
personally identifiable information.
• Reports - these are a more traditional report format without visual elements.
Users with access to the report can choose the columns to include, so this is
better suited for power users who are willing and able to customize their
reports.
• Data Providers - this is the query that retrieves the information to use in a
dashboard and or report.
• Categories - these are groups of dashboards and reports to provide
organization
Make sure all your configuration aligns with the CU OnBase Naming Conventions.
It can be helpful to create dashboards, reports and data providers in DMOSTG to
have access to updated data that’s not always available in DMOTST.
Prerequisites
In order to configure anything in the Reporting Dashboards module, you will need to
use the Unity client and be in the appropriate user group for reporting configuration
privileges.
You’ll need to complete the trainings below to be given access to administrative
reporting dashboard privileges.
Resources
• Hyland’s premium subscription includes these trainings, which are great
starting points for learning about dashboards.
o A hands-on lab for Reporting Dashboards.
o Intro to Reporting Dashboards
o Reporting Dashboards Beyond the Basics (covers WorkView reporting)
• Improve OnBase with Reporting Dashboards, presentation from 2018
CommunityLive
• Reporting Dashboards MRG
• Reporting Dashboards product page

4
• Reporting Dashboards - Share by URL on the UIS OnBase Training page.
Please contact [email protected] for assistance as needed.
Administrative Dashboards
In addition to the dashboards and reports you create for your own department, a
variety are already available and shared with applicable user groups. Some are
available to all OnBase users while others are limited to the appropriate
administrative groups.
More information is available in the Certified Admin Handbook.
User Groups/Access
There are several layers to granting access to reporting items. In order to access
dashboards and/or reports, users will need to members of a group that is assigned
to the dashboard/report and all data providers used by the dashboard/report.
If the data provider is based on a WorkView module association, the user group will
also need to be assigned to the module association. Refer to our WorkView for Unity
Form Reporting guide for more information.
Assign to User Groups, not Users
While items can be assigned to individual user accounts, instead this should be
assigned by user groups for easier maintenance as users change or leave.
Assignments made directly to user accounts can only be seen or changed in the
Unity client, which requires identifying, locating and modifying each individual
dashboard, report and data provider.
When assigning using groups, this can be managed from any client where you can
assign groups (Unity client, web client, or Configuration) and fewer changes are
needed and access is more likely to be updated correctly for staffing changes.
“Reporting” User Groups
As described in the Expectations and Tips for Certified Admins guide, reporting
items should be assigned using “Reporting” user groups, not other types of groups.
In order to appear in the list of groups available for assignment to dashboards,
reports, and data providers, the group will need to have the “User Access” reporting
dashboards privilege.
This is assigned in Configuration > Users & Groups > User Groups/Rights > select
group > Reporting Dashboards.

5
No other privileges should be assigned beyond “User Access”. This is monitored and
any additional privileges will be removed.
Functional User Groups
Users who have completed the appropriate training may be in either of the
Functional groups that provide administrative access to dashboard configuration.
Functional - Developer - Reporting Dashboards &
Functional - Admin - System (Certified Only):
• Allows creation of categories, dashboards, reports and data providers
(excluding SQL data providers or use of external data sources).
• This group allows modification of any items the user has “full control” access
to or items they create, and access to those items through Administration in
the Unity client.
• Users in this group can also delete the items they have “full control” access to
or have created themselves.
• Items assigned to them as read-only or execute-only cannot be modified or
deleted.
Access Levels for Dashboards/Reports
When assigning a “Reporting” group to a dashboard or report, the following access
levels can be applied to the group:

6
• Read Only: users in the group can view the dashboard/report but cannot
change or delete the dashboard/report.
• Modify: users in the group can view and modify the dashboard/report but
cannot delete.
• Full Control: users in the group can view, modify and delete the
dashboard/report. This is true even when the user is not in any functional
groups allowing reporting dashboard privileges!
Extra permissions can also be assigned for dashboards:
• Re-Share Dashboard/Report: users in the group can share the dashboard
or report with other users.
• Export Dashboard/Report Data: users in the group can export the data that
was used to create the dashboard or report.
• Add/Remove Data Providers: users in the group can change the data
providers used to retrieve data for the dashboard or report. This permission is
only available to change if the user has Modify access.
Access Levels for Data Providers
When assigning a “Reporting” group to a dashboard or report, the following access
levels can be applied to the group:
• Execute Only: users in the group can only use the data provider to view
results on a dashboard or report.
• Full Control: users in the group can modify or delete the data provider,
including assigning other user groups. This is true even when the user is not
in any functional groups allowing reporting dashboard privileges!
Configuring Data Providers
Most reporting needs can be met with one of the pre-defined data provider types. To
create a new data provider, go to the Unity client then Reporting Dashboards. Click
the Create New Data Provider button on the menu from Administration. Or, if you
select Create New Dashboard, the dashboard wizard will include creating a data
provider if it doesn’t already exist.
Data Providers should follow the standard OnBase naming conventions.
• Document Query - Used for reporting on keyword values for selected
document types.
o This is the most commonly used of the built-in data provider types.
o This can also include the current workflow queue and queue entry date
so is great for basic workflow reporting.
o Generally, document values you want to report on should be
configured as keywords.

7
• Workflow Activity - Used for reporting on ad hoc task execution and an
item’s transition through workflow queues
o This will include historical/previous workflow activity and additional
detail, beyond the current activity available in the Document Query
data provider.
o For ad hoc task execution, you’ll need to have “log execution” enabled
on the tasks. There is an option to enable this in the data provider
configuration, but that will only begin going forward, you won’t have the
historical data.
• Workflow Inbox - Used for reporting on items currently in the selected
workflow queues.
o As of June 2020, the “Assigned To” field does not work. (Workaround:
store the assigned to user value as a keyword value).
• Workflow Configuration - Used for reporting on configuration of a life
cycle/selected queues.
o This can provide information on load balancing configuration (there is
an administrative dashboard for this as well in the Configuration
category).
• Document Imaging Query - Time in Queue/Time to Process - Used to
report on activity in batch scanning and batch processing.
o These data provider types have been incompatible with our Oracle
database in some versions, so use with caution.
• WorkView - Used for reporting on attribute values for the selected
applications/classes
o This requires that a module association is configured for the filter that
returns the data you want to use on the dashboard/report.
Dashboards can use multiple data providers, and data providers can be used on
multiple dashboards/reports.
If needed, custom SQL data providers can be written to retrieve information from the
OnBase database or other external data sources. Please contact the UIS team for
creation of custom SQL data providers.
Editing Data Providers
From the dashboard designer, there is easy access to edit the current data provider
or add/remove data providers on the dashboard (including creating new data
providers).
8
Or you can go to Administration in Reporting Dashboards in the Unity client, then
choose Data Providers and find the data provider in the list.
Configuring Dashboards
To create a new dashboard, go to the Unity client then Reporting Dashboards. Click
the Create New Dashboard button on the menu, or you can copy from an existing
dashboard to save time if a similar one already exists. After completing the
dashboard creation wizard, you’ll be directed to the dashboard designer.
Dashboards and Reports should follow the standard OnBase naming conventions.
Dashboard Items/Elements
While others are available, the most commonly-used data provider items are:
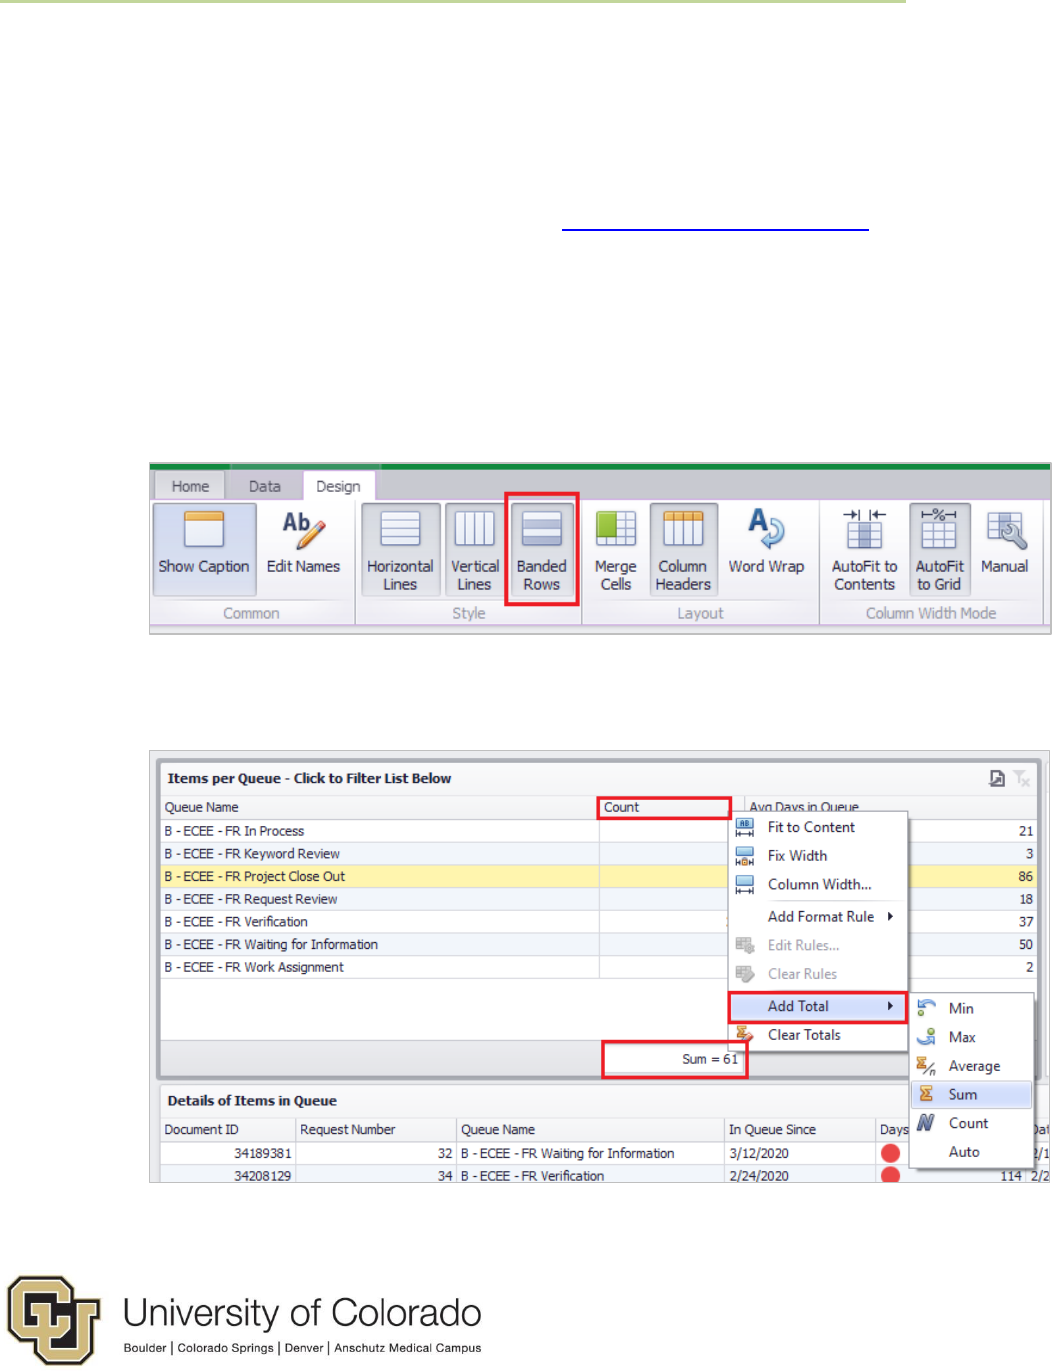
• Grid - this item appears like a spreadsheet of columns and rows.
o On the design tab, enabling banded rows makes it easier to read
across lines of data.
o You can add totals (count, sum, etc.) for columns by clicking the
column heading in the dashboard designer.
• Pie Chart

9
o On the Design tab, the Data Labels option lets you set whether to
show the argument name, value, and/or percentage.
o Also on the Design tab, you can enable or disable the Show Pie
Captions option. Usually this is redundant or unnecessary so it can be
hidden. It’s still a good idea to set a logical caption so that if the item is
exported to an image (where it may be shown despite disabling
captions) it will not be confusing.
• Chart - Includes bar charts, line graphs, etc.
o After adding a chart, you can change the type of chart from the Design
tab or with the option button next to the value in the Data Item list.
o Another useful option there is on the Point Label Options tab. Checking
Show point labels adds the values to each point on the chart.

10
o There are also options in the X-Axis Settings and Y-Axis Settings.
For example, enable zooming on the x-axis allows users to scroll when
hovering over a chart to zoom in for more details.
• Pivot Table - Columns and rows with summarized/aggregated values.
o You can choose whether columns and rows are expanded or collapsed
by default and which totals to include.

11
• Gauge - Shows actual value vs. a target value
o You can use a calculated field to set a target value
o You can specify in the settings next to your values whether above the
target or below the target is the goal.
o You can also change the layout of the gauge and enable/disable
captions on the Design tab.

12
• Images - Images can be added to the dashboard or within the Title
configuration.
o Load Image: Add an image to the dashboard by reference. If the path
to an image added by reference cannot be resolved when the
dashboard is accessed, the image is not displayed.
o Import Image: Add an image to the dashboard by importing it to the
system. Images added in this way are always available when the
dashboard is accessed.
▪ NOTE: Images imported this way are stored to the SYS System
Bitmaps document type, which are then are available as icon
selections.
Dashboard items can also be placed into groups on the dashboard. This can help
organize and label information but also affects filtering using filter elements.
Filtering Dashboards
There are a variety of ways that you can filter data on your dashboard, whether
that’s within the design of the dashboard so certain values will not appear, or
configured as options for users of the dashboard to filter as they are viewing the
dashboard.
Most of the “end user” filtering options described here require additional
configuration in the dashboard designer but will make the dashboard easier to use
and provide more valuable information.
Exclude Values from Dashboard Items (Pre-configured)
To exclude certain values from appearing on a dashboard element, right click the
item and choose Edit Filter. The value for the filter must be assigned to the
dashboard item. If you don’t want the value you are using for filtering to be visible,
add it as a Dimension in Hidden Data Items.

13
Default Filtering Options (End User)
Without any additional configuration, dashboard items like grids can be filtered using
the column headers.
Filter Values using Filter Elements (End User)
A variety of filters can be added to the dashboard layout so that users can more
easily filter the results as they like. Insert these from the Home tab of the designer.
• Range Filter
o Provides a slider that can be adjusted to narrow or expand the results

14
o Good for filtering by date or a numeric value
o A distinct count (ex. Using Document Handle to get a count of
documents) is a good option for the Value.
o Your Argument can then be the value (ex. Date) you want to filter on.
• List Box
o Provides a list of checkboxes for each value so they can be
included/excluded
o Good for a short list of values
• Tree View
o Same as List Box but allows for nesting of values.
o For example, could be used to filter by document type
groups/document types, where document types will be nested within
their groups.

15
• Combo Box
o Same as List Box but displays checkboxes in a drop-down list
Drill Down (End User)
Enabling the Drill Down option on the Data tab will summarize your
numeric/aggregate values based on the first column. Then as you click on a row,
you “drill down” into the results for that row.

16
When you want to move back up a level, click the arrow in the corner.
Filter Dashboard Items based on other Dashboard Items (End-User)
Dashboard data can also be filtered based on selection of a value on another
dashboard item like a grid or a chart.
Select the item you want to use as the source of the filter and then go to the Data
tab. Enable the Single Master Filter or Multiple Master Filter option depending on
whether more than one item should be selected as the filter value.
If any items should not be affected by the filter, select them then enable the Ignore
Master Filter option on the Data tab.
By default, master filters will only affect other dashboard items based on the same
data provider. But it is possible to filter between items using different data providers.
To do so, each item involved will need to have a common value with the same
column/field name in both data providers. Then each item will need to have that
value included in its visible or hidden data items. Once that is done, select the item
that will be the source of the filter, then enable Cross-Data-Source Filtering on the
Data tab.

17
Formatting
Value Formatting
By default, dashboards will apply certain formatting based on the data type. To
change the format of a value, click to open the menu for the column on the desired
dashboard item.
Names
You can change the name on items by right clicking and choosing Edit Names
(there’s also a button on the menu).
Rules
You can apply rules to add formatting (highlight, bold/italic, icons, bars, etc.) to
dashboard items based on the value (similar to conditional formatting in Excel).

18
Configure your item then right click and choose Edit Rules. You’ll need to choose
which value to base the rule on, then configure the rule depending on the data type.
To apply rules based on fields that are not visible on the dashboard, add the field as
a Measure in the Hidden Data Items section.
Make sure not to rely on only color differentiation (ex. Use yellow highlight with bold
font and orange highlight with italic font) when configuring rules so that users who
cannot perceive the color difference are able to get the same information as users
who can.
Calculated Fields
Calculated fields allow you to adjust any values in your data provider to display a
different value, to combine/concatenate values, group like items, or perform more
common calculations (addition, subtraction, etc.).
Calculated fields are configured per dashboard, the do not carry over to other
dashboards/reports using the same data provider so you’ll need to recreate the field
and copy and paste the expression (vote to change that here).
To create a calculated field, right click on the list of available data fields and choose
Add Calculated Field.
This will open an expression editor with lists of your existing columns/fields and the
functions you can use. This expression editor offers slightly different functions and
requires different syntax than the workflow expression editor.

19
Once you save the field, right click to rename it. You can also modify the expression
by right clicking.
Dashboard Designer Tips
• If you have multiple data providers assigned to a dashboard, choose between
them using the drop-down above the field list.
• By default, the field list is grouped by data type, then sorted alphabetically.
You can turn this grouping off by clicking the button with two blue boxes.
• To save time, you can duplicate dashboard items and then make small
adjustments. Duplicating items will retain any filters or rules you have
configured. To duplicate, right click on an item or select it and choose
Duplicate from the menu.
• Another way to save time is by converting items to another type (ex. From
pivot table to a pie chart). You can duplicate an item then convert it to test out
an idea or to avoid reconfiguring the item. Either right click or use the menu
option.

20
Configuring Reports
Reports use the same data providers as dashboards. Instead of configuring a pre-
defined visual display of the information, reports will prompt users to define the
columns, layout and aggregation when the first view the report.
To create a report, go to the Unity client then navigate to Reporting Dashboards >
Administration. Choose Reports, then click Create New Report. Or you can right
click in the Gallery and choose Create Report.
You’ll be prompted to enter a name, choose/create a data provider, and assign user
groups. At that point, the report can be accessed by users.
If the report has not been viewed by the current user, they’ll need to add columns as
desired. This does not carry over from user to user. If the Column Chooser is not
shown by default, you can open it from the menu. Then drag the columns into the
desired order.

21
You can filter data by using the Filter Editor.
Right click below a column to add a total or a count.

22
Configuring Categories
Categories can be used to group your dashboards and reports so they are more
organized and easy to find. You will need to share the category with user groups (in
addition to the individual reports and dashboards) for other users to see them.
To create a category, go to the Unity client then navigate to Reporting Dashboards >
Administration. Choose Categories, then click Create New Category. Or you can
right click in the Gallery and choose Create Category.
You’ll be prompted to enter a name, assign user groups, and assign items. Later on,
you can make changes by right clicking the category in the Gallery and going to
Properties.
Display Actions
If they have the required permissions, users can open documents, folders, workflow
queues, or WorkView objects from dashboards/reports using display actions.
To configure a display action, the relevant unique identifier will need to be included
on the element that will be clicked. For example, to open documents, you’d need to
include the Document ID (document handle). If you don’t want the value to be visible
on the dashboard, add it to the item as a Dimension in the Hidden Data Items
section.
23
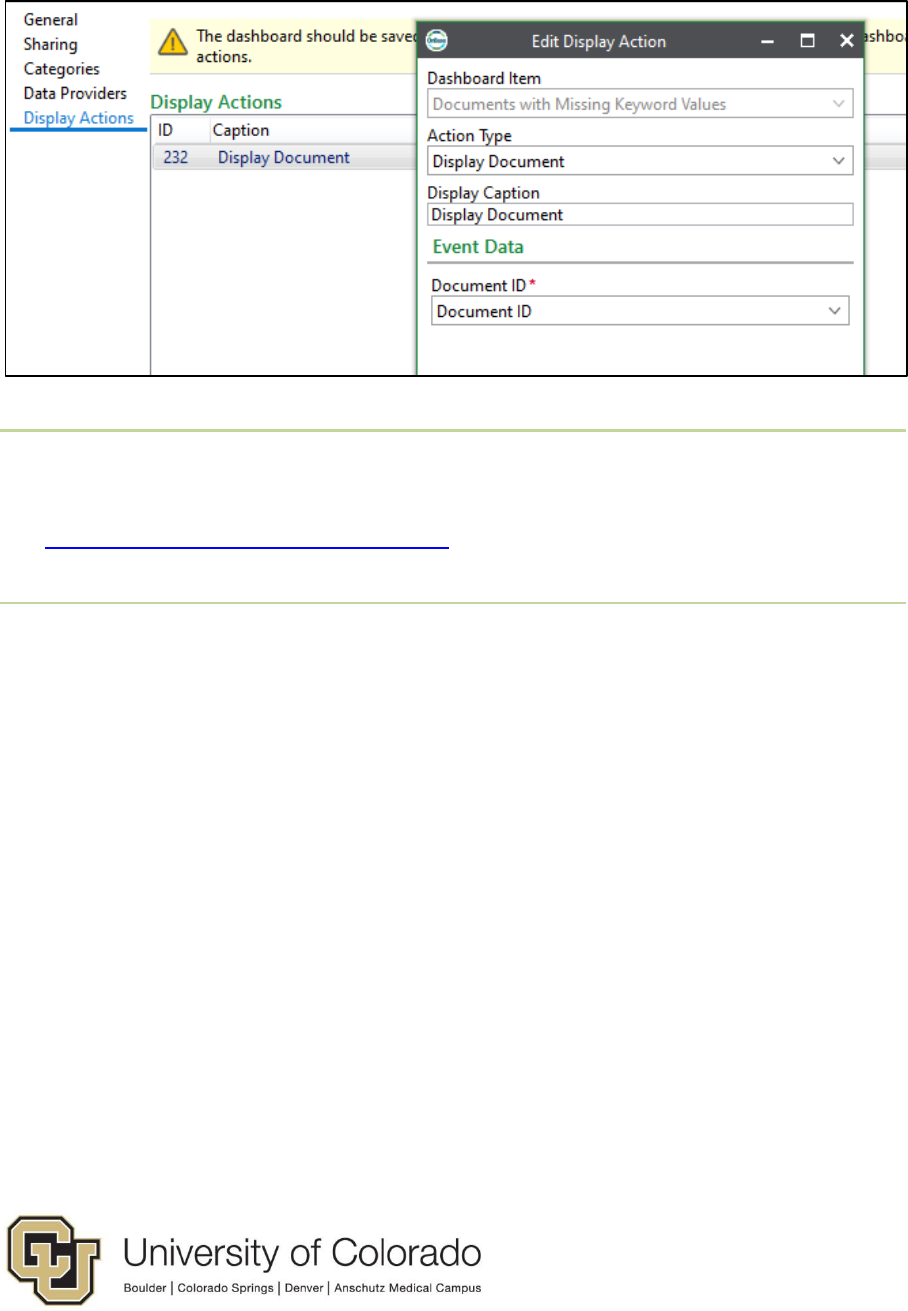
Once you’ve saved the dashboard, go to Properties for the dashboard/report and
choose Display Actions. Add an action and choose the appropriate dashboard item,
what type of item to display, and the unique ID for that item type.
Migration
Migration of reporting dashboard configuration is done in the Unity client. Refer to
our Exporting and Importing Configuration guide for more details.
Scheduling
In Unity Management Console, you can schedule reports or data provider exports.
The generated report/data can be stored to a network location that is accessible by
the scheduler server or stored as an OnBase document.
To have a report/data provider export delivered by email, save it as an OnBase
document and route it through workflow to be sent as a notification attachment.
More information about scheduling reports is available in the Unity Scheduler MRG.
